UPDATED August 2023: Hardening PostgreSQL has become ever more important. Security is king these days and people want to know how to make PostgreSQL safe. Some of us might still remember what happened to MongoDB in recent years and we certainly want to avoid similar security problems in the PostgreSQL world. What happened to MongoDB is actually stunning: Thousands of databases were held ransom because of poor default security settings - it was an absolute nightmare and greatly damaged the reputation of not just MongoDB but the entire industry. PostgreSQL people do everything they can to avoid a repeat performance of that in our ecosystem.
The hashtag #ransomware is not what you want to see when somebody is talking about your company. To help you avoid the most common pitfalls, we have compiled a “best of PostgreSQL security problems” list:
PostgreSQL is running as a server process and people want to connect to the database. The question is: Where are those connections coming from? The listen_addresses setting which can be found in postgresql.conf controls those bind addresses.
In other words: If listen_addresses is set to ‘*’, PostgreSQL will listen on all network devices, consider those connections and move on to the next stage, which evaluates the content of pg_hba.conf.
Listening on all devices is a problem, because a bad actor could easily spam you with authentication requests - disaster is then just one
pg_hba.confentry away.
listen_addresses = ‘localhost’listen_addresses = ‘localhost, ’If you don’t listen at all, you are definitely more secure. PostgreSQL will not even have to reject your connection if you are already limiting network access.
After dealing with listen_addresses (= bind addresses), PostgreSQL is going to process pg_hba.conf to figure out if a connection is actually allowed or not. The main question which arises is: What can possibly go wrong when talking about pg_hba.conf? Well, there are some things which are worth mentioning.
What we frequently see is that people use “trust” to ensure that people can connect to PostgreSQL without a password. Using trust is basically the worst thing you can do if you are working on hardening PostgreSQL. For local connections, “peer” might be a valid choice - trust is certainly not.
trust (especially not for remote connections) if you are hardening PostgreSQL.pg_hba.conf entries that allow connections to all databases or for all users. Be specific.For many years md5 was the method of choice to do password authentication in PostgreSQL. However, the days of md5 are long gone. You can even download ready-made files containing the most frequently used hashes from the internet, and crack passwords even faster.
In other words: Forget about md5 and move to stronger hashes. If you want to find out how to migrate from md5 to scram-sha-256 make sure you check out our post “From MD5 to scram-sha-256 in PostgreSQL”.
In PostgreSQL there is a thing called PUBLIC. It is basically the database equivalent of “UNIX world”. As you will see, in PG versions prior to version 15, it may cause some issues - which can, however, be avoided. For the most recent information about schema PUBLIC since PostgreSQL version 15, see this blog.
|
1 2 3 4 5 6 7 8 9 |
postgres=# CREATE USER joe; CREATE ROLE postgres=# c postgres joe You are now connected to database 'postgres' as user 'joe'. postgres=> SELECT current_user; current_user -------------- joe (1 row) |
We have created a user and logged in as joe. What we see here is that joe is not allowed to create a new database, which is exactly what we expect. BUT: joe is allowed to connect to some other database we have not even heard of so far. Fortunately, joe is not allowed to read any objects in this database:
|
1 2 3 4 5 6 |
postgres=> CREATE DATABASE joedb; ERROR: permission denied to create database postgres=> \c demo You are now connected to database "demo" as user "joe". demo=> SELECT * FROM t_demo; ERROR: permission denied for table t_demo |
However, joe is allowed to create tables by default (public schema) which is certainly not a good idea:
|
1 2 |
demo=> CREATE TABLE bad_idea (id int); CREATE TABLE |
joe is allowed to connect to other databasesjoe is allowed to spam the public schemaThis is worse than it looks at first glance. Experience shows that most of the privilege escalation attack vectors discovered in PostgreSQL over the years work by creating malicious objects in a database.
|
1 2 3 4 |
demo=# REVOKE ALL ON DATABASE demo FROM public; REVOKE demo=# REVOKE ALL ON SCHEMA public FROM public; REVOKE |
Now that we have done that, we can reconnect to the demo database as “joe”. In psql one can do that using the c command. If you are using a graphical user interface, change your database connection and log in as user joe:
|
1 2 3 4 |
demo=# \c demo joe FATAL: permission denied for database "demo" DETAIL: User does not have CONNECT privilege. Previous connection kept |
First, we have revoked permission from PUBLIC to make sure that the database connection is not possible anymore. Then we have fixed permissions on the public schema. As you can see, the connection is no longer possible.
PUBLIC from your database permissionsPUBLIC from your public-schema permissionsIt may also be a good idea to revoke the TEMP privilege on databases from all users that do not need it. Some privilege escalation attacks work just as well with temporary objects.
Also, make sure that you properly test your setup to ensure that no leaks are left open.
Again, as of v15 schema PUBLIC has changed... see this blog for details.
Changing a password in PostgreSQL is easy. Most people use ALTER USER … SET PASSWORD to do that. However, there is a problem: This SQL statement ends up in your database log in PLAIN text which is of course a major issue.
Recommendation:
ALTER ROLE. For example, psql has password and pgAdmin has a "change password" dialog.This recommendation may seem absurd. However, there is some reasoning behind it. To change the password, there is protocol support which bypasses the problem of plain text passwords in the log. By doing things visually - and not via plain SQL - most GUIs will fix the problem for you.
Hint: CYBERTEC PostgreSQL Enterprise Edition (PGEE) even prohibits ALTER USER … SET PASSWORD explicitly to avoid the risk passwords in the log stream.
Suppose you are running an application. Your database contains 200 tables. Permissions are set perfectly for countless users. Let us assume that we want to update this application so DDLs are executed to make the change. But what if somebody makes a mistake? What if permissions are not set properly? Small problems will start accumulating.
ALTER DEFAULT PRIVILEGES:|
1 2 3 4 5 6 7 8 9 10 11 12 13 |
ALTER DEFAULT PRIVILEGES Description: define default access privileges Syntax: ALTER DEFAULT PRIVILEGES [ FOR { ROLE | USER } target_role [, ...] ] [ IN SCHEMA schema_name [, ...] ] abbreviated_grant_or_revoke where abbreviated_grant_or_revoke is one of: GRANT { { SELECT | INSERT | UPDATE | DELETE | TRUNCATE | REFERENCES | TRIGGER } [, ...] | ALL [ PRIVILEGES ] } ON TABLES TO { [ GROUP ] role_name | PUBLIC } [, ...] [ WITH GRANT OPTION ] … |
The idea is to define default permissions long before objects are created. Whenever you create a database object, default privileges will automatically kick in and fix things for you. PostgreSQL will greatly simplify your hardening process in this case by automatically setting permissions on new objects.
SSL is one of the most important topics in the realm of PostgreSQL security. If you want to harden your PostgreSQL database, there is no way around SSL.
PostgreSQL provides various levels of SSL, and allows you to encrypt connections between client and server. In general, we recommend using at least TLS 1.2 to ensure a high enough level of security.
If you want to learn more about SSL, and figure out how to set it up, please check out our page about that.
Stored procedures and server side functions in general can be a major security concern. There are two ways in PostgreSQL to execute a function:
By default, a function is executed as the current user. In other words: If you are currently user joe the function will run as joe. However, sometimes it can be useful to run code as the author of the function and thus with different security settings. That way, you can let a user with low privileges perform certain actions that need elevated privileges in a controlled fashion. The way to do that is to use the SECURITY DEFINER option when creating the function.
But powerful tools are also dangerous, so you have to define those functions carefully. Read our article about SECURITY DEFINER functions for details.
SQL injection is not only a problem on the application (client) side, it can affect procedural code in the database just as well. If you want to avoid SQL injection, we recommend you continue reading and learn more.
Consider this silly function:
|
1 2 3 4 5 6 7 8 9 10 11 |
CREATE FUNCTION tally(table_name text) RETURNS bigint LANGUAGE plpgsql AS $$ DECLARE result bigint; BEGIN EXECUTE 'SELECT count(*) FROM ' || table_name INTO result; RETURN result; END; $$; |
Now, any attacker who has control over the argument supplied to the function can launch a denial-of-service attack:
|
1 |
SELECT tally('generate_series(1, 100000000000000000000)'); |
Or they could find out how much money is on your account:
|
1 2 3 |
SELECT tally('generate_series(1, 1000000) UNION SELECT amount::bigint FROM account WHERE name = ''loser'''); |
Use the usual security precautions:
format() to construct SQL query strings.It is always good if the number of people who have administrative access to a security critical system is as limited as possible. How far you want to go here depends on your security needs:
pg_hba.conf. Ideally, only local connections are allowed. If you don't want that, restrict access to the personal system of the administrator.In general, using superusers is dangerous.
Recommendation:
Finally, it is important to update PostgreSQL on a regular basis. Keep in mind that most minor releases updates (eg. 13.0 -> 13.2, etc.) come with security-related updates which are vital to reducing the attack surface of your system.
PostgreSQL security updates are available on a regular basis, and we recommend applying them as soon as possible.
So far, you have learned how to encrypt the connection between client and server. However, sometimes it is necessary to encrypt the entire server including storage. PostgreSQL TDE does exactly that:
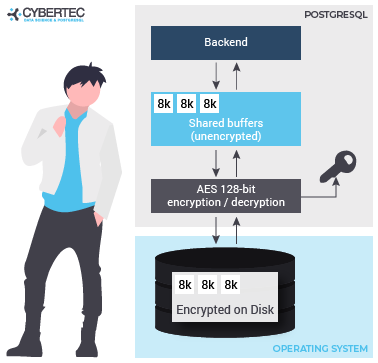
To find out more, check out our website about PostgreSQL TDE. We offer a fully encrypted stack to help you achieve maximum PostgreSQL security. TDE is available for free (Open Source).
Materialized views are an important feature in most databases, including PostgreSQL. They can help to speed up large calculations - or at least to cache them.
If you want to make sure that your materialized views are up to date and if you want to read more about PostgreSQL right now, check out our blog about pg_timetable which shows you how to schedule jobs in PostgreSQL. Why is pg_timetable so useful? Our scheduler makes sure that identical jobs cannot overlap, but simply don’t execute again, in case the same job is already running. When you run long jobs, this is super important - especially if you want to use materialized views.
In order to receive regular updates on important changes in PostgreSQL, subscribe to our newsletter, or follow us on Twitter, Facebook, or LinkedIn.
zheap has been designed as a new storage engine to handle UPDATE in PostgreSQL more efficiently. A lot has happened since my last report on this important topic, and I thought it would make sense to give readers a bit of a status update - to see how things are going, and what the current status is.
Let's take a look at the most important things we've achieved since our last status report:
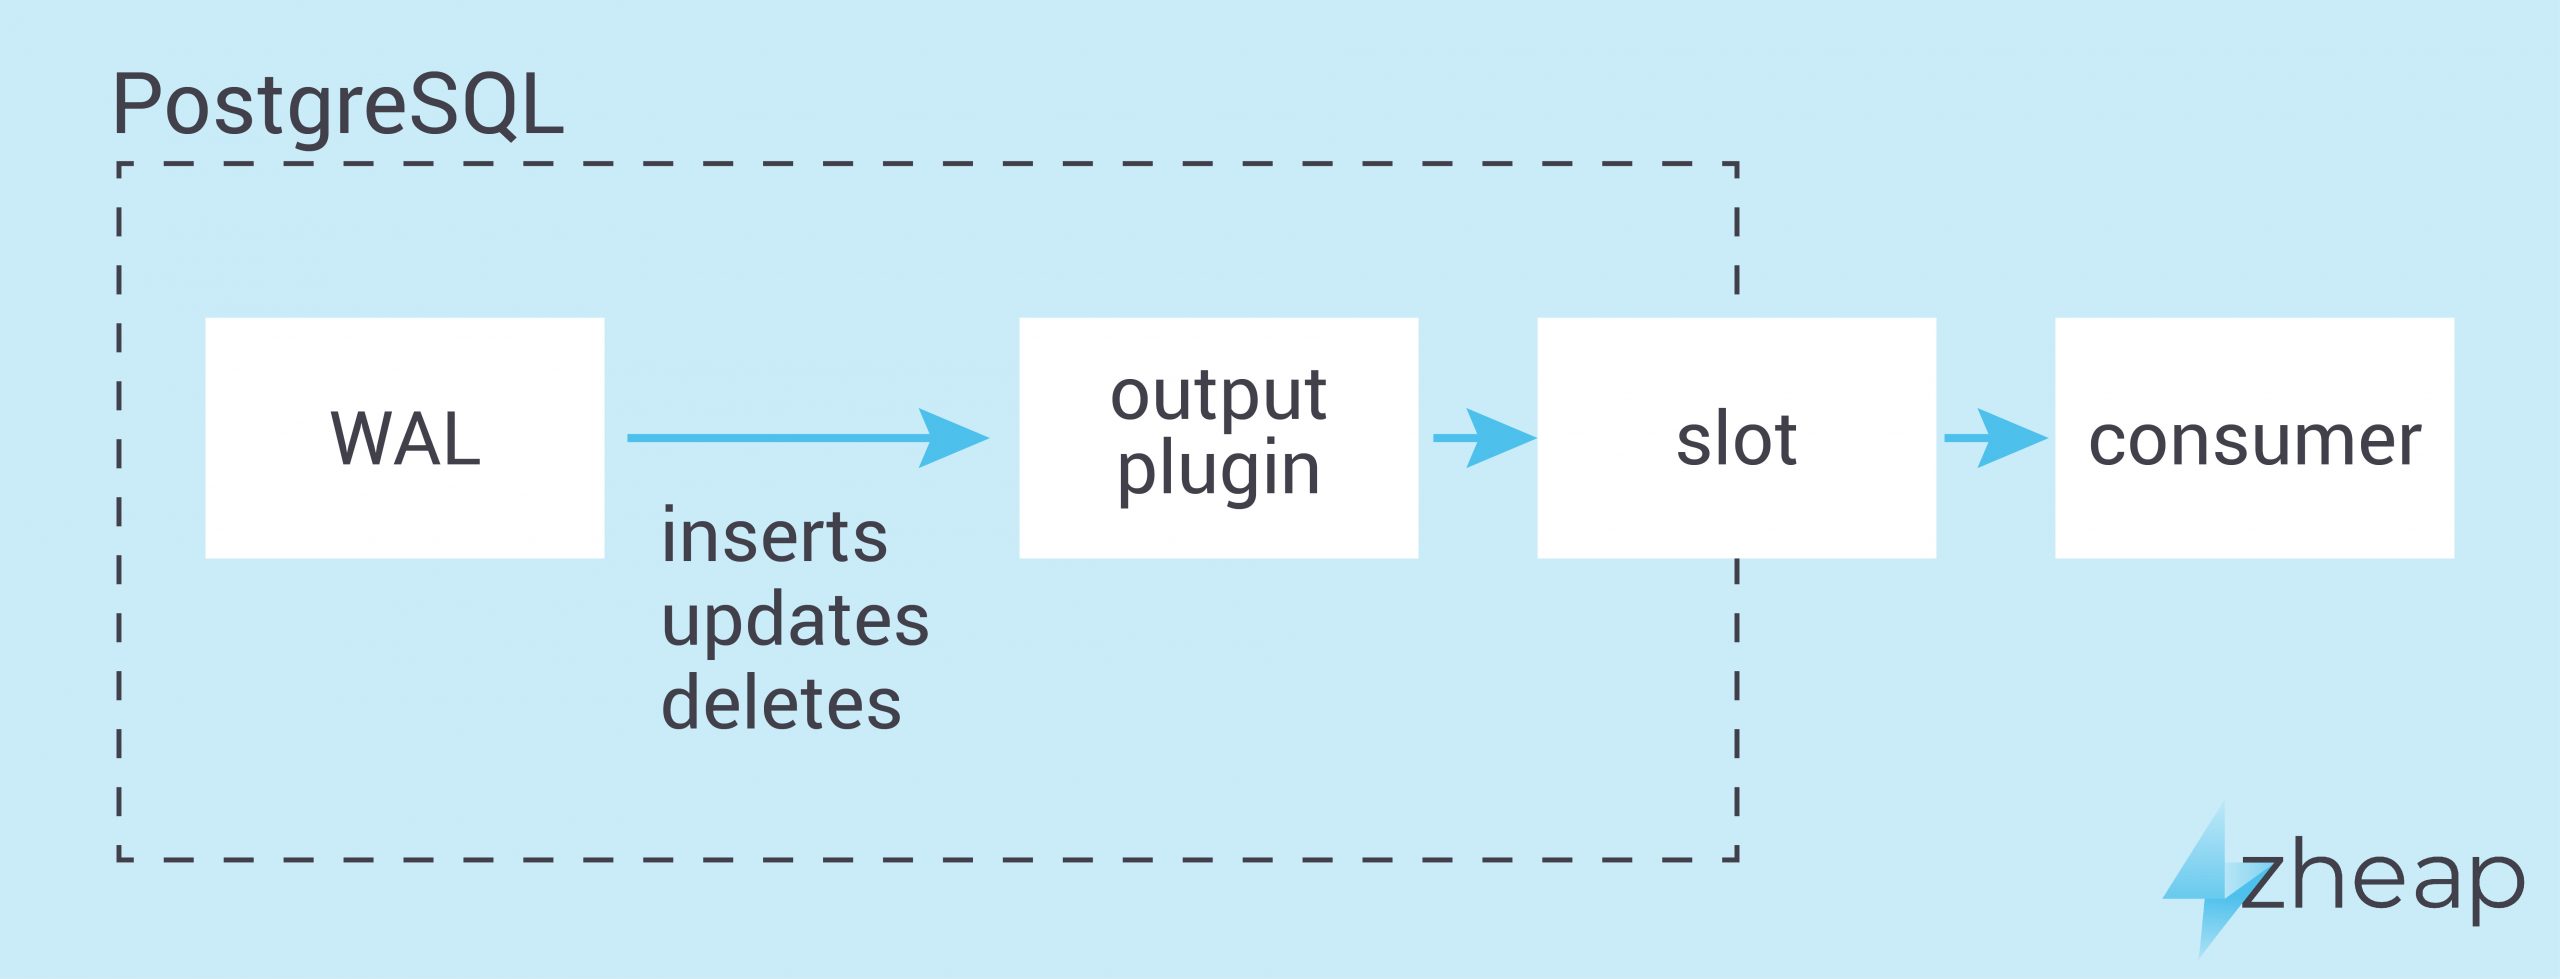
The first thing on the list is definitely important. Most people might be familiar with PostgreSQL’s capability to do logical decoding. What that means is that the transaction log (= WAL) is transformed back to SQL so that it can be applied on some other machine, leading to identical results on the second server. The capability to do logical decoding is not just a given. Code has to be written which can decode zheap records and turn them into readable output. So far this implementation looks good. We are not aware of bugs in this area at the moment.
zheap is just one part of the equation when it comes to new storage engines. As you might know, a standard heap table in PostgreSQL will hold all necessary versions of a row inside the same physical files. In zheap this is not the case. It is heavily based on a feature called “UNDO” which works similar to what Oracle and some other database engines do. The idea is to move old versions of a row out of the table and then, in case of a ROLLBACK, put them back in .
What has been achieved is that the zheap code is now compatible with the new UNDO infrastructure suggested by the community (which we hope to see in core by version 15). The general idea here is that UNDO should not only be focused on zheap, but provide a generic infrastructure other storage engines will be able to use in the future as well. That's why preparing the zheap code for a future UNDO feature of PostgreSQL is essential to success. If you want to follow the discussion on the mailing list, here is where you can find some more detailed information about zheap and UNDO.
As you can imagine, a major project such as zheap will also cause some serious work on the quality management front. Let's look at the size of the code:
|
1 2 3 4 5 6 7 8 9 10 11 12 13 14 15 16 17 18 19 20 21 22 23 24 25 |
[hs@node1 zheap_postgres]$ cd src/backend/access/zheap/ [hs@node1 zheap]$ ls -l *c -rw-rw-r--. 1 hs hs 14864 May 27 04:25 prunetpd.c -rw-rw-r--. 1 hs hs 27935 May 27 04:25 prunezheap.c -rw-rw-r--. 1 hs hs 11394 May 27 04:25 rewritezheap.c -rw-rw-r--. 1 hs hs 96748 May 27 04:25 tpd.c -rw-rw-r--. 1 hs hs 13997 May 27 04:25 tpdxlog.c -rw-rw-r--. 1 hs hs 285703 May 27 04:25 zheapam.c -rw-rw-r--. 1 hs hs 59175 May 27 04:25 zheapam_handler.c -rw-rw-r--. 1 hs hs 62970 May 27 04:25 zheapam_visibility.c -rw-rw-r--. 1 hs hs 61636 May 27 04:25 zheapamxlog.c -rw-rw-r--. 1 hs hs 16608 May 27 04:25 zheaptoast.c -rw-rw-r--. 1 hs hs 16218 May 27 04:25 zhio.c -rw-rw-r--. 1 hs hs 21039 May 27 04:25 zmultilocker.c -rw-rw-r--. 1 hs hs 16480 May 27 04:25 zpage.c -rw-rw-r--. 1 hs hs 43128 May 27 04:25 zscan.c -rw-rw-r--. 1 hs hs 27760 May 27 04:25 ztuple.c -rw-rw-r--. 1 hs hs 55849 May 27 04:25 zundo.c -rw-rw-r--. 1 hs hs 51613 May 27 04:25 zvacuumlazy.c [hs@node1 zheap]$ cat *c | wc -l 29696 |
For those of you out there who are anxiously awaiting a productive version of zheap, I have to point out that this is really a major undertaking which is not trivial to do. You can already try out and test zheap. However, keep in mind that we are not quite there yet. It will take more time, and especially feedback from the community to make this engine production-ready, capable of handling any workload reliably and bug-free.
I won't go into the details of what has been fixed, but we had a couple of issues including bugs, compiler warnings, and so on.
What has also been done was to merge the zheap code with current versions of PostgreSQL, to make sure that we're up to date with all the current developments.
As far as the next steps are concerned, there are a couple of things on the list. One of the first things will be to work on the discard worker. Now what is that? Consider the following listing:
|
1 2 3 4 5 6 7 8 9 10 11 12 13 14 15 16 17 18 19 20 |
test=# BEGIN BEGIN test=*# CREATE TABLE sample (x int) USING zheap; CREATE TABLE test=*# INSERT INTO sample SELECT * FROM generate_series(1, 1000000) AS x; INSERT 0 1000000 test=*# SELECT * FROM pg_stat_undo_chunks; logno | start | prev | size | discarded | type | type_header --------+------------------+------+----------+-----------+------+----------------------------------- 000001 | 000001000021AC3D | | 57 | f | xact | (xid=745, dboid=16384, applied=f) 000001 | 000001000021AC76 | | 44134732 | f | xact | (xid=748, dboid=16384, applied=f) (2 rows) test=*# COMMIT; COMMIT test=# SELECT * FROM pg_stat_undo_chunks; logno | start | prev | size | discarded | type | type_header --------+------------------+------+----------+-----------+------+----------------------------------- 000001 | 000001000021AC3D | | 57 | f | xact | (xid=745, dboid=16384, applied=f) 000001 | 000001000021AC76 | | 44134732 | f | xact | (xid=748, dboid=16384, applied=f) (2 rows) |
What we see here is that the UNDO chunks do not go away. They keep piling up. At the moment, it is possible to purge them manually:
|
1 2 3 4 5 6 7 8 9 10 11 12 13 14 15 16 17 18 19 20 21 22 |
test=# SELECT pg_advance_oldest_xid_having_undo(); pg_advance_oldest_xid_having_undo ----------------------------------- 750 (1 row) test=# SELECT * FROM pg_stat_undo_chunks; logno | start | prev | size | discarded | type | type_header -------+------------------+------+----------+-----------+------+----------------------------------- 000001 | 000001000021AC3D | | 57 | t | xact | (xid=745, dboid=16384, applied=f) 000001 | 000001000021AC76 | | 44134732 | t | xact | (xid=748, dboid=16384, applied=f) (2 rows) test=# SELECT pg_discard_undo_record_set_chunks(); pg_discard_undo_record_set_chunks ----------------------------------- (1 row) test=# SELECT * FROM pg_stat_undo_chunks; logno | start | prev | size | discarded | type | type_header ------+-------+------+------+-----------+------+------------- (0 rows) |
As you can see, the UNDO has gone away. The goal here is that the cleanup should happen automatically - using a “discard worker”. Implementing this process is one of the next things on the list.
Community feedback is currently one of the bottlenecks. We invite everybody with an interest in zheap to join forces and help to push this forward. Everything from load testing to feedback on the design is welcome - and highly appreciated! zheap is important for UPDATE-heavy workloads, and it's important to move this one forward.
If you want to get involved, or just try out zheap, we have created a tarball for you which can be downloaded from our website. It contains our latest zheap code (as of May 27th, 2021).
Simply compile PostgreSQL normally:
|
1 2 3 4 |
./configure --prefix=/your_path/pg --enable-debug --with-cassert make install cd contrib make install |
Then you can create a database instance, start the server normally and start playing. Make sure that you add “USING zheap” when creating a new table, because otherwise PostgreSQL will create standard “heap” tables (so not zheap ones).
We want to say thank you to Heroic Labs for providing us with all the support we have to make zheap work. They are an excellent partner and we recommend checking out their services. Their commitment has allowed us to allocate so many resources to this project, which ultimately benefits the entire community. A big thanks goes out to those guys.
If you want to know more about zheap, we suggest checking out some of our other posts on this topic. Here is more about zheap and storage consumption.
Most people in the SQL and in the PostgreSQL community have used the LIMIT clause provided by many database engines. However, what many do not know is that LIMIT / OFFSET are off standard and are thus not portable. The proper way to handle LIMIT is basically to use SELECT … FETCH FIRST ROWS. However, there is more than meets the eye.
Before we dig into some of the more advanced features we need to see how LIMIT and FETCH FIRST ROWS can be used. To demonstrate this feature, I have compiled a simple data set:
|
1 2 3 4 5 6 7 8 9 10 11 12 13 14 15 16 17 |
test=# CREATE TABLE t_test (id int); CREATE TABLE test=# INSERT INTO t_test VALUES (1), (2), (3), (3), (4), (4), (5); INSERT 0 7 test=# TABLE t_test; id ---- 1 2 3 3 4 4 5 (7 rows) |
Our data set has 7 simple rows. Let’s see what happens if we use LIMIT:
|
1 2 3 4 5 6 7 |
test=# SELECT * FROM t_test LIMIT 3; id ---- 1 2 3 (3 rows) |
In this case, the first three rows are returned. Note that we are talking about ANY rows here. Whatever can be found first is returned. There is no special order.
The ANSI SQL compatible way of doing things is as follows:
|
1 2 3 4 5 6 7 8 9 |
test=# SELECT * FROM t_test FETCH FIRST 3 ROWS ONLY; id ---- 1 2 3 (3 rows) |
Many of you may never have used or seen this kind of syntax before, but this is actually the “correct” way to handle LIMIT.
However, there is more: What happens if NULL is used inside your LIMIT clause? The result might surprise you::
|
1 2 3 4 5 6 7 8 9 10 11 |
test=# SELECT * FROM t_test LIMIT NULL; id ---- 1 2 3 3 4 4 5 (7 rows) |
The database engine does not know when to stop returning rows. Remember, NULL is undefined, so it does not mean zero. Therefore, all rows are returned. You have to keep that in mind in order to avoid unpleasant surprises...
WITH TIES has been introduced in PostgreSQL 13 and fixes a common problem: handling duplicates. If you fetch the first couple of rows, PostgreSQL stops at a fixed number of rows. However, what happens if the same data comes again and again? Here is an example:
|
1 2 3 4 5 6 7 8 9 10 11 |
test=# SELECT * FROM t_test ORDER BY id FETCH FIRST 3 ROWS WITH TIES; id ---- 1 2 3 3 (4 rows) |
In this case, we’ve actually got 4 rows, not just 3. The reason is that the last value shows up again after 3 rows, so PostgreSQL decided to include it as well. What is important to mention here is that an ORDER BY clause is needed, because otherwise, the result would be quite random. WITH TIES is therefore important if you want to include all rows of a certain kind - without stopping at a fixed number of rows.
Suppose one more row is added:
|
1 2 3 4 5 6 7 8 9 10 11 12 |
test=# INSERT INTO t_test VALUES (2); INSERT 0 1 test=# SELECT * FROM t_test ORDER BY id FETCH FIRST 3 ROWS WITH TIES; id ---- 1 2 2 (3 rows) |
In this case, we indeed get 3 rows, because it is not about 3 types of values, but really about additional, identical data at the end of the data set.
So far we have learned something about the simplest case using just one column. However, that’s far from practical. In a real work application, you will certainly have more than a single column. So let us add one:
|
1 2 3 4 5 6 7 8 9 10 11 12 13 14 15 |
test=# ALTER TABLE t_test ADD COLUMN x numeric DEFAULT random(); ALTER TABLE test=# TABLE t_test; id | x ----+-------------------- 1 | 0.258814135879447 2 | 0.561647200043165 3 | 0.340481941960185 3 | 0.999635345010109 4 | 0.467043266494571 4 | 0.742426363498449 5 | 0.0611112678267247 2 | 0.496917052156565 (8 rows) |
In the case of LIMIT nothing changes. However, WITH TIES is a bit special here:
|
1 2 3 4 5 6 7 8 9 10 11 12 |
test=# SELECT * FROM t_test ORDER BY id FETCH FIRST 4 ROWS WITH TIES; id | x ----+------------------- 1 | 0.258814135879447 2 | 0.561647200043165 2 | 0.496917052156565 3 | 0.999635345010109 3 | 0.340481941960185 (5 rows) |
What you can see here is that 5 rows are returned. The fifth row is added because id = 3 appears more than once. Mind the ORDER BY clause: We are ordering by id. For that reason, the id column is relevant to WITH TIES.
Let’s take a look at what happens when the ORDER BY clause is extended:
|
1 2 3 4 5 6 7 8 9 10 11 |
test=# SELECT * FROM t_test ORDER BY id, x FETCH FIRST 4 ROWS WITH TIES; id | x ----+------------------- 1 | 0.258814135879447 2 | 0.496917052156565 2 | 0.561647200043165 3 | 0.340481941960185 (4 rows) |
We are ordering by two columns. Therefore WITH TIES is only going to add rows if both columns are identical, which is not the case in my example.
WITH TIES is a wonderful new feature provided by PostgreSQL. However, it is not only there to limit data. If you are a fan of windowing functions you can also make use of WITH TIES as shown in one of my other blog posts covering advanced SQL features provided by PostgreSQL.
In order to receive regular updates on important changes in PostgreSQL, subscribe to our newsletter, or follow us on Twitter, Facebook, or LinkedIn.
LATERAL joins are one of the lesser-known features of PostgreSQL and other relational databases such as Oracle, DB2 and MS SQL. However, LATERAL joins are a really useful feature, and it makes sense to take a look at what you can accomplish with them.
Before we dive into LATERAL, it makes sense to sit back and think about SELECT and FROM clauses in SQL on a more philosophical level. Here is an example:
|
1 |
SELECT whatever FROM tab; |
Basically, we could see this statement as a loop. Writing this SQL statement in pseudo code would look somewhat like the following snippet:
|
1 2 3 4 |
for x in tab loop “do whatever” end loop |
For each entry in the table, we do what the SELECT clause says. Usually data is simply returned as it is. A SELECT statement can be seen as a loop. But what if we need a “nested” loop? This is exactly what LATERAL is good for.
Let’s imagine a simple example. Imagine we have a line of products, and we’ve also got customer wishlists. The goal now is to find the best 3 products for each wishlist. The following SQL snippet creates some sample data:
|
1 2 3 4 5 6 7 8 9 10 11 12 13 14 15 16 17 18 |
CREATE TABLE t_product AS SELECT id AS product_id, id * 10 * random() AS price, 'product ' || id AS product FROM generate_series(1, 1000) AS id; CREATE TABLE t_wishlist ( wishlist_id int, username text, desired_price numeric ); INSERT INTO t_wishlist VALUES (1, 'hans', '450'), (2, 'joe', '60'), (3, 'jane', '1500') ; |
The product table is populated with 1000 products. The price is random, and we used a pretty creative name to name the products:
|
1 2 3 4 5 6 7 8 9 10 11 12 13 14 |
test=# SELECT * FROM t_product LIMIT 10; product_id | price | product ------------+--------------------+------------ 1 | 6.756567642432323 | product 1 2 | 5.284467408540081 | product 2 3 | 28.284196164210904 | product 3 4 | 13.543868035690423 | product 4 5 | 30.576923884383156 | product 5 6 | 26.572431211361902 | product 6 7 | 64.84599396020204 | product 7 8 | 21.550701384168747 | product 8 9 | 28.995584553969174 | product 9 10 | 17.31335004787411 | product 10 (10 rows) |
Next, we have a list of wishes.
|
1 2 3 4 5 6 7 |
test=# SELECT * FROM t_wishlist; wishlist_id | username | desired_price -------------+----------+--------------- 1 | hans | 450 2 | joe | 60 3 | jane | 1500 (3 rows) |
As you can see, the wishlist belongs to a user and there is a desired price for those three products we want to suggest.
After providing some sample data and loading it into our PostgreSQL database, we can approach the problem and try to come up with a solution.
Suppose we wanted to find the top three products for every wish, in pseudo-code:
|
1 2 3 4 5 6 7 8 9 10 11 12 13 |
for x in wishlist loop for y in products order by price desc loop found++ if found <= 3 then return row else jump to next wish end end loop end loop |
The important thing is that we need two loops. First, we need to iterate through the list of wishes and then we take a look at the sorted list of products, pick 3 and move on to the next wishlist.
Let’s see how this can be done using a LATERAL-join:
|
1 2 3 4 5 6 7 8 9 |
SELECT * FROM t_wishlist AS w, LATERAL (SELECT * FROM t_product AS p WHERE p.price < w.desired_price ORDER BY p.price DESC LIMIT 3 ) AS x ORDER BY wishlist_id, price DESC; |
We’ll go through it step by step. The first thing you see in the FROM clause is the t_wishlist table. What LATERAL can do now is to use entries from the wishlist to do its magic. So for each entry in the wishlist, we pick three products. To figure out which products we need, we can make use of w.desired_price. In other words: It is like a “join with parameters”. The FROM-clause is the “outer loop” in our pseudo code and the LATERAL can be seen as the “inner loop”.
The result set looks as follows:
|
1 2 3 4 5 6 7 8 9 10 11 12 |
wishlist_id | username | desired_price | product_id | price | product -------------+----------+---------------+------------+--------------------+------------- 1 | hans | 450 | 708 | 447.0511375753179 | product 708 1 | hans | 450 | 126 | 443.6560873146138 | product 126 1 | hans | 450 | 655 | 438.0566432022443 | product 655 2 | joe | 60 | 40 | 59.32252841190291 | product 40 2 | joe | 60 | 19 | 59.2142714048882 | product 19 2 | joe | 60 | 87 | 58.78014573804254 | product 87 3 | jane | 1500 | 687 | 1495.8794483743645 | product 687 3 | jane | 1500 | 297 | 1494.4586352980593 | product 297 3 | jane | 1500 | 520 | 1490.7849437550085 | product 520 (9 rows) |
PostgreSQL returned three entries for each wishlist, which is exactly what we wanted. The important part here is that the LIMIT-clause is inside the SELECT fed to LATERAL. Thus it limits the number of rows per wishlist, and not the overall number of rows.
PostgreSQL is doing a pretty good job optimizing LATERAL joins. In our case, the execution plan is going to look pretty straightforward:
|
1 2 3 4 5 6 7 8 9 10 11 12 13 14 15 16 17 18 19 20 21 |
test=# explain SELECT * FROM t_wishlist AS w, LATERAL (SELECT * FROM t_product AS p WHERE p.price < w.desired_price ORDER BY p.price DESC LIMIT 3 ) AS x ORDER BY wishlist_id, price DESC; QUERY PLAN --------------------------------------------------------------------------------------- Sort (cost=23428.53..23434.90 rows=2550 width=91) Sort Key: w.wishlist_id, p.price DESC -> Nested Loop (cost=27.30..23284.24 rows=2550 width=91) -> Seq Scan on t_wishlist w (cost=0.00..18.50 rows=850 width=68) -> Limit (cost=27.30..27.31 rows=3 width=23) -> Sort (cost=27.30..28.14 rows=333 width=23) Sort Key: p.price DESC -> Seq Scan on t_product p (cost=0.00..23.00 rows=333 width=23) Filter: (price < (w.desired_price)::double precision) (9 rows) |
LATERAL joins are extremely useful, and can be utilized in many cases to speed up operations, or to simply make code a lot easier to understand.
If you want to learn more about joins in general and if you want to read more about PostgreSQL right now consider checking out Laurenz Albe’s excellent post about join strategies in PostgreSQL.
If you want to learn more about the PostgreSQL optimizer in general, and if you want to find out more about optimization and other important topics related to PostgreSQL query optimization, check out my blog post about the optimizer.
On some rare occasions, I’ve been asked if Postgres supports system-versioned temporal tables - in other words, time travel on table data for your queries. As quite often with Postgres, thanks to its extensibility, I can answer: well, officially, it does not...but, you can make it work, nevertheless 🙂
Why are people even asking such a crazy question? Well, the idea has something to it. For example, when something fishy suddenly happens with your data, i.e. an UPDATE returns “1000 rows affected”, but you were expecting 10 rows to be affected - then it would be nice to quickly “scroll back the time” and see how the table actually looked 5 minutes ago, to maybe then reinstate the lost data quickly if it indeed was an error. Turning to real cold backups in such a case could mean hours spent - too slow!
The first possibility for achieving such a requirement on any database system is with meticulous schema design, and basically not deleting data at all - i.e. “insert only” data modelling. In some cases, it can be pretty convenient, so if the concept is new to you I’d recommend checking out the effects in the PostgreSQL context, from earlier posts here and here.
At the system-level implementation, Oracle has had something like that for years, in the form of the “AS OF” syntax. Also, MS SQL has supported something similar, since its v2016 release. I must say that I’ve never used that particular Oracle feature myself, but I’ve heard that it has some limitations in terms of huge databases with lots of changes happening - so probably something disk / WAL storage related. Which I can well believe - database engines almost always need to pick and optimize for some important attributes - can’t have them all.
In short, it’s true that PostgreSQL has no such native feature out of the box, but the idea is definitely not a new one - as can be seen here. As always with Postgres, there are some related extensions or plain schema design scripts available, which I’ve seen quite a few of. The most promising of them might be this one, but I’ve yet to try it out.
My workaround solution for today is a mishmash of two more “rareish” PostgreSQL features: dblink + recovery apply delay.
This cool Postgres feature largely lives in the shadows, but it basically allows you to have an extra regular streaming replication node, constantly time-delayed! So you can tell it to not apply the changes coming from the primary node immediately, which is the default. Instead, it will implement them after some time, like 1h.
The parameter to set the “apply delay” is called recovery_min_apply_delay (official documentation here) and can be conveniently set in human readable units. Note the “min” or minimum part - meaning, if you have some longer queries on the node, or the hardware is weak, the actual delay could be longer.
Bear in mind that for huge and very busy databases, in practice this feature can get “costly” in the sense of disk space. - as the WAL pulled in must be stored for the selected time period (and usually even a bit more) until a “restartpoint” is performed. It’s better to start conservatively with lags measured in hours, not days. If this really becomes a show-stopper for longer lag periods, there are alternatives: one can switch to the old “archive recovery” replication method (which was the only binary replication possibility before v9.0) and only pull in WAL when needed, or even maybe regularly re-syncing with a PITR backup system like pgBackRest which performs very snappily in “delta” mode.
This feature, or an extension actually, is probably more well-known than the previous feature - since something equivalent is provided pretty much by any other DBMS system. It basically allows you to access arbitrary remote Postgres nodes on-the-fly, in a fully dynamic way - i.e. we don’t need to set up anything on the target system or the executing system! The queries can be arbitrarily complex - given that we know what data types are being returned; the syntax requires that we declare aliases. So a “Hello world” for “dblink” in simplest form would look something like this:
|
1 2 3 4 5 6 7 8 |
CREATE EXTENSION dblink; /* opening a remote connection to the same instance I’m on */ SELECT * from dblink('host=localhost port=5432', 'select 1') as t(x int); x ─── 1 (1 row) |
By the way, if you’re planning to make more heavy use of this functionality, you can also use some more elaborate access patterns with connection caching or privilege escalation - see the documentation for that.
So what do we get when we cross-pollinate the two features previously explained? Yep, you guessed it - a dose of extra coolness in the form of “temporal tables”!
There are some small annoyances to be dealt with. As explained in the “dblink” section - we need to explicitly know our returned data types, and the SQL code is not going to look pretty, intermingled with some connect string info. Also, since it’s not really “native”, performance could potentially be sub-optimal, and would need verification in each individual use case.
Additionally, we cannot just select a new “timeline” within a query as we please, but rather we need to meddle with the replica configuration. We can only conveniently scroll the time forward - say from 2h lag to 1h lag. Going to a 3h lag would require a rebuild or PITR restore. But we can have many replicas running simultaneously with different lags, with a little extra hardware cost.
In the end, it works, so let’s cut to the code and set up a minimal useful example with 2 nodes, using the latest PostgreSQL version - v13.2.
For test hardware, I used 2 DigitalOcean nodes with 4 vCPU, 8GB of RAM and 160GB of SSD disks in the same AMS3 AZ. The IP address in the sample code below means 10.110.0.4 is the primary and 10.110.0.5 is for the time-delayed replica node. As the test dataset, I used the good old default pgbench schema, with a scaling factor of 100, resulting in 1.3GB of data, so that everything would be cached and we’re not affected by disk slowness, since we don’t want to measure disk access here.
The only changes I made to the server configuration on both nodes were the following: “work_mem=512MB” and “shared_buffers=2GB” + “trust” access in pg_hba.conf between the two hosts’ private IPs.
Note that I’m skipping the build-up of initial streaming replication, as it would be 100% a standard setup. We’ll skip directly to more interesting stuff.
|
1 2 3 4 |
# on the primary node, assuming you are logged in as a “postgres” user # let’s initialize 10 million test bank accounts pgbench -i -s 100 psql -c “CREATE EXTENSION dblink” |
Let’s see if “dblink” works by trying to access the secondary node from the primary one, with the former being a completely normal up-to-date streaming replication HA replica which is ready for a theoretical failover.
|
1 2 3 4 5 6 7 8 |
SELECT * FROM dblink('host=10.110.0.5 dbname=postgres', 'select aid, abalance from pgbench_accounts limit 1') AS t1( aid int, abalance int); aid | abalance -----+---------- 1 | 0 (1 row) |
Yay, it works! So now we can go and enable the “apply lag” on the replica side, and verify that the feature indeed functions as it should.
On node 2, we can enable the “apply lag” dynamically, but changing the configuration file + restart also works.
|
1 2 3 4 5 6 7 |
postgres=# ALTER SYSTEM SET recovery_min_apply_delay TO '1h'; ALTER SYSTEM postgres=# SELECT pg_reload_conf(); pg_reload_conf ---------------- t (1 row) |
Now we’re ready to generate some test transactions on the primary, and verify that the time-delayed replica does not yet reflect the change:
|
1 2 3 4 5 6 7 8 9 |
# let’s run “simple” version of the built-in TPC-B test for the duration of 1 second on the primary pgbench -T 1 -N -n # and check the sum of all account balances psql -c 'SELECT sum(abalance) from pgbench_accounts' sum -------- 110304 (1 row) |
But on the replica:
|
1 2 3 4 5 |
psql -c 'SELECT sum(abalance) from pgbench_accounts' sum ----- 0 (1 row) |
We are still on zero, since we see the “lag” feature working!
Let’s assume that we want to use a “pseudo temporal tables“ to see which rows have changed since 1 hour ago, which might be a common use case. We basically need to then calculate a diff - combining data both from the primary and the time-delayed replica. For the number of changed rows, let’s just take about 1% of total rows, i.e. 100k rows in our case. So on the primary, let’s execute the following:
|
1 2 3 4 5 6 7 8 9 10 11 |
# let’s also enable asynchronous commit here to speed up the test, we’re not really # interested in testing nor waiting on the disk PGOPTIONS=“-c synchronous_commit=off” pgbench -t 100000 -N -n -M prepared # let’s check how many rows actually have been changed - some rows were changed many times # due to random selection psql -c 'SELECT count(*) FROM pgbench_accounts WHERE abalance <> 0' count ------- 99201 (1 row) |
And now, to the diffing part. The query itself in “meta-SQL” could, in its simplest form, look something like this:
|
1 |
SELECT * FROM $current c FULL OUTER JOIN $lag l using (id) where c.$datacol IS DISTINCT FROM l.$datacol OR c.id IS NULL OR l.id IS NULL; |
Note that this is one of those rare cases where we definitely want to use a FULL OUTER JOIN as we also want to know about new / disappeared rows. If we were only interested in new and changed rows, we could just use a LEFT JOIN, and the query would probably be quite a bit faster.
Now to the more important question - how does “dblink” perform with our test query? Can we actually use it in the real world to compare a significant amount of rows? Let’s find out...
|
1 2 3 4 5 6 7 8 9 10 11 12 13 14 15 16 17 18 19 20 21 22 23 |
postgres=# EXPLAIN (ANALYZE, COSTS OFF, TIMING OFF) WITH lag_data AS ( SELECT aid, abalance FROM dblink('host=10.110.0.5 dbname=postgres', 'select aid, abalance from pgbench_accounts') AS pgbench_accounts_lag(aid int, abalance int) ) SELECT * FROM pgbench_accounts c FULL OUTER JOIN lag_data l using (aid) where c.abalance IS DISTINCT FROM l.abalance OR c.aid IS NULL OR l.aid IS NULL; QUERY PLAN -------------------------------------------------------------------------------------------- Hash Full Join (actual rows=99201 loops=1) Hash Cond: (l.aid = c.aid) Filter: ((c.abalance IS DISTINCT FROM l.abalance) OR (c.aid IS NULL) OR (l.aid IS NULL)) Rows Removed by Filter: 9900799 CTE lag_data -> Function Scan on dblink pgbench_accounts_lag (actual rows=10000000 loops=1) -> CTE Scan on lag_data l (actual rows=10000000 loops=1) -> Hash (actual rows=10000000 loops=1) Buckets: 16777216 Batches: 1 Memory Usage: 1390838kB -> Seq Scan on pgbench_accounts c (actual rows=10000000 loops=1) Planning Time: 0.136 ms Execution Time: 20854.470 ms (12 rows) |
Around 20 seconds - not bad, I believe! Given 10 million rows scanned on both sides, plus transmitting that 10 million over the wire once.
NB! Note that I actually executed the query a couple of times to get everything cached, since we usually want to remove disk access from the equation. I actually didn’t want to get the changed rows, so I used EXPLAIN ANALYZE with additional costs, and particularly with timings disabled, to minimize the “observer effect”.
Along the lines of query performance...I started to wonder: was the number we got actually any good? How would it perform if the data was totally local and persistent, i.e. like a normal table? So on the primary side, I pulled in the whole lagged dataset from the standby into a separate table!
|
1 2 3 4 5 6 7 8 9 10 11 12 13 14 15 16 17 18 19 20 |
CREATE UNLOGGED TABLE pgbench_accounts_lag_local (LIKE pgbench_accounts INCLUDING ALL); INSERT INTO pgbench_accounts_lag_local SELECT * FROM dblink('host=10.110.0.5', 'select aid, bid, abalance, filler from pgbench_accounts') AS x(aid int, bid int, abalance int, filler text); VACUUM ANALYZE pgbench_accounts_lag_local; EXPLAIN (ANALYZE, COSTS OFF, TIMING OFF) SELECT* FROM pgbench_accounts c FULL OUTER JOIN pgbench_accounts_lag_local l using (aid) where c.abalance IS DISTINCT FROM l.abalance OR c.aid IS NULL OR l.aid IS NULL; QUERY PLAN -------------------------------------------------------------------------------------------- Hash Full Join (actual rows=99201 loops=1) Hash Cond: (c.aid = l.aid) Filter: ((c.abalance IS DISTINCT FROM l.abalance) OR (c.aid IS NULL) OR (l.aid IS NULL)) Rows Removed by Filter: 9900799 -> Seq Scan on pgbench_accounts c (actual rows=10000000 loops=1) -> Hash (actual rows=10000000 loops=1) Buckets: 16777216 Batches: 1 Memory Usage: 1390838kB -> Seq Scan on pgbench_accounts_lag_local l (actual rows=10000000 loops=1) Planning Time: 0.130 ms Execution Time: 11233.989 ms (10 rows) |
After a couple of runs, we arrived at around 11s. As expected - considerably faster locally 🙂 But also not really tragic I would say, at least not on an order of magnitude. I could live with that, given that something like this is a rare occasion. Well, at least, it should be 🙂
As we saw, this somewhat obscure approach of “dblink” + “recovery delay” mixed together can definitely deliver good results within a reasonable amount of time for our simple test case - so the approach might be worth making a mental note of, if you haven’t seen it before. The performance side could get problematic for really large data amounts - but hey, we’re competing with much more expensive and complex database systems, and we still get the job done, without paying a dime!
Also, the test buildup could surely be improved - consider that we were changing quite a lot of data - 1% of some huge transactional table usually does not get changed within an hour. In a real-world scenario, we could potentially take advantage of some indexes, whereas here we only had full scans.
In the future, the coolest would be some level of support for something like that on the “postgres_fdw” side - I even actually tried it, but currently it’s not an intended use case, so recursion went on behind the scenes, with lots of connections being opened until some ‘out of connection’ errors popped up.
Thanks for reading!
+43 (0) 2622 93022-0
office@cybertec.at
You need to load content from reCAPTCHA to submit the form. Please note that doing so will share data with third-party providers.
More InformationYou are currently viewing a placeholder content from Facebook. To access the actual content, click the button below. Please note that doing so will share data with third-party providers.
More InformationYou are currently viewing a placeholder content from X. To access the actual content, click the button below. Please note that doing so will share data with third-party providers.
More Information