Start with an overview of the dashboard. Once you understand the basics, graduate to the more nuanced aspects. For example, you’ll learn how to use location data, or how to insert JavaScript notation for the most flexible and beautiful charts. Not only will you come away with fresh knowledge of how to quickly build applications, you’ll see how easy it is to use CYPEX for truly astonishing results. It’s a low-code approach that you can instantly update.
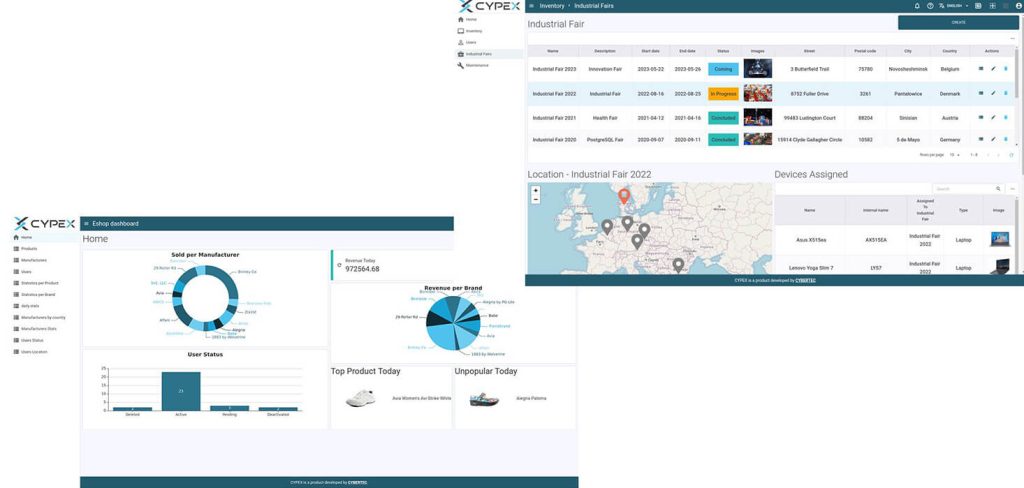
Easy-to-use dashboards; attractive, yet practical graphical user interface
Table of contents
We provide you with a Git repository which allows you to download, install and configure it. All containers are provided for direct use. As CYPEX can be connected with existing databases, you’ll need to provide information to tell it where PostgreSQL can be found (such as: host, port, and database name).
The admin panel is a core component of CYPEX – it allows you to gain an overview of which applications exist and to define new applications by adding workflows.
The predicted application is then modified by the user to satisfy their needs. The application section within the admin panel helps users generate new apps. A user can select a handful of queries (or all of them) and provide some meta data. The CYPEX engine will use this information to make predictions. In this chapter, you’ll learn how to create your first CYPEX application in just over 10 minutes. You’ll start with a data model and end up with a full-fledged application.
Once you’ve become familiar with the admin panel, move on to the CYPEX model builder . The CYPEX model builder allows you to inspect the current data model as it is in PostgreSQL and define basic CYPEX objects such as queries, workflows, etc.
Furthermore, default queries are a core concept of the entire CYPEX system. Learn how to mark which tables you need with the help of a default query. The default query is assigned permissions. Depending on the extent of the user’s permissions, the query will be available as a data source in the GUI or will be unavailable to that user.
Another tool we provide helps construct queries. Plain tables are often not a good data source. You’ll need joins, aggregations, windowing functions, etc. To make sure that such operations are permitted, make use of our
query builder.
CYPEX offers a simple way to create workflows, an important cornerstone of the modern application-building process. Building workflows is easy in CYPEX; they allow you to move quickly from a data model to a complete application. Workflows can be changed in CYPEX without having to re-generate the application all over again. Simply go to the model builder and adjust the workflow as needed. All changes will be directly reflected in the GUI.
In CYPEX, the state machine allows you to transition from one state to another. Connecting all states by hand can be cumbersome. CYPEX features the ability to “fully connect” states with each other. The idea is to have a workflow that allows for state changes from every state to every other state, ridding you of the extra work.
In order to automate various operations, triggers in PostgreSQL are offered to improve your data model.
Default lookups help to fix relational data models that would usually show ID’s as opposed to names.
One of the core features of CYPEX is adding auditing to your application. Enable the “audit” feature for a relation in order to track it. The CYPEX admin panel allows you to inspect your tables as well as the relations between them.
The CYPEX model builder allows you to configure the authentication strategy of your application and helps you to configure your security model.
Creating new users in CYPEX is easy. Simply go to the “Users” section in the admin panel. Add and remove users in the “Users” section within the admin panel. There you can decide who is allowed to make use of your applications. Create and add roles as you need it in the admin panel.
The application authentication section allows you to customize your login screen. You can set the logo as well as the title.
In a large corporation, Single-Sign-On is the authentication method of choice. CYPEX supports SSO authentication and allows you to connect user management to LDAP.
By including ready-made extensions we’ve drastically reduced the overhead of high-usage services (e.g. addresses and country lists). CYPEX has all the means to do more with less time.
And last but not least, there are 2 types of repositories: extensions and ready-made apps. The structure of these two types of repositories are slightly different. Depending on the type of repo, it will either show up in “repository applications” or in “extensions”.
File storage that can handle user-uploaded files is a must for every web editor. You can quickly integrate photos into all upcoming apps, while keeping the flexibility to backup data and programs all at once by utilizing the CYPEX file store.
Critical applications need auditing. CYPEX has onboard means to handle this, out-of-the-box. Click on relations in the ER editor and enable the audit module. CYPEX will configure all that is needed for you.
CYPEX automatically exposes your data as an easy-to-use API which allows you to integrate your database with external platforms in a straightforward manner. The APIs automatically keep up to date in case changes are made to the data model.
CYPEX allows you to hook up to a repository and load ready-made SQL fragments directly into your application, allowing you both to perform basic common tasks more quickly and to achieve a higher level of quality at those tasks.
Repository applications are applications which can be directly downloaded into your CYPEX deployment. These video tutorials show how such applications can be made.
In this chapter, you’ll learn how to create a sample application based on an existing database model.
Watch our videos and have a look at the large variety of field types available (e.g. boolean with “true” & “false”, code input fields, date & time inputs, number fields, slide input, text elements, multiple file input fields, array text fields, buttons, subform tables, …). Many of these field types support autocomplete and syntax highlighting.
Furthermore, CYPEX offers special design and grouping functions. A container element allows you to group elements within a grid. They can be conditional as well. Markdown fields are a generic way to add content to the screen. They can be linked to other elements on the page and are therefore an easy way to display things and to generate content on the fly. Don’t forget about images! There one of the most basic design elements on any page, and are often subject to dynamic behavior. CYPEX lets you work with color fields. CYPEX is able to display a square containing a color to indicate information on the page.
On top of that, CYPEX allows you to edit JSON documents using a special GUI element. The key advantage is that the GUI element assures that the JSON document sent to the backend is always valid, which helps to avoid errors.
CYPEX offers many more time-saving functions, find out about:
See examples in the CYPEX Online Academy design best practice showcases section.