PostgreSQL TDE is a version of PostgreSQL which offers on-disk encryption for PostgreSQL. It is part of the CYBERTEC POSTGRESQL ENTERPRISE EDITION (PGEE). What we have noticed recently is that people kept asking about how to integrate PostgreSQL TDE with existing key management solutions. To help you manage encryption keys with PostgreSQL TDE, we have decided to outline the basic concepts and help people to implement key management strategies for PostgreSQL to secure their infrastructures.
Running PostgreSQL TDE is easy. However, it requires some basic understanding of how we handle keys in general. The following image shows the basic architecture of how to manage encryption keys using our security-enabled version of PostgreSQL:
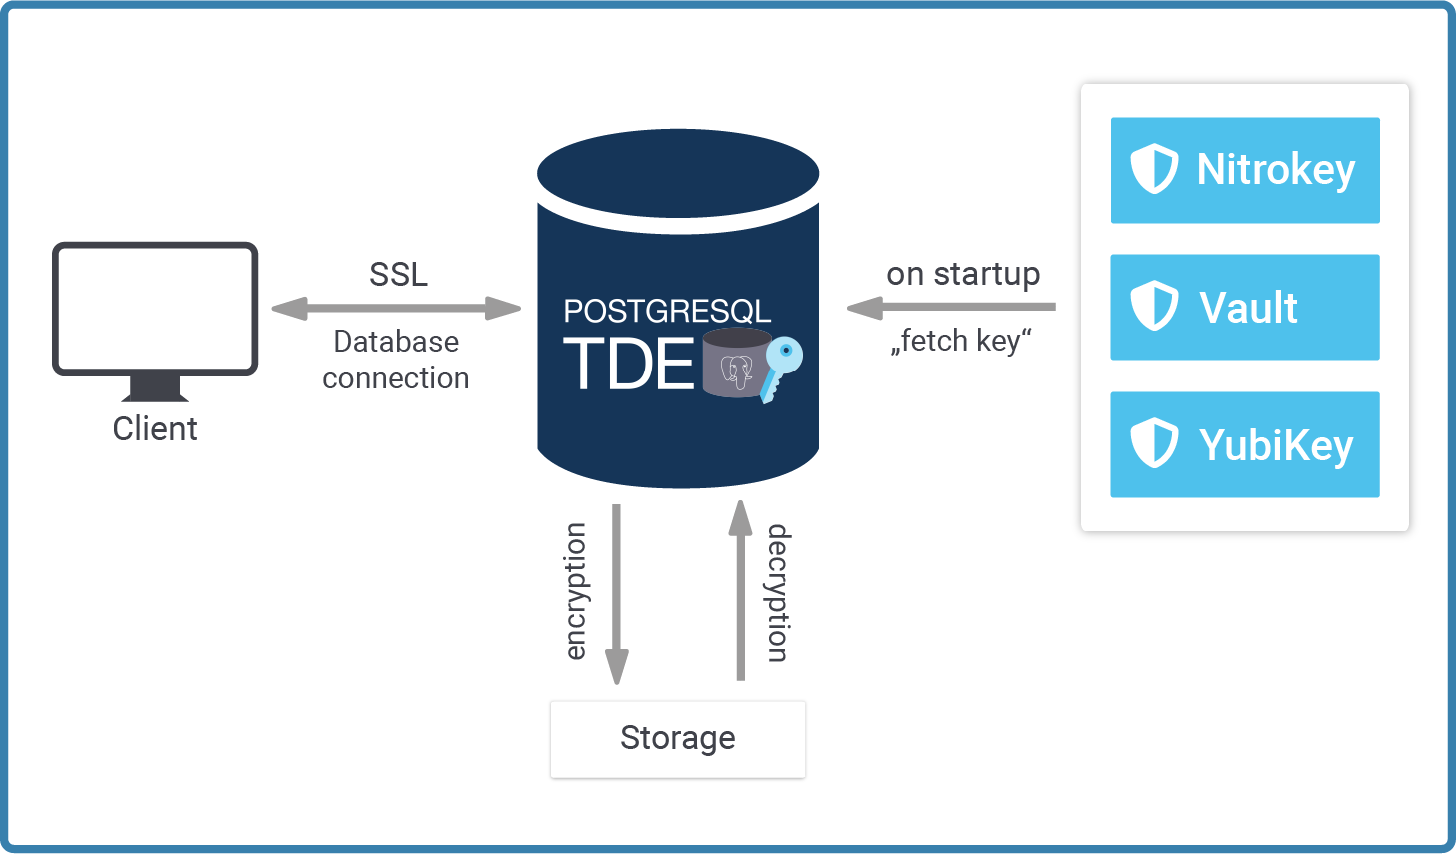
Let's focus on each of these parts separately.
When a new PostgreSQL instance is created, initdb is executed behind the scenes. Most systems do that for you when the service is started for the first time. The purpose of initdb is to create the initial content of the data directory, deploy a config file and so on.
The point is: In the case of TDE (= Transparent Data Encryption), the data files on disk have to be encrypted. The natural question which arises is: How can we find the key? It's not a good idea to store the key directly in the data directory, so we have to be a little creative to handle keys properly.
When we developed PostgreSQL TDE, we decided on a simple plugin architecture. Key management can be quite diverse. Many different keystores exist and the requirements of every single company differ depending on use cases, philosophy, guidelines and sometimes even due to legal requirements.
When PostgreSQL TDE fetches the key, it uses a plugin which is an executable we have to point to:
|
1 |
[tde@cybertec]$ initdb --help |
initdb initializes a PostgreSQL database cluster.
|
1 |
initdb [OPTION]... [DATADIR] |
|
1 2 3 4 |
... -k, --data-checksums use data page checksums -K, --encryption-key-command command that returns encryption key |
The -K option requires you to point to a script that returns the key as a string. Note that this key is never visible to anybody but the database server. It does not show up in a process table. It does not show up anywhere. The beauty of this design is that you can write any plugin for any key manager of your choice. For testing purposes, you can even call up the command line and make the administrator type in the key. In the real world, almost no-one does that - but even that approach is possible.
As stated: Provide a script or an executable that echoes the key to stdout. PostgreSQL will read it and use it to encrypt your data files. This script gives you total flexibility to integrate with every possible kind of key management.
|
1 |
[tde@cybertec]$ ./initdb -D /path/db -K /path/key_manager.sh |
The files which belong to this database system will be owned by user "hs".
This user must also own the server process.
The database cluster will be initialized with locales
|
1 2 3 4 5 6 |
COLLATE: en_US.UTF-8 CTYPE: en_US.UTF-8 MESSAGES: en_US.UTF-8 MONETARY: de_DE.UTF-8 NUMERIC: de_DE.UTF-8 TIME: de_DE.UTF-8 |
The default database encoding has been set accordingly, to "UTF8".
The default text search configuration will be set to "english".
Data page checksums are disabled.
Data encryption is enabled.
|
1 2 3 4 5 6 7 8 9 10 11 12 13 14 |
creating directory /path/db ... ok creating subdirectories ... ok selecting dynamic shared memory implementation ... posix selecting default max_connections ... 100 selecting default shared_buffers ... 128MB selecting default time zone ... Europe/Vienna creating configuration files ... ok running bootstrap script ... ok performing post-bootstrap initialization ... ok syncing data to disk ... ok initdb: warning: enabling 'trust' authentication for local connections You can change this by editing pg_hba.conf or using the option -A, or --auth-local and --auth-host, the next time you run initdb. |
|
1 |
[tde@cybertec]$ ./pg_ctl -D /path/db -l logfile start |
The -K option is really the path to success here. In the simplest of all cases the script simply returns a constant:
|
1 2 3 |
[tde@cybertec]$ cat /path/key_manager.sh #!/bin/sh echo 4e5358ab309bcdea23450934546298ab |
But, as stated earlier, this is really just a showcase. DO NOT store the key on the same server - instead, integrate it with a proper key store and manage the key remotely. Otherwise, TDE would be pointless and simply a waste of resources.
What is really important to note here is that the key has to be in hex and it has to be 32 characters long. Otherwise initdb will error out.
|
1 |
initdb: fatal: encryption key is too short, should be a 32 character hex key |
For using secrets that humans can memorize there is a bundled pg_keytool utility that takes as input a passphrase and uses a key derivation function to form a correctly formatted output key. By using a key derivation function that takes a non-trivial amount of time to calculate, this adds an extra layer of security against dictionary attacks.
Once the instance has been deployed, we can actually start PostgreSQL normally.
What initdb has done for us is to adjust the relevant values in postgresql.conf:
|
1 2 3 |
# - Encryption - encryption_key_command = '/path/key_manager.sh' |
Every time the server starts up, it will run the same program to fetch the key. Remember, we need this key to decrypt those data files. The server has already taken care to ensure that nothing can go wrong - assuming that the program does indeed return the correct key. If the key cannot be provided, then the server cannot be started. There is NO BACKDOOR, no emergency key or anything of that kind. If you cannot provide the correct key your data is lost. That is the entire idea of TDE. We do not want backdoors.
People keep asking: How can I figure out if my PostgreSQL instance is indeed encrypted? The way to do that is to control pg_controldata:
|
1 2 3 4 5 6 7 8 9 |
[tde@cybertec]$ pg_controldata /path/db/ ... Database system identifier: 7036323720088499175 Database cluster state: shut down pg_control last modified: Di 30 Nov 2021 12:29:41 CET ... Mock authentication nonce: f12fd3308a81f946ffbb36a0a3bd4d41c87bbb9ba4d612b809a001a2202cdc6a Data encryption: on Data encryption fingerprint: D2D2CED8FE9F3980599289B1F468A9FB |
At the end of the listing, you can find the encryption details. Make sure that you use the RIGHT version of pg_controldata. Otherwise, you won't be able to find that information.
One of the main questions is: Which key store can one use for PostgreSQL? The answer is: Any of them. Here are some which are quite popular and widely used by many companies. Keep in mind that the list is not exhaustive:
A typical solution for a production system is to use a scheme where the database master key is generated randomly, then encrypted using a key from a key management system, and finally stored in the PostgreSQL data directory. This allows for keys to be rotated or even the key management system to be swapped out without having to re-encrypt the whole database.
You can read more about the topic of encryption in our introduction to Transparent Layer Security (TLS).
Exciting news in the realm of GIS - we recently released a website that offers ready-to-use GIS data. If you are using PostGIS and OSM data, this is the place to go. We provide you with ready-made database dumps featuring the entire planet. Check out our GIS site.
Some time ago, I posted some information about zheap, a storage engine for PostgreSQL. The idea behind zheap is to make UPDATE statements run faster in order to keep table bloat under control. Currently, PostgreSQL copies data on UPDATE and puts the copy of the row into the same data file. While this isn't a bad strategy, it can in some cases lead to table bloat. The idea behind zheap undo is to manage old copies of rows, which is similar to Oracle. Until now, the problem was that this “zheap undo” was not cleaned up. That's why we implemented a “discard worker” to handle the cleanup. By discarding zheap UNDO logs, the worker keeps UPDATE-related table bloat to a minimum.
Before we dig into what the discard worker does, you need to install a zheap-enabled version of PostgreSQL. To make it easier for everybody, we created a container to allow users to give zheap a try out-of-the-box.
The original idea was to have zheap as an extension. However, it's too invasive, therefore you can't just install it on top of PostgreSQL, as you can with other extensions. zheap does need core patches.
Also: I want to point out that this is not a production-ready version, but rather a tech preview. We're happy to share it with the community to get feedback and maybe gather some bug reports.
Here is the freely available docker container for you to try out. Installation is simple and very straightforward:
|
1 2 |
[hs@fedora ~]$ docker run --name zHeap -p 5432:5432 -d cybertecpostgresql/zheap |
To connect to the newly created instance, just run psql as you normally would. The default username and password are both postgres.
Username: postgres
Password: postgres
|
1 2 |
[hs@fedora ~]$ psql -h localhost -p 5432 -U postgres UNDO: Cleaning up using the discard worker |
Once your zheap-enabled version of PostgreSQL is up and running, we can inspect the process table:
|
1 2 3 4 5 6 7 8 9 10 11 |
[hs@fedora ~]$ ps axf | grep post ... 2403084 ? Ss 0:00 _ /home/hs/pgzheap/bin/postgres -D ./dbzheap 2403086 ? Ss 0:00 _ postgres: checkpointer 2403087 ? Ss 0:00 _ postgres: background writer 2403088 ? Ss 0:00 _ postgres: walwriter 2403089 ? Ss 0:00 _ postgres: autovacuum launcher 2403090 ? Ss 0:00 _ postgres: stats collector 2403091 ? Ss 0:00 _ postgres: undo discard worker 2403093 ? Ss 0:00 _ postgres: logical replication launcher ... |
The discard worker is launched automatically. Let's see what it does, and how the undo log is stored.
Before we create a table and fill it with data, we've got to adjust a variable:
|
1 2 3 4 5 6 7 8 |
test=# SHOW default_table_access_method; default_table_access_method ----------------------------- heap (1 row) test=# SET default_table_access_method TO zheap; SET |
This setting tells PostgreSQL which storage engine you want to use by default when creating a new table. Usually we want heaps. However, in this case zheap is the desired choice. We can add the zheap option to each CREATE TABLE. In many cases you might want to set it for the entire session as I just did:
|
1 2 |
test=# CREATE TABLE t_large (id serial, name text); CREATE TABLE |
The layout of the table doesn't really matter. We can use any layout.
Let's load some data:
|
1 2 3 4 5 6 7 8 9 10 11 |
test=# BEGIN; BEGIN test=*# INSERT INTO t_large (name) SELECT 'dummy' FROM generate_series(1, 10000000); INSERT 0 10000000 test=*# d+ List of relations Schema | Name | Type | Owner | Persistence | Access method | Size | Description --------+----------------+----------+----------+-------------+---------------+------------+------------- public | t_large | table | hs | permanent | zheap | 193 MB | public | t_large_id_seq | sequence | hs | permanent | | 8192 bytes | (2 rows) |
The important thing is that zheap is able to rollback in case of error. Therefore, a lot of undo has to be written: Let's take a look at the undo directories before we commit the transaction:
|
1 2 3 4 5 6 7 8 9 10 11 12 |
[hs@fedora dbzheap]$ ls -l ./pg_undo/ && ls -l ./base/undo/ total 8 -rw-------. 1 hs hs 52 12. Nov 11:47 00000001A84012A0 -rw-------. 1 hs hs 52 12. Nov 11:47 00000001C9F48970 total 432128 -rw-------. 1 hs hs 1048576 12. Nov 11:47 000000.0065A00000 -rw-------. 1 hs hs 1048576 12. Nov 11:47 000000.0065B00000 -rw-------. 1 hs hs 1048576 12. Nov 11:47 000000.0065C00000 ... -rw-------. 1 hs hs 1048576 12. Nov 11:47 000000.007FD00000 -rw-------. 1 hs hs 1048576 12. Nov 11:47 000000.007FE00000 -rw-------. 1 hs hs 1048576 12. Nov 11:47 000000.007FF00000 |
You can see that we've created a fairly large number of files in our base/undo directory. Let's commit and see what happens:
|
1 2 |
test=*# COMMIT; COMMIT |
PostgreSQL will recycle (= delete) these logs when the new discard worker kicks in. Let's take a look and see:
|
1 2 3 4 5 6 7 |
[hs@fedora dbzheap]$ ls -l ./pg_undo/ && ls -l ./base/undo/ total 8 -rw-------. 1 hs hs 52 12. Nov 11:47 00000001A84012A0 -rw-------. 1 hs hs 52 12. Nov 11:47 00000001C9F48970 total 2048 -rw-------. 1 hs hs 1048576 12. Nov 11:47 000000.007FF00000 -rw-------. 1 hs hs 1048576 12. Nov 11:47 000000.0080000000 |
The files are gone, which is what we expected.
The same will happen when we run UPDATE statements:
|
1 2 3 4 |
test=# BEGIN; BEGIN test=*# UPDATE t_large SET id = id - 1; UPDATE 10000000 |
The important aspect is that there is actually a lot of WAL created. As you can see, we are talking about around 600 MB:
|
1 2 3 |
[hs@fedora dbzheap]$ cd base/undo/ [hs@fedora undo]$ du -h 603M |
Now, let's commit the transaction:
|
1 2 |
test=*# COMMIT; COMMIT |
What's interesting is what happens immediately after the commit statement:
|
1 2 3 4 5 6 |
[hs@fedora undo]$ date && du -h Fr 12. Nov 11:55:50 CET 2021 603M . [hs@fedora undo]$ date && du -h Fr 12. Nov 11:55:57 CET 2021 2,0M . |
So that's it - the zheap UNDO logs are gone. The cleanup is NOT part of a commit, but is actually done by the discard worker which is in charge of making sure that log is not killed too early. Keep in mind: You might not be the only transaction at work here, so the cleanup still has to be asynchronous (just like a vacuum is).
Check out our Table Bloat Archive for more important information about zheap!
We also recently released a website that offers ready-to-use GIS data. If you use PostGIS and OSM data, this is the place to go. We provide you with ready-made database dumps featuring the entire planet. Check out our new GIS site.
PostgreSQL table partitioning is by far one of the most popular new PostgreSQL features. Many people look to partitioned tables as a way to improve performance and broaden scalability. However, partitioning comes with a little problem: How can you partition an existing table without locking up the database? The answer is: pg_rewrite can help you with PostgreSQL table partitioning. Here you will learn how to implement pg_rewrite to help you solve partitioning problems in the most elegant way possible.
pg_rewrite is Open Source and can be quickly and easily downloaded from our Github profile. Cloning the repository works as shown in the next listing:
|
1 2 3 4 5 6 7 8 9 |
hs@fedora src]$ git clone https://github.com/cybertec-postgresql/pg_rewrite.git Cloning into 'pg_rewrite'... remote: Enumerating objects: 22, done. remote: Counting objects: 100% (22/22), done. remote: Compressing objects: 100% (17/17), done. remote: Total 22 (delta 3), reused 22 (delta 3), pack-reused 0 Receiving objects: 100% (22/22), 44.51 KiB | 1.78 MiB/s, done. Resolving deltas: 100% (3/3), done. |
Once this is done, we can enter the directory:
|
1 |
[hs@fedora src]$ cd pg_rewrite/ |
To build the code, we have to make sure that the correct version of pg_config is in the path. In my case, I have a working binary in my home directory, so I can effortlessly build the code:
|
1 2 3 |
[hs@fedora pg_rewrite]$ which pg_config ~/pg14/bin/pg_config |
If pg_config is in the path, all you have to do is to run “make install” to compile and install the code:
|
1 2 3 4 5 6 7 8 9 10 11 |
[hs@fedora pg_rewrite]$ make install gcc -Wall -Wmissing-prototypes -Wpointer-arith -Wdeclaration-after-statement -Werror=vla -Wendif-labels -Wmissing-format-attribute -Wimplicit-fallthrough=3 -Wcast-function-type - Wformat-security -fno-strict-aliasing -fwrapv -fexcess-precision=standard -Wno-format -truncation -Wno-stringop-truncation -g -O2 -fPIC -I. -I./ -I/home/hs/pg14/include/postgresql/server -I/home/hs/pg14/include/postgresql/internal -D_GNU_SOURCE -c -o pg_rewrite.o pg_rewrite.c ... /usr/bin/install -c -m 644 concurrent.bc '/home/hs/pg14/lib/postgresql/bitcode'/pg_rewrite/./ cd '/home/hs/pg14/lib/postgresql/bitcode' && /usr/bin/llvm-lto -thinlto -thinlto- action=thinlink -o pg_rewrite.index.bc pg_rewrite/pg_rewrite.bc pg_rewrite/concurrent.bc |
The next thing to do is to adjust postgresql.conf file. pg_rewrite has to be loaded as a library when the server starts. Otherwise, it won’t work. Configuring PostgreSQL to load pg_rewrite works as follows:
|
1 2 3 4 5 6 |
wal_level = logical max_replication_slots = 1 # ... or add 1 to the current value. shared_preload_libraries = 'pg_rewrite' # ... or add the library to the existing ones. |
The wal_level has to be adjusted to make sure that the WAL contains enough information for logical decoding to work. On top of that, you'll need a sufficient number of replication slots to safely run logical decoding. pg_rewrite will need one slot to operate.
After these changes are done, restart your server and verify that the variables are properly set:
|
1 2 3 4 5 6 7 |
test=# SHOW shared_preload_libraries; shared_preload_libraries -------------------------- pg_rewrite (1 row) |
Finally, you have to enable the pg_rewrite extension to ensure that the partition_table function is available:
|
1 2 3 4 5 6 7 8 9 10 11 12 13 14 |
test=# CREATE EXTENSION pg_rewrite; CREATE EXTENSION test=# x Expanded display is on. test=# df *partition_table* List of functions -[ RECORD 1 ]-------+--------------------------------------------------- Schema | public Name | partition_table Result data type | void Argument data types | src_table text, dst_table text, src_table_new text Type | func |
Voilà, you have a working version of pg_rewrite. Let's take a look at how we can use it.
After installing pg_rewrite, we can create a table - which we'll want to partition later on:
|
1 2 3 4 5 |
test=# CREATE TABLE t_number (x numeric); CREATE TABLE test=# INSERT INTO t_number SELECT random() - 0.5 FROM generate_series(1, 1000000); INSERT 0 1000000 |
For the sake of simplicity, the table contains a couple of random values. Some are greater than zero and some are less than zero. Let's verify that:
|
1 2 3 4 5 6 7 |
test=# SELECT x < 0, count(*) FROM t_number GROUP BY 1; ?column? | count ----------+-------- f | 499729 t | 500271 (2 rows) |
The data seem correct, so we can move to the next step:
|
1 2 |
test=# ALTER TABLE t_number ADD PRIMARY KEY (x); ALTER TABLE |
PostgreSQL can only identify a row if there is a primary key. Otherwise, we'll have problems and the code won't work. So it's important to ensure that there are indeed primary keys.
Before we can partition the table, we have to come up with a partitioning scheme. We want to use that scheme for our database. In my example, all I'm doing is putting negative values into one table, and positive values into another. Here's how it works:
|
1 2 3 4 5 6 7 8 |
test=# CREATE TABLE t_part_number (x numeric PRIMARY KEY) PARTITION BY RANGE (x); CREATE TABLE test=# CREATE TABLE t_part_number_neg PARTITION OF t_part_number FOR VALUES FROM (MINVALUE) TO (0); CREATE TABLE test=# CREATE TABLE t_part_number_pos PARTITION OF t_part_number FOR VALUES FROM (0) TO (MAXVALUE); CREATE TABLE |
Make sure that the primary keys and constraints are identical. Otherwise, pg_rewrite will produce an error. Remember: we want to repartition the table - we don’t want anything else to happen.
Now that all the ingredients are in place, we can rewrite the data:
|
1 2 3 4 5 |
test=# SELECT partition_table('t_number', 't_part_number', 't_old_number'); partition_table ----------------- (1 row) |
t_number is the source table which has to be rewritten. t_part_number is the freshly partitioned table which we want to use as intermediate storage. t_old_number is the name of the original table which will be renamed. In case something goes wrong, the old table will still be found. The advantage is that nothing can go wrong. The downside is that more storage is needed. However, that is the case DURING repartitioning anyway so it does not matter if the source table is deleted or not. We need twice the space anyway.
|
1 2 3 4 5 6 7 8 9 10 |
test=# d+ List of relations Schema | Name | Type | Owner | Persistence | Access method | Size | Description --------+-------------------+-------------------+-------+-------------+---------------+---------+------------- public | t_number | partitioned table | hs | permanent | | 0 bytes | public | t_old_number | table | hs | permanent | heap | 42 MB | public | t_part_number_neg | table | hs | permanent | heap | 21 MB | public | t_part_number_pos | table | hs | permanent | heap | 21 MB | (4 rows) |
As you can see, the original table is still in place using up 42 MB of storage. Our two partitions will need the same amount of space.
pg_rewrite is a good method to turn existing tables into PostgreSQL partitions. It only needs a short lock, which makes it superior to the long and extensive table locking needed by the PostgreSQL core.