After all the technical articles I have written, I thought it would be nice to write about PostgreSQL sociology for a change.
A community like PostgreSQL has no clearly defined borders. There is no membership certificate; you belong to it if you feel that you belong. That said, you can only get that feeling if you feel accepted.
In all communities, language is an important factor. In the case of an international technical community where much of the communication is in written form, this is not so much about the correct accent or general mastership of the language: it is more the choice of technical terms that separates the “in” crowd from the outsiders. This “jargon”, which primarily serves to unambiguously convey certain technical concepts, also has a social dimension.
A shibboleth, as Wikipedia defines it, is
any custom or tradition, usually a choice of phrasing or even a single word, that distinguishes one group of people from another.
The term comes from the Biblical Book of Judges (12:5-6):
The Gileadites seized the fords of the Jordan and held them against Ephraim. When any Ephraimite who had escaped wished to cross, the men of Gilead would ask, ‘Are you an Ephraimite?’ and if he said ‘No,’ they would retort, ‘Say “Shibboleth.”’ He would say ‘Sibboleth,” and because he could not pronounce the word properly, they seized him and killed him at the fords. At that time fourty-two thousand men of Ephraim lost their lives.
Now, I am not suggesting that the PostgreSQL crowd engages in genocide, but there is a word that immediately exposes you as an outsider if you pronounce or write it wrong: The name “PostgreSQL” itself.
The official name is of course “PostgreSQL”, and the documentation states that
Many people continue to refer to PostgreSQL as “Postgres” (now rarely in all capital letters) because of tradition or because it is easier to pronounce. This usage is widely accepted as a nickname or alias.
Also, it is not unusual to refer to the product as “PGSQL” or, even shorter, “PG”.
Now “PostgreSQL” is not a word that lends itself to pronunciation easily (and there have been repeated attempts to change the name), so you can imagine that the pronunciation varies even more wildly. My research showed a surprising number of Youtube videos teaching what they perceive as the correct pronunciation, and there has even been a survey by the project about people's preferred pronunciation. The widely accepted forms are “POST-gres-cue-ell” and “POST-gres”.
So given that diversity, you'd think that you cannot get it wrong - but you can.
There are two ways to write and pronounce “PostgreSQL” that will immediately identify you as an outsider:
Nobody will seize and kill you if you use these, but people will assume that you don't know a thing about PostgreSQL.
Fake it till you make it! Show that you belong and avoid calling the product “Postgre” or “Postgres SQL”.
I wrote about the new pg_timetable 3 major release not so long ago. Two essential features were highlighted:
- new session locking implementation
- new jackc/pgx Golang library used
Today I want to reveal one more advanced feature! Fasten your seat belts!
First, we need to distinguish exclusive client session mode from exclusive chain execution mode.
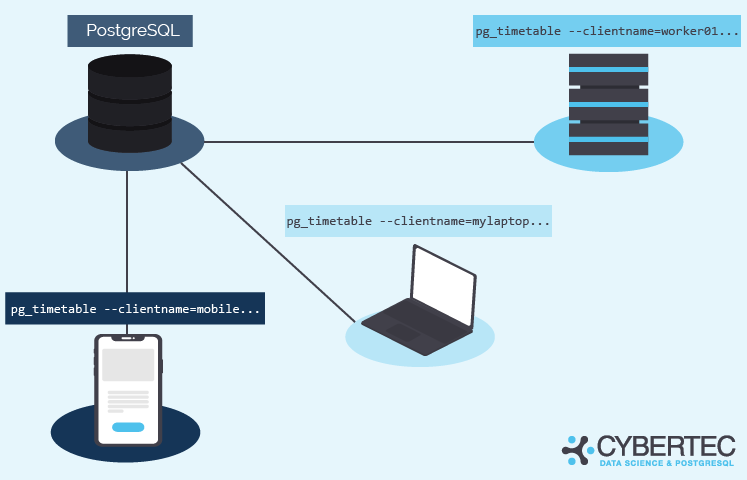
Each pg_timetable instance, known as a client, is pre-set to work in the exclusive mode. Meaning there is no possibility each target database can hold more than one active client connection with the same client name. How we distinguish clients? Simple, the command-line parameter:pg_timetable --clientname=worker01 ...
It is possible to run as many different clients as you want. Take a look:
Of course, life is complicated, and sometimes more than one pg_timetable instance with the same client name may connect to the target database. In this case, pg_timetable ensures that one and only one is executing chains exclusively. The second will wait until the active one will disconnect.
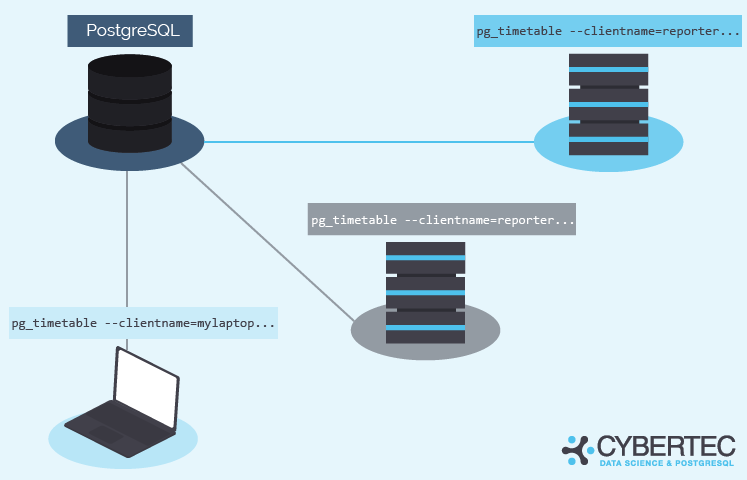
Frankly speaking, you can run whatever number of pg_timetable clients with the same name. The only one will be active (primary), and all others will be waiting (standby). The obvious drawback of such a situation is losing database connection slots to idle clients.

Let's get back to chains. By default, all chains are supposed to run simultaneously at their schedule. This number is physically limited by the number of pg_timetable instance parallel workers. Right now, this number is 16 for scheduled chains workers and 16 for interval chains workers. These workers are implemented using lightweight goroutines. That doesn't mean you cannot have more than 32 chains scheduled for the same time. It means no more than 16 scheduled are executed at any given time, and others are waiting in the queue.
Maybe later, we can add a settings parameter to specify the exact number of workers to run. However, we have never yet hit the situation where the default settings were not enough.
Imagine there are several pg_timetable instances working simultaneously against the same PostgreSQL database. And some task (exclusive or not) has no specified executor (by default). That leads all clients will execute the same chain in their own session.
One more time. We can only guarantee exclusive chain execution within the pg_timetable client session. We won't block any chain's simultaneous execution in several parallel pg_timetable sessions by design. Please use the client_name field of the timetable.chain_execution_config table during chain creation to prevent this situation.
Why exclusive chains matter? I'm sure you can find many use cases: report building, software updates, external non-transactional data updates (files), other process waiting, etc.
Let's sum up the concept of the exclusive task:
If you look at the problem closer, you might see the classic readers-writers problems.
Readers-writers problems (there are some variations, check the wiki for details) occur when a shared piece of resource needs to be accessed by multiple executors. We assume our exclusive chains are writers, and non-exclusive (regular) chains are readers.
⚠ This is not related to a database, file system, or any other IO read-write. Just the concept itself is identical, so we can use the same algorithms efficiently.
Thank God we have standard Golang sync package which provides RWMutex type to solve this in a simple way.
From the Golang docs:
An RWMutex is a reader/writer mutual exclusion lock. The lock can be held by an arbitrary number of readers or a single writer. The zero value for an RWMutex is an unlocked mutex.
In other words, non-exclusive regular chains (readers) don't have to wait for each other. They only have to wait for exclusive chains (writers) holding the lock. And only one exclusive (writer) lock is possible at any given time.
During parallel operation, regular chains will call RWMutex.RLock() before and RWMutex.RUnlock() after transaction is done.
And exclusive chains will call RWMutex.Lock() before and RWMutex.Unlock() after. Simple and effective. I really like to Go!
Further reading:
This was the first in a series of posts dedicated to the new pg_timetable v3 features. Stay tuned for the components to be highlighted:
The previous post can be found here.
Stay safe, healthy, and wealthy!
Be happy! Peace! Love! ❤
We know that PostgreSQL does not update a table row in place. Rather, it writes a new version of the row (the PostgreSQL term for a row version is “tuple”) and leaves the old row version in place to serve concurrent read requests. VACUUM later removes these “dead tuples”.
If you delete a row and insert a new one, the effect is similar: we have one dead tuple and one new live tuple. This is why many people (me, among others) explain to beginners that “an UPDATE in PostgreSQL is almost the same as a DELETE, followed by an INSERT”.
This article is about that “almost”.
UPDATE and DELETE + INSERTLet's take this simple test table:
|
1 2 3 4 5 6 |
CREATE TABLE uptest ( id smallint PRIMARY KEY, val smallint NOT NULL ); INSERT INTO uptest VALUES (1, 42); |
In the two following tests, we will issue statements from two concurrent sessions.
First, the UPDATE:
|
1 2 3 4 5 6 7 8 9 10 11 |
Session 1 Session 2 BEGIN; UPDATE uptest SET id = 2 WHERE val = 42; SELECT id FROM uptest WHERE val = 42 FOR UPDATE; -- hangs COMMIT; -- one row is returned |
Let's reset the table before the second test;
|
1 2 |
TRUNCATE uptest; INSERT INTO uptest VALUES (1, 42); |
Now let's repeat the experiment with DELETE and INSERT:
|
1 2 3 4 5 6 7 8 9 10 11 12 13 |
Session 1 Session 2 BEGIN; DELETE FROM uptest WHERE id = 1; INSERT INTO uptest VALUES (2, 42); SELECT id FROM uptest WHERE val = 42 FOR UPDATE; -- hangs COMMIT; -- no row is returned |
The documentation describes what happens when an SQL statement runs into a lock in a transaction with the default READ COMMITTED isolation level:
UPDATE,DELETE,SELECT FOR UPDATE, andSELECT FOR SHAREcommands behave the same asSELECTin terms of searching for target rows: they will only find target rows that were committed as of the command start time. However, such a target row might have already been updated (or deleted or locked) by another concurrent transaction by the time it is found. In this case, the would-be updater will wait for the first updating transaction to commit or roll back (if it is still in progress). If the first updater rolls back, then its effects are negated and the second updater can proceed with updating the originally found row. If the first updater commits, the second updater will ignore the row if the first updater deleted it, otherwise it will attempt to apply its operation to the updated version of the row. The search condition of the command (theWHEREclause) is re-evaluated to see if the updated version of the row still matches the search condition. If so, the second updater proceeds with its operation using the updated version of the row. In the case ofSELECT FOR UPDATEandSELECT FOR SHARE, this means it is the updated version of the row that is locked and returned to the client.
The above shows that there is some way for PostgreSQL to find the new version of an updated row. That is why the first experiment returned a result row. In the second experiment, there was no connection between the old, deleted row and the newly inserted one, that's why we get no result in that case.
To figure out how the old and the new version are connected, we have to look deeper.
UPDATE with “pageinspect”The extension pageinspect allows us to see all data in a PostgreSQL data page. It requires superuser permissions.
Let's use it to see what's on disk after the first experiment:
|
1 2 3 4 5 6 7 8 9 10 11 12 13 14 15 16 17 18 19 |
TRUNCATE uptest; INSERT INTO uptest VALUES (1, 42); UPDATE uptest SET id = 2 WHERE val = 42; SELECT lp, t_xmin AS xmin, t_xmax AS xmax, t_ctid, to_hex(t_infomask2) AS infomask2, to_hex(t_infomask) AS infomask, t_attrs FROM heap_page_item_attrs(get_raw_page('uptest', 0), 'uptest'); lp | xmin | xmax | t_ctid | infomask2 | infomask | t_attrs ----+--------+--------+--------+-----------+----------+----------------------- 1 | 385688 | 385689 | (0,2) | 2002 | 100 | {'\x0100','\x2a00'} 2 | 385689 | 0 | (0,2) | 2 | 2800 | {'\x0200','\x2a00'} (2 rows) |
The first entry is the old version of the row, the second the new version.
The lp is the line pointer number, which stands for the number of the tuple within the data page. Together with the page number, this constitutes the physical address (tuple ID or tid) of a tuple.
It follows that the t_ctid stored in the tuple header is usually redundant, since it is implicit in the line pointer. However, it becomes relevant after an UPDATE: then t_ctid contains the tuple identifier of the updated version of the row.
This is the “missing link” between the old row version and the updated one!
DELETE + DELETE with “pageinspect”Let's compare this to DELETE + INSERT:
|
1 2 3 4 5 6 7 8 9 10 11 12 13 14 15 16 17 18 19 20 21 22 |
TRUNCATE uptest; INSERT INTO uptest VALUES (1, 42); BEGIN; DELETE FROM uptest WHERE id = 1; INSERT INTO uptest VALUES (2, 42); COMMIT; SELECT lp, t_xmin AS xmin, t_xmax AS xmax, t_ctid, to_hex(t_infomask2) AS infomask2, to_hex(t_infomask) AS infomask, t_attrs FROM heap_page_item_attrs(get_raw_page('uptest', 0), 'uptest'); lp | xmin | xmax | t_ctid | infomask2 | infomask | t_attrs ----+--------+--------+--------+-----------+----------+----------------------- 1 | 385691 | 385692 | (0,1) | 2002 | 100 | {'\x0100','\x2a00'} 2 | 385692 | 0 | (0,2) | 2 | 800 | {'\x0200','\x2a00'} (2 rows) |
Here the t_ctid column from the old, deleted tuple is unchanged and there is no link to the new tuple. The second tuple is not found by the SELECT ... FOR UPDATE, since it is “invisible” to the “snapshot” used for scanning the table.
infomask and infomask2There are also some relevant differences in the attributes infomask and infomask2. You can see the meaning of these flags in the PostgreSQL source file src/include/access/htup_details.h.
infomask2: 2 is the number of columns, and HEAP_KEYS_UPDATED (0x2000) means that the tuple is deleted or updatedinfomask: HEAP_XMIN_COMMITTED (0x0100) means that the tuple was valid before it was removed (a hint bit)infomask: both cases have HEAP_XMAX_INVALID (0x0800) set (they have not been deleted), but the UPDATE case also has HEAP_UPDATED (0x2000), which shows that this is the result of an UPDATETo understand the difference between UPDATE and DELETE+INSERT, we had a closer look at the tuple headers. We saw infomask, infomask2 and t_ctid, where the latter provides the link between the old and the new version of a row.
PostgreSQL's row header occupies 23 bytes, which is more storage overhead than in other databases, but is required for PostgreSQL's special multiversioning and tuple visibility implementation.
UPDATE can be challenging in PostgreSQL: if you want to read more about its problems and how to deal with them, read my article on HOT update.
Blog post updated 05.12.2022 People keep asking: "What are the best ways to upgrade and update my PostgreSQL to the latest version?" This blog post covers how you can upgrade or update to the latest PostgreSQL release.
Before we get started, we have to make a distinction between two things:
Let’s take a look at both scenarios.
The first scenario I want to shed some light on is updating within a major version of PostgreSQL: What does that mean? Suppose you want to move from PostgreSQL 15.0 to PostgreSQL 15.1. In that case, all you have to do is to install the new binaries and restart the database.
There is no need to reload the data. The downtime required is minimal. The binary format does not change; a quick restart is all you need. The same is true if you are running a HA (high availability) cluster solution such as Patroni. Simply restart all nodes in your PostgreSQL cluster and you are ready to go.
The following table contains a little summary:
| Tooling | Task | Reloading data | Downtime needed |
yum/dnf/apt | Minor release update | Not needed | Close to zero |
Now let’s take a look at upgrades: if you want to move from PostgreSQL 9.6, 10, 13 or some other older version to PostgreSQL 15, an upgrade is needed. To do that, you have various options:
pg_dumpall: Dump / reloadpg_upgrade: Copy data on a binary levelpg_upgrade --link: In-place upgradesIf you dump and reload data, it might take a lot of time. The bigger your database is, the more time you will need to do the upgrade. It follows that pg_dump/pg_dumpall and restore are not the right tools to upgrade a large multi-terabyte database.pg_upgrade is here to do a binary upgrade. It copies all the data files from the old directory to the new one. Depending on the amount of data, this can take quite a lot of time and cause serious downtime. However, if the new and the old data directory are on the same filesystem, there is a better option: “pg_upgrade --link”. Instead of copying all the files, pg_upgrade will create hard links for those data files. The amount of data is not a limiting factor anymore, because hard links can be created quickly. “pg_upgrade --link” therefore promises close to zero downtime.
| Tooling | Task | Reloading data | Downtime needed |
pg_upgrade | Major release update | Metadata and files are copied | Downtime is needed |
pg_upgrade --link | Major release update | Only metadata are copied | Close to zero |
What is important to note here is that pg_upgrade is never destructive. If something goes wrong, you can always delete the new data directory and start from scratch.
To show pg_upgrade in action, I have created a little sample database to demonstrate how things work in real life:
|
1 2 3 4 5 6 7 8 9 10 11 12 |
test=# CREATE TABLE a AS SELECT id AS a, id AS b, id AS c FROM generate_series(1, 50000000) AS id; SELECT 50000000 test=# CREATE TABLE b AS SELECT * FROM a; SELECT 50000000 test=# CREATE INDEX idx_a_a ON a (a); CREATE INDEX test=# CREATE INDEX idx_a_b ON a (b); CREATE INDEX test=# CREATE INDEX idx_b_a ON b (a); CREATE INDEX |
This is a fairly small database, but it is already large enough so that users can feel the difference when doing the upgrade:
|
1 2 3 4 5 |
test=# SELECT pg_size_pretty(pg_database_size('test')); pg_size_pretty ---------------- 7444 MB (1 row) |
7.4 GB are ready to be upgraded. Let’s see how it works.
To upgrade a database, three steps are needed:
initdb ...pg_hba.conf and pg_ident.conf and adapt the new postgresql.confpg_upgrade ...Let us start with initdb:
|
1 2 3 4 5 6 7 8 9 10 11 12 13 14 15 16 17 18 19 20 21 22 23 24 25 26 27 28 29 30 31 32 33 34 35 36 37 |
iMac:tmp hs$ initdb -D /data/db15 The files belonging to this database system will be owned by user 'hs'. This user must also own the server process. The database cluster will be initialized with locales COLLATE: en_US CTYPE: UTF-8 MESSAGES: en_US MONETARY: en_US NUMERIC: en_US TIME: en_US The default database encoding has accordingly been set to 'UTF8'. initdb: could not find suitable text search configuration for locale 'UTF-8' The default text search configuration will be set to 'simple'. Data page checksums are disabled. creating directory /data/db15 ... ok creating subdirectories ... ok selecting dynamic shared memory implementation ... posix selecting default max_connections ... 100 selecting default shared_buffers ... 128MB selecting default time zone ... Europe/Vienna creating configuration files ... ok running bootstrap script ... ok performing post-bootstrap initialization ... ok syncing data to disk ... ok initdb: warning: enabling 'trust' authentication for local connections You can change this by editing pg_hba.conf or using the option -A, or --auth-local and --auth-host, the next time you run initdb. Success. You can now start the database server using: pg_ctl -D /data/db15 -l logfile start |
Note that pg_upgrade is only going to work in case the encodings of the old and the new database instance match. Otherwise, it will fail.
After adapting the configuration files, we can run pg_upgrade: Basically, we need four pieces of information here: The old and the new data directory as well as the path of the old and the new binaries:
|
1 2 3 4 5 6 7 8 9 10 11 12 13 14 15 16 17 18 19 20 21 22 23 24 25 26 27 28 29 30 31 32 33 34 35 36 37 38 39 40 41 42 43 44 45 46 47 48 49 50 51 52 53 54 55 56 |
iMac:tmp hs$ time pg_upgrade -d /data/db12/ -D /data/db15 -b /path/pg12/bin/ -B /usr/local/Cellar/postgresql/15.1/bin/ Performing Consistency Checks ----------------------------- Checking cluster versions ok Checking database user is the install user ok Checking database connection settings ok Checking for prepared transactions ok Checking for reg* data types in user tables ok Checking for contrib/isn with bigint-passing mismatch ok Creating dump of global objects ok Creating dump of database schemas ok Checking for presence of required libraries ok Checking database user is the install user ok Checking for prepared transactions ok If pg_upgrade fails after this point, you must re-initdb the new cluster before continuing. Performing Upgrade ------------------ Analyzing all rows in the new cluster ok Freezing all rows in the new cluster ok Deleting files from new pg_xact ok Copying old pg_xact to new server ok Setting next transaction ID and epoch for new cluster ok Deleting files from new pg_multixact/offsets ok Copying old pg_multixact/offsets to new server ok Deleting files from new pg_multixact/members ok Copying old pg_multixact/members to new server ok Setting next multixact ID and offset for new cluster ok Resetting WAL archives ok Setting frozenxid and minmxid counters in new cluster ok Restoring global objects in the new cluster ok Restoring database schemas in the new cluster ok Copying user relation files ok Setting next OID for new cluster ok Sync data directory to disk ok Creating script to analyze new cluster ok Creating script to delete old cluster ok Upgrade Complete ---------------- Optimizer statistics are not transferred by pg_upgrade so, once you start the new server, consider running: ./analyze_new_cluster.sh Running this script will delete the old cluster's data files: ./delete_old_cluster.sh real 4m11.702s user 0m0.255s sys 0m13.385s |
What is worth mentioning here is that the upgrade process takes over four minutes because all the data had to be copied to the new directory. My old Mac is not very fast and copying takes a very long time.
To reduce downtime, we can clean out the directory, run initdb again and add the --link option:
|
1 2 3 4 5 6 7 8 9 10 11 12 13 14 15 16 17 18 19 20 21 22 23 24 25 |
iMac:~ hs$ time pg_upgrade -d /data/db12/ -D /data/db15 -b /path/pg12/bin/ -B /usr/local/Cellar/postgresql/15.1/bin/ --link Performing Consistency Checks ----------------------------- Checking cluster versions ok Checking database user is the install user ok ... Upgrade Complete ---------------- Optimizer statistics are not transferred by pg_upgrade so, once you start the new server, consider running: ./analyze_new_cluster.sh Running this script will delete the old cluster's data files: ./delete_old_cluster.sh real 0m3.538s user 0m0.198s sys 0m0.322s |
In this case, it took only 3.5 seconds to upgrade. We can start the database instance directly and keep working with the new instance.
pg_upgrade --link under the hoodThe --link option can reduce the downtime to close to zero. The question is what happens under the hood? Let's check out the data files:
|
1 2 3 4 5 6 7 8 9 10 11 12 13 14 |
-rw------- 2 hs wheel 1073741824 Nov 22 11:55 16388 -rw------- 2 hs wheel 1073741824 Nov 22 11:58 16388.1 -rw------- 2 hs wheel 66576384 Nov 22 12:01 16388.2 -rw------- 2 hs wheel 1073741824 Nov 22 12:12 16391 -rw------- 2 hs wheel 1073741824 Nov 22 12:13 16391.1 -rw------- 2 hs wheel 66576384 Nov 22 12:14 16391.2 -rw------- 2 hs wheel 1073741824 Nov 22 12:01 16394 -rw------- 2 hs wheel 49373184 Nov 22 12:01 16394.1 -rw------- 2 hs wheel 1073741824 Nov 22 12:03 16395 -rw------- 2 hs wheel 49373184 Nov 22 12:03 16395.1 -rw------- 2 hs wheel 1073741824 Nov 22 12:15 16396 -rw------- 2 hs wheel 49373184 Nov 22 12:15 16396.1 -rw------- 1 hs wheel 8192 Nov 24 10:03 174 -rw------- 1 hs wheel 8192 Nov 24 10:03 175 |
What you see here is that the relevant data files have two entries: “2” means that the same file (inode) shows up as two directories. pg_upgrade creates hard links, and this is exactly what we see here.
That's why it is super important to make sure that the mount point is /data and not /data/db12. Otherwise, hard links are not possible.
pg_upgrade is an important tool. However, there are more ways to upgrade: Logical replication is an alternative method. Check out our blog post about this exciting technology.
PostgreSQL offers a nice BLOB interface which is widely used. However, recently we came across problems faced by various customers, and it makes sense to reflect a bit and figure out how PostgreSQL handles BLOBs - and especially BLOB cleanup.
In PostgreSQL, you can use various means to store binary data. The simplest form is definitely to make use of the “bytea” (= byte array) data type. In this case a binary field is basically seen as part of a row.
Here is how it works:
|
1 2 3 4 5 6 7 8 9 |
test=# CREATE TABLE t_image (id int, name text, image bytea); CREATE TABLE test=# d t_image Table 'public.t_image' Column | Type | Collation | Nullable | Default -------+---------+-----------+----------+--------- id | integer | | | name | text | | | image | bytea | | | |
As you can see, this is a normal column and it can be used just like a normal column. The only thing worth mentioning is the encoding one has to use on the SQL level. PostgreSQL uses a variable to configure this behavior:
|
1 2 3 4 5 |
test=# SHOW bytea_output; bytea_output -------------- hex (1 row) |
The bytea_output variable accepts two values: “hex” tells PostgreSQL to send the data in hex format. “escape” means that data has to be fed in as an octal string. There is not much the application has to worry about here, apart from the maximum size of 1 GB per field.
However, PostgreSQL has a second interface to handle binary data: The BLOB interface. Let me show an example of this powerful tool in action:
|
1 2 3 4 5 |
test=# SELECT lo_import('/etc/hosts'); lo_import ----------- 80343 (1 row) |
In this case, the content of /etc/hosts has been imported into the database. Note that PostgreSQL has a copy of the data - it is not a link to the filesystem. What is noteworthy here is that the database will return the OID (object ID) of the new entry. To keep track of these OIDs, some developers do the following:
|
1 2 3 4 5 6 7 8 9 10 11 12 13 |
test=# CREATE TABLE t_file ( id int, name text, object_id oid ); CREATE TABLE test=# INSERT INTO t_file VALUES (1, 'some_name', lo_import('/etc/hosts')) RETURNING *; id | name | object_id ----+---------------+----------- 1 | some_name | 80350 (1 row) |
|
1 |
INSERT 0 1 |
This is absolutely fine, unless you do something like below:
|
1 2 |
test=# DELETE FROM t_file WHERE id = 1; DELETE 1 |
The problem is that the object id has been forgotten. However, the object is still there. pg_largeobject is the system table in charge of storing the binary data inside PostgreSQL. All lo_functions will simply talk to this system table in order to handle thesethings:
|
1 2 3 4 5 6 7 |
test=# x Expanded display is on. test=# SELECT * FROM pg_largeobject WHERE loid = 80350; -[ RECORD 1 ]------------------------------------------ loid | 80350 pageno | 0 data | ##\012# Host Database\012#\012# localhost ... |
Why is that a problem? The reason is simple: Your database will grow and the number of “dead objects” will accumulate.
Therefore the correct way to kill a BLOB entry is as follows:
|
1 2 3 4 5 6 7 8 9 10 11 12 13 |
test=# x Expanded display is off. test=# test=# SELECT lo_unlink(80350); lo_unlink ----------- 1 (1 row) test=# SELECT * FROM pg_largeobject WHERE loid = 80350; loid | pageno | data ------+--------+------ (0 rows) |
If you forget to unlink the object, you will suffer in the long run - and we have often seen that happen. It is a major issue if you are using the BLOB interface.
However, how can one fix the problem once you have accumulated thousands, or maybe millions, of dead BLOBs? The answer is a command line tool called “vacuumlo”.
Let us first create a dead entry:
|
1 2 3 4 5 |
test=# SELECT lo_import('/etc/hosts'); lo_import ----------- 80351 (1 row) |
Then we can run vacuumlo from any client:
|
1 2 3 4 |
iMac:~ hs$ vacuumlo -h localhost -v test Connected to database 'test' Checking object_id in public.t_file Successfully removed 2 large objects from database 'test'. |
As you can see, two dead objects have been killed by the tool. vacuumlo is the easiest way to clean out orphan objects.
However, there is more than just lo_import and lo_unlink. PostgreSQL offers a variety of functions to handle large objects in a nice way:
|
1 2 3 4 5 6 7 8 9 10 11 12 13 14 15 16 17 18 19 20 21 22 23 |
test=# df lo_* List of functions Schema | Name | Result data type | Argument data types | Type ------------+---------------+------------------+---------------------------+------ pg_catalog | lo_close | integer | integer | func pg_catalog | lo_creat | oid | integer | func pg_catalog | lo_create | oid | oid | func pg_catalog | lo_export | integer | oid, text | func pg_catalog | lo_from_bytea | oid | oid, bytea | func pg_catalog | lo_get | bytea | oid | func pg_catalog | lo_get | bytea | oid, bigint, integer | func pg_catalog | lo_import | oid | text | func pg_catalog | lo_import | oid | text, oid | func pg_catalog | lo_lseek | integer | integer, integer, integer | func pg_catalog | lo_lseek64 | bigint | integer, bigint, integer | func pg_catalog | lo_open | integer | oid, integer | func pg_catalog | lo_put | void | oid, bigint, bytea | func pg_catalog | lo_tell | integer | integer | func pg_catalog | lo_tell64 | bigint | integer | func pg_catalog | lo_truncate | integer | integer, integer | func pg_catalog | lo_truncate64 | integer | integer, bigint | func pg_catalog | lo_unlink | integer | oid | func (18 rows) |
There are two more functions which don’t follow the naming convention for historic reasons: loread and lowrite:
|
1 2 |
pg_catalog | loread | bytea | integer, integer | func pg_catalog | lowrite | integer | integer, bytea | func |
They are functions whose names cannot easily be changed anymore. However, it is worth noting that they exist.
The PostgreSQL BLOB interface is really useful and can be used for many things. The beauty is that it is fully transactional and therefore binary content and metadata cannot go out of sync anymore.
If you want to learn more about triggers to enforce constraints in PostgreSQL, we recommend you check out our blog post written by Laurenz Albe. It will shed some light on this important topic.
In order to receive regular updates on important changes in PostgreSQL, subscribe to our newsletter, or follow us on Facebook or LinkedIn.