This blog introduces you to PostgREST and helps you to get started with it quickly. What is PostgREST? First think about this: a modern database application usually doesn’t connect to the database directly and issue arbitrary SQL commands. In general, there is always some kind of abstraction layer in between. This layer could be Hibernate code or simply some kind of API.
Table of Contents
The trouble is: Writing APIs by hand is a lot of work, and pretty cumbersome. Usually the database has most of the information already (= fields, data types, etc.) However, if the API is written by hand, you basically duplicate what the database already knows. PostgREST is a totally different approach: it inspects the database system catalog and generates an API out of your database automatically. As long as you have sufficient permissions tables, views and functions will be represented as API endpoints. Basically, the amount of work needed to create a fully functional and bug-free API is close to zero.
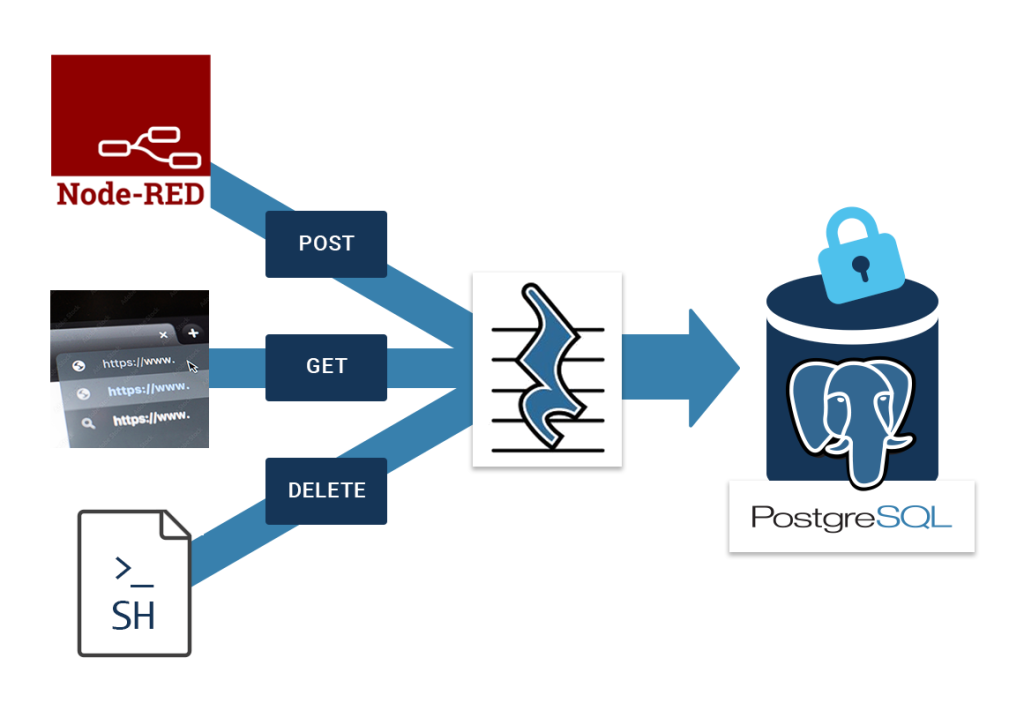
As you can see, PostgREST is between PostgreSQL and your client app. It is stateless and can therefore easily be scaled.
Installing PostgREST is relatively easy. For the sake of this post I have used Mac OS X to run the tool. However, it works on most platforms.
To install on Mac OS X we can simply use “brew install”. It is the easiest way to get you going in seconds:
|
1 2 3 4 5 6 7 8 9 10 11 12 13 14 15 16 17 18 19 20 21 22 23 24 25 26 27 28 29 30 31 32 33 34 35 36 37 38 39 40 41 42 43 44 45 46 47 48 49 50 51 52 53 54 |
HansJurgensMini:~ hs$ brew install postgrest Running `brew update --auto-update`... ==> Auto-updated Homebrew! Updated 3 taps (homebrew/core, homebrew/cask and homebrew/services). ==> New Formulae aws-sam-cli cdebug dstack ecoji flagd gokey grayskull ocm pari-nflistdata plz-cli prs ==> New Casks codux oka-unarchiver runcat-plugins-manager threads You have 19 outdated formulae installed. You can upgrade them with brew upgrade or list them with brew outdated. ==> Fetching dependencies for postgrest: krb5 and libpq ==> Fetching krb5 ==> Downloading https://ghcr.io/v2/homebrew/core/krb5/manifests/1.20.1 ######################################################################## 100.0% ==> Downloading https://ghcr.io/v2/homebrew/core/krb5/blobs/sha256:a6ef38ba592b8b2b541db10011c301006c25f94b1db 786b0a8f7c904755a3e1e ==> Downloading from https://pkg-containers.githubusercontent.com/ghcr1/blobs/sha256:a6ef38ba592b8b2b541db10011 c301006c25f94b1db786b0a8f7c904755a3e1e?se=2023-01-20T10%3A45%3A00Z&sig=cv9DPpuSCkWSj1Hy ######################################################################## 100.0% ==> Fetching libpq ==> Downloading https://ghcr.io/v2/homebrew/core/libpq/manifests/15.1 ######################################################################## 100.0% ==> Downloading https://ghcr.io/v2/homebrew/core/libpq/blobs/sha256:93be59131fe599125fbab83e21a0f954d866957a8fd 139f8e822b21d5300befe ==> Downloading from https://pkg-containers.githubusercontent.com/ghcr1/blobs/sha256:93be59131fe599125fbab83e21 a0f954d866957a8fd139f8e822b21d5300befe?se=2023-01-20T10%3A45%3A00Z&sig=cIfFjFdN7eYNwQGc ######################################################################## 100.0% ==> Fetching postgrest ==> Downloading https://ghcr.io/v2/homebrew/core/postgrest/manifests/10.1.1 ######################################################################## 100.0% ==> Downloading https://ghcr.io/v2/homebrew/core/postgrest/blobs/sha256:a6e3487057fd0995e25420d30f7350e98da5dda 1904b9876175fbe8d7540eb46 ==> Downloading from https://pkg-containers.githubusercontent.com/ghcr1/blobs/sha256:a6e3487057fd0995e25420d30f 7350e98da5dda1904b9876175fbe8d7540eb46?se=2023-01-20T10%3A45%3A00Z&sig=rLfDcmNgi6a%2Fcq ######################################################################## 100.0% ==> Installing dependencies for postgrest: krb5 and libpq ==> Installing postgrest dependency: krb5 ==> Pouring krb5--1.20.1.arm64_monterey.bottle.tar.gz ???? /opt/homebrew/Cellar/krb5/1.20.1: 162 files, 5.6MB ==> Installing postgrest dependency: libpq ==> Pouring libpq--15.1.arm64_monterey.bottle.tar.gz ???? /opt/homebrew/Cellar/libpq/15.1: 2,367 files, 28.4MB ==> Installing postgrest ==> Pouring postgrest--10.1.1.arm64_monterey.bottle.tar.gz ???? /opt/homebrew/Cellar/postgrest/10.1.1: 6 files, 104.1MB ==> Running `brew cleanup postgrest`... Disable this behaviour by setting HOMEBREW_NO_INSTALL_CLEANUP. Hide these hints with HOMEBREW_NO_ENV_HINTS (see `man brew`). |
On Linux the process is pretty simple too. All that you need to do is to download the package and untar the file, as shown in the next listing:
|
1 2 |
# For UNIX platforms tar Jxf postgrest-[version]-[platform].tar.xz |
Once this is done we can run the “--help” command to see which options are available:
|
1 2 3 4 5 6 7 8 9 10 11 |
HansJurgensMini:~ hs$ postgrest --help Usage: postgrest [-e|--example] [--dump-config | --dump-schema] [FILENAME] PostgREST 10.1.1 / create a REST API to an existing Postgres database Available options: -h,--help Show this help text -e,--example Show an example configuration file --dump-config Dump loaded configuration and exit --dump-schema Dump loaded schema as JSON and exit (for debugging, output structure is unstable) FILENAME Path to configuration file |
As you can see, all we have to do is to feed a config file to the tool and that’s it. It's really that simple and straightforward.
Firing up PostgREST is easy, but let's create some demo data first -- to ensure that there is actually data which can be exposed to PostgREST later on. To demonstrate the tool, all we need is a table containing a handful of records:
|
1 2 3 4 5 6 7 8 9 10 |
demo=# CREATE TABLE t_demo (id int, name text); CREATE TABLE demo=# INSERT INTO t_demo VALUES (1, 'hans'), (2, 'paul'); INSERT 0 2 demo=# SELECT * FROM t_demo; id | name ----+------ 1 | hans 2 | paul (2 rows) |
Once this is done, the next step is to come up with a config file. Below you can see that it's really short and rarely contains more than a connect string and some basic user information:
|
1 2 3 4 5 6 7 8 9 10 11 12 13 14 15 16 17 18 |
HansJurgensMini:~ hs$ cat tmp/postgrest.conf # postgrest.conf # The standard connection URI format, documented at # https://www.postgresql.org/docs/current/libpq-connect.html#LIBPQ-CONNSTRING db-uri = 'postgres://hs:mypass@localhost:5432/demo' # The database role to use when no client authentication is provided. # Should differ from authenticator db-anon-role = 'hs' # The secret to verify the JWT for authenticated requests with. # Needs to be 32 characters minimum. jwt-secret = 'reallyreallyreallyreallyreallyreallyreallysafe' # jwt-secret-is-base64 = False # Port the postgrest process is listening on for http requests server-port = 80 |
The critical part is that the password has to be sufficiently long. The rest is straightforward.
Let 's start the tool:
|
1 2 3 4 5 6 7 |
HansJurgensMini:~ hs$ postgrest ./tmp/postgrest.conf 20/Jan/2023:11:49:03 +0100: Attempting to connect to the database... 20/Jan/2023:11:49:03 +0100: Connection successful 20/Jan/2023:11:49:03 +0100: Listening on port 80 20/Jan/2023:11:49:03 +0100: Config reloaded 20/Jan/2023:11:49:03 +0100: Listening for notifications on the pgrst channel 20/Jan/2023:11:49:03 +0100: Schema cache loaded |
We can use a command line tool to access the API or do the same using any library provided by the programming language of your choice:
|
1 2 3 4 5 6 7 8 9 10 11 12 13 14 15 16 17 18 19 20 21 22 23 24 25 26 27 28 29 30 31 32 |
HansJurgensMini:hs$ curl localhost:80 | jq { 'swagger': '2.0', 'info': { 'description': 'standard public schema', 'title': 'PostgREST API', 'version': '10.1.1' }, 'host': '0.0.0.0:80', 'basePath': '/', 'schemes': [ 'http' ], 'consumes': [ 'application/json', 'application/vnd.pgrst.object+json', 'text/csv' ], 'produces': [ 'application/json', 'application/vnd.pgrst.object+json', 'text/csv' ], … }, 'externalDocs': { 'description': 'PostgREST Documentation', 'url': 'https://postgrest.org/en/v10.1/api.html' } } |
The first thing you can see here is that PostgREST already exposes a lot of information when calling the web service. You will receive a lengthy JSON document containing end points, the version and a lot more.
Now that you've successfully started the tooling, you can try to access the table in your demo database. As you can see, an API endpoint is readily available. Again, use a command line call to fetch the JSON document which is then transformed into a nicer-looking representation using “jq” (which is a super-useful command line tool to display JSON documents):
|
1 2 3 4 5 6 7 8 9 10 11 |
HansJurgensMini:hs$ curl localhost:80/t_demo | jq [ { 'id': 1, 'name': 'hans' }, { 'id': 2, 'name': 'paul' } ] |
In this case, you've fetched the data without filters. However, you can easily use a filter and only fetch rows “greater or equal than” (gte) 2:
|
1 2 3 4 5 6 7 |
HansJurgensMini:hs$ curl localhost:80/t_demo?id=gte.2 | jq [ { 'id': 2, 'name': 'paul' } ] |
The filter will reduce the result set to what you really want to see. PostgREST provides you with various operators to filter and order data, as described by the official PostgREST documentation.
PostgREST will cache the information taken from the PostgreSQL system catalog, as I stated earlier. This is done for performance reasons because inspecting the PostgreSQL catalog for every single API call is way too slow. Therefore the cache has to be refreshed in case the underlying data structure in your database has changed:
|
1 |
HansJurgensMini:~ hs$ killall -SIGUSR1 postgrest |
A simple signal is enough to make PostgREST refresh the caches. Some log lines will tell you that the cache has indeed been refreshed:
|
1 2 3 4 |
20/Jan/2023:12:54:01 +0100: Attempting to connect to the database... 20/Jan/2023:12:54:01 +0100: Connection successful 20/Jan/2023:12:54:01 +0100: Config reloaded 20/Jan/2023:12:54:01 +0100: Schema cache loaded |
PostgREST provides a rich set of features. This is true on the API as well as on the security side. In general, PostgREST will try to mimic the permission set found in the database and expose it to the outer world consistently. The API will therefore have the same security policies as your data structure. There is no need to change things manually.
On top of accessing tables you can also access views, stored procedures and a lot more. Endpoints will be provided automatically.
You can use a rich set of client libraries to access the API via HTTP or HTTPS. There are hardly any known limitations.
If you want to dive deeper into PostgreSQL and you're interested in architecture, check out Pavlo Golub's latest post on using Mermaid and SQL to create ER (Entity Relationship) diagrams.
Leave a Reply