PostgreSQL is a secure database and we want to keep it that way. It makes sense, then, to consider SSL to encrypt the connection between client and server. This posting will help you to set up SSL authentication for PostgreSQL properly, and hopefully also to understand some background information to make your database more secure.
Table of Contents
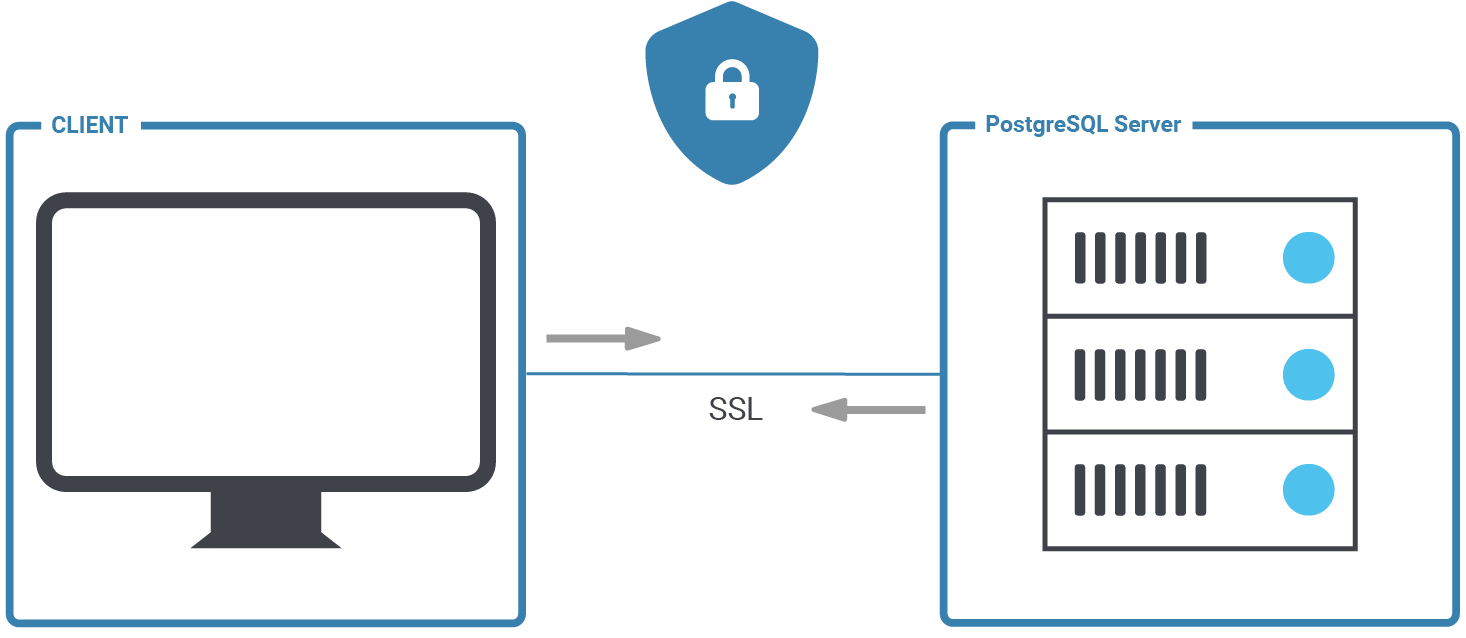
At the end of this post, you should be able to configure PostgreSQL and handle secure client server connections in the easiest way possible.
The first thing we have to do to set up OpenSSL is to change postgresql.conf. There are a couple of parameters which are related to encryption:
|
1 2 3 4 5 6 7 8 9 10 11 12 13 |
ssl = on #ssl_ca_file = '' #ssl_cert_file = 'server.crt' #ssl_crl_file = '' #ssl_key_file = 'server.key' #ssl_ciphers = 'HIGH:MEDIUM:+3DES:!aNULL' # allowed SSL ciphers #ssl_prefer_server_ciphers = on #ssl_ecdh_curve = 'prime256v1' #ssl_min_protocol_version = 'TLSv1.2' #ssl_max_protocol_version = '' #ssl_dh_params_file = '' #ssl_passphrase_command = '' #ssl_passphrase_command_supports_reload = off |
Once ssl = on, the server will negotiate SSL connections in case they are possible. The remaining parameters define the location of key files and the strength of the ciphers. Please note that turning SSL on does not require a database restart. The variable can be set with a plain reload. However, you will still need a restart, otherwise PostgreSQL will not accept SSL connections. This is an important point which frequently causes problems for users:
|
1 2 3 4 5 6 7 8 9 10 11 |
postgres=# SELECT pg_reload_conf(); pg_reload_conf ---------------- t (1 row) postgres=# SHOW ssl; ssl ----- on (1 row) |
The SHOW command is an easy way to make sure that the setting has indeed been changed. Technically, pg_reload_conf() is not needed at this stage. It is necessary to restart later anyway. We just reloaded to show the effect on the variable.
In the next step, we have to adjust pg_hba.conf to ensure that PostgreSQL will handle our connections in a secure way:
|
1 2 3 4 5 6 7 |
# TYPE DATABASE USER ADDRESS METHOD # 'local' is for Unix domain socket connections only local all all peer host all all 127.0.0.1/32 scram-sha-256 host all all ::1/128 scram-sha-256 hostssl all all 10.0.3.0/24 scram-sha-256 |
Then restart the database instance to make sure SSL is enabled.
In order to keep things simple, we will simply create self-signed certificates here. However, it is of course also possible with other certificates are. Here is how it works:
|
1 2 3 4 5 6 7 8 9 |
[postgres@node1 data]$ openssl req -new -x509 -days 365 -nodes -text -out server.crt -keyout server.key -subj '/CN=cybertec-postgresql.com' Generating a RSA private key .......+++++ ....................................................+++++ writing new private key to 'server.key' ----- |
This certificate will be valid for 365 days.
Next we have to set permissions to ensure the certificate can be used. If those permissions are too relaxed, the server will not accept the certificate:
|
1 |
[postgres@node1 data]$ chmod og-rwx server.key |
Self-signed certificates are nice. However, to create a server certificate whose identity and origin can be validated by clients, first create a certificate signing request and a public/private key file:
|
1 2 3 4 5 6 7 8 9 |
[postgres@node1 data]$ openssl req -new -nodes -text -out root.csr -keyout root.key -subj '/CN=cybertec-postgresql.com' Generating a RSA private key .................................+++++ ....................+++++ writing new private key to 'root.key' ----- |
Again, we have to make sure that those permissions are exactly the way they should be:
|
1 |
[postgres@node1 data]$ chmod og-rwx root.key |
To do that with OpenSSL, we first have to find out where openssl.cnf can be found. We have seen that it is not always in the same place - so make sure you are using the right path:
|
1 2 3 |
[postgres@node1 data]$ find / -name openssl.cnf 2> /dev/null /etc/pki/tls/openssl.cnf |
We use this path when we sign the request:
|
1 2 3 4 5 6 7 8 9 |
[postgres@node1 data]$ openssl x509 -req -in root.csr -text -days 3650 -extfile /etc/pki/tls/openssl.cnf -extensions v3_ca -signkey root.key -out root.crt Signature ok subject=CN = cybertec-postgresql.com Getting Private key |
Let’s create the certificate with the new root authority:
|
1 2 3 4 5 6 7 8 9 10 11 12 13 14 15 16 |
[postgres@node1 data]$ openssl req -new -nodes -text -out server.csr -keyout server.key -subj '/CN=cybertec-postgresql.com' Generating a RSA private key .....................+++++ ...........................+++++ writing new private key to 'server.key' [postgres@node1 data]$ chmod og-rwx server.key [postgres@node1 data]$ openssl x509 -req -in server.csr -text -days 365 -CA root.crt -CAkey root.key -CAcreateserial -out server.crt Signature ok subject=CN = cybertec-postgresql.com Getting CA Private Key |
server.crt and server.key should be stored on the server in your data directory as configured on postgresql.conf.
But there's more: root.crt should be stored on the client, so the client can verify that the server's certificate was signed by the certification authority. root.key should be stored offline for use in creating future certificates.
The following files are needed:
| File name | Purpose of the file | Remarks |
| ssl_cert_file ($PGDATA/server.crt) | server certificate | sent to client to indicate server's identity |
| ssl_key_file ($PGDATA/server.key) | server private key | proves server certificate was sent by the owner; does not indicate certificate owner is trustworthy |
| ssl_ca_file | trusted certificate authorities | checks that client certificate is signed by a trusted certificate authority |
| ssl_crl_file | certificates revoked by certificate authorities | client certificate must not be on this list |
Now that all the certificates are in place it is time to restart the servers:
|
1 |
[root@node1 ~]# systemctl restart postgresql-13 |
Without a restart, the connection would fail with an error message (“psql: error: FATAL: no pg_hba.conf entry for host "10.0.3.200", user "postgres", database "test", SSL off”).
However, after the restart, the process should work as expected:
|
1 2 3 4 5 6 7 8 |
[root@node1 ~]# su - postgres [postgres@node1 ~]$ psql test -h 10.0.3.200 Password for user postgres: psql (13.2) SSL connection (protocol: TLSv1.3, cipher: TLS_AES_256_GCM_SHA384, bits: 256, compression: off) Type 'help' for help. test=# |
psql indicates that the connection is encrypted. To figure out if the connection is indeed encrypted, we need to check the content of pg_stat_ssl:
|
1 2 3 4 5 6 7 8 9 10 11 12 13 14 |
postgres=# d pg_stat_ssl View 'pg_catalog.pg_stat_ssl' Column | Type | Collation | Nullable | Default ----------------+---------+-----------+----------+--------- pid | integer | | | ssl | boolean | | | version | text | | | cipher | text | | | bits | integer | | | compression | boolean | | | client_dn | text | | | client_serial | numeric | | | issuer_dn | text | | | |
Let us query the system view and see what it contains:
|
1 2 3 4 5 6 7 8 9 10 11 12 13 |
test=# x Expanded display is on. test=# SELECT * FROM pg_stat_ssl; -[ RECORD 1 ]-+----------------------- pid | 16378 ssl | t version | TLSv1.3 cipher | TLS_AES_256_GCM_SHA384 bits | 256 compression | f client_dn | client_serial | issuer_dn | |
The connection has been successfully encrypted. If “ssl = true”, then we have succeeded.
Two SSL setups are not necessarily identical. There are various levels which allow you to control the desired level of security and protection. The following table outlines those SSL modes as supported by PostgreSQL:
sslmode | Eavesdropping protection | MITM (= man in the middle) protection | Statement |
| disable | No | No | No SSL, no encryption and thus no overhead. |
| allow | Maybe | No | The client attempts an unencrypted connection, but uses an encrypted connection if the server insists. |
| prefer | Maybe | No | The reverse of the “allow” mode: the client attempts an encrypted connection, but uses an unencrypted connection if the server insists. |
| require | Yes | No | Data should be encrypted and the overhead of doing so is accepted. The network is trusted and will send me to the desired server. |
| verify-ca | Yes | Depends on CA policy | Data must be encrypted. Systems must be doubly sure that the connection to the right server is established. |
| verify-full | Yes | Yes | Strongest protection possible. Full encryption and full validation of the desired target server. |
The overhead really depends on the mode you are using. First let’s take a look at the general mechanism:

The main question now is: How does one specify the mode to be used? The answer is: It has to be hidden as part of the connect string as shown in the next example:
|
1 2 3 |
[postgres@node1 data]$ psql 'dbname=test host=10.0.3.200 user=postgres password=1234 sslmode=verify-ca' psql: error: root certificate file '/var/lib/pgsql/.postgresql/root.crt' does not exist Either provide the file or change sslmode to disable server certificate verification. |
In this case, verify-ca does not work because to do that the root.* files have to be copied to the client, and the certificates have to be ones which allow for proper validation of the target server.
So far, you have learned how to encrypt the connection between client and server. However, sometimes it is necessary to encrypt the entire server, including storage. PostgreSQL TDE does exactly that:
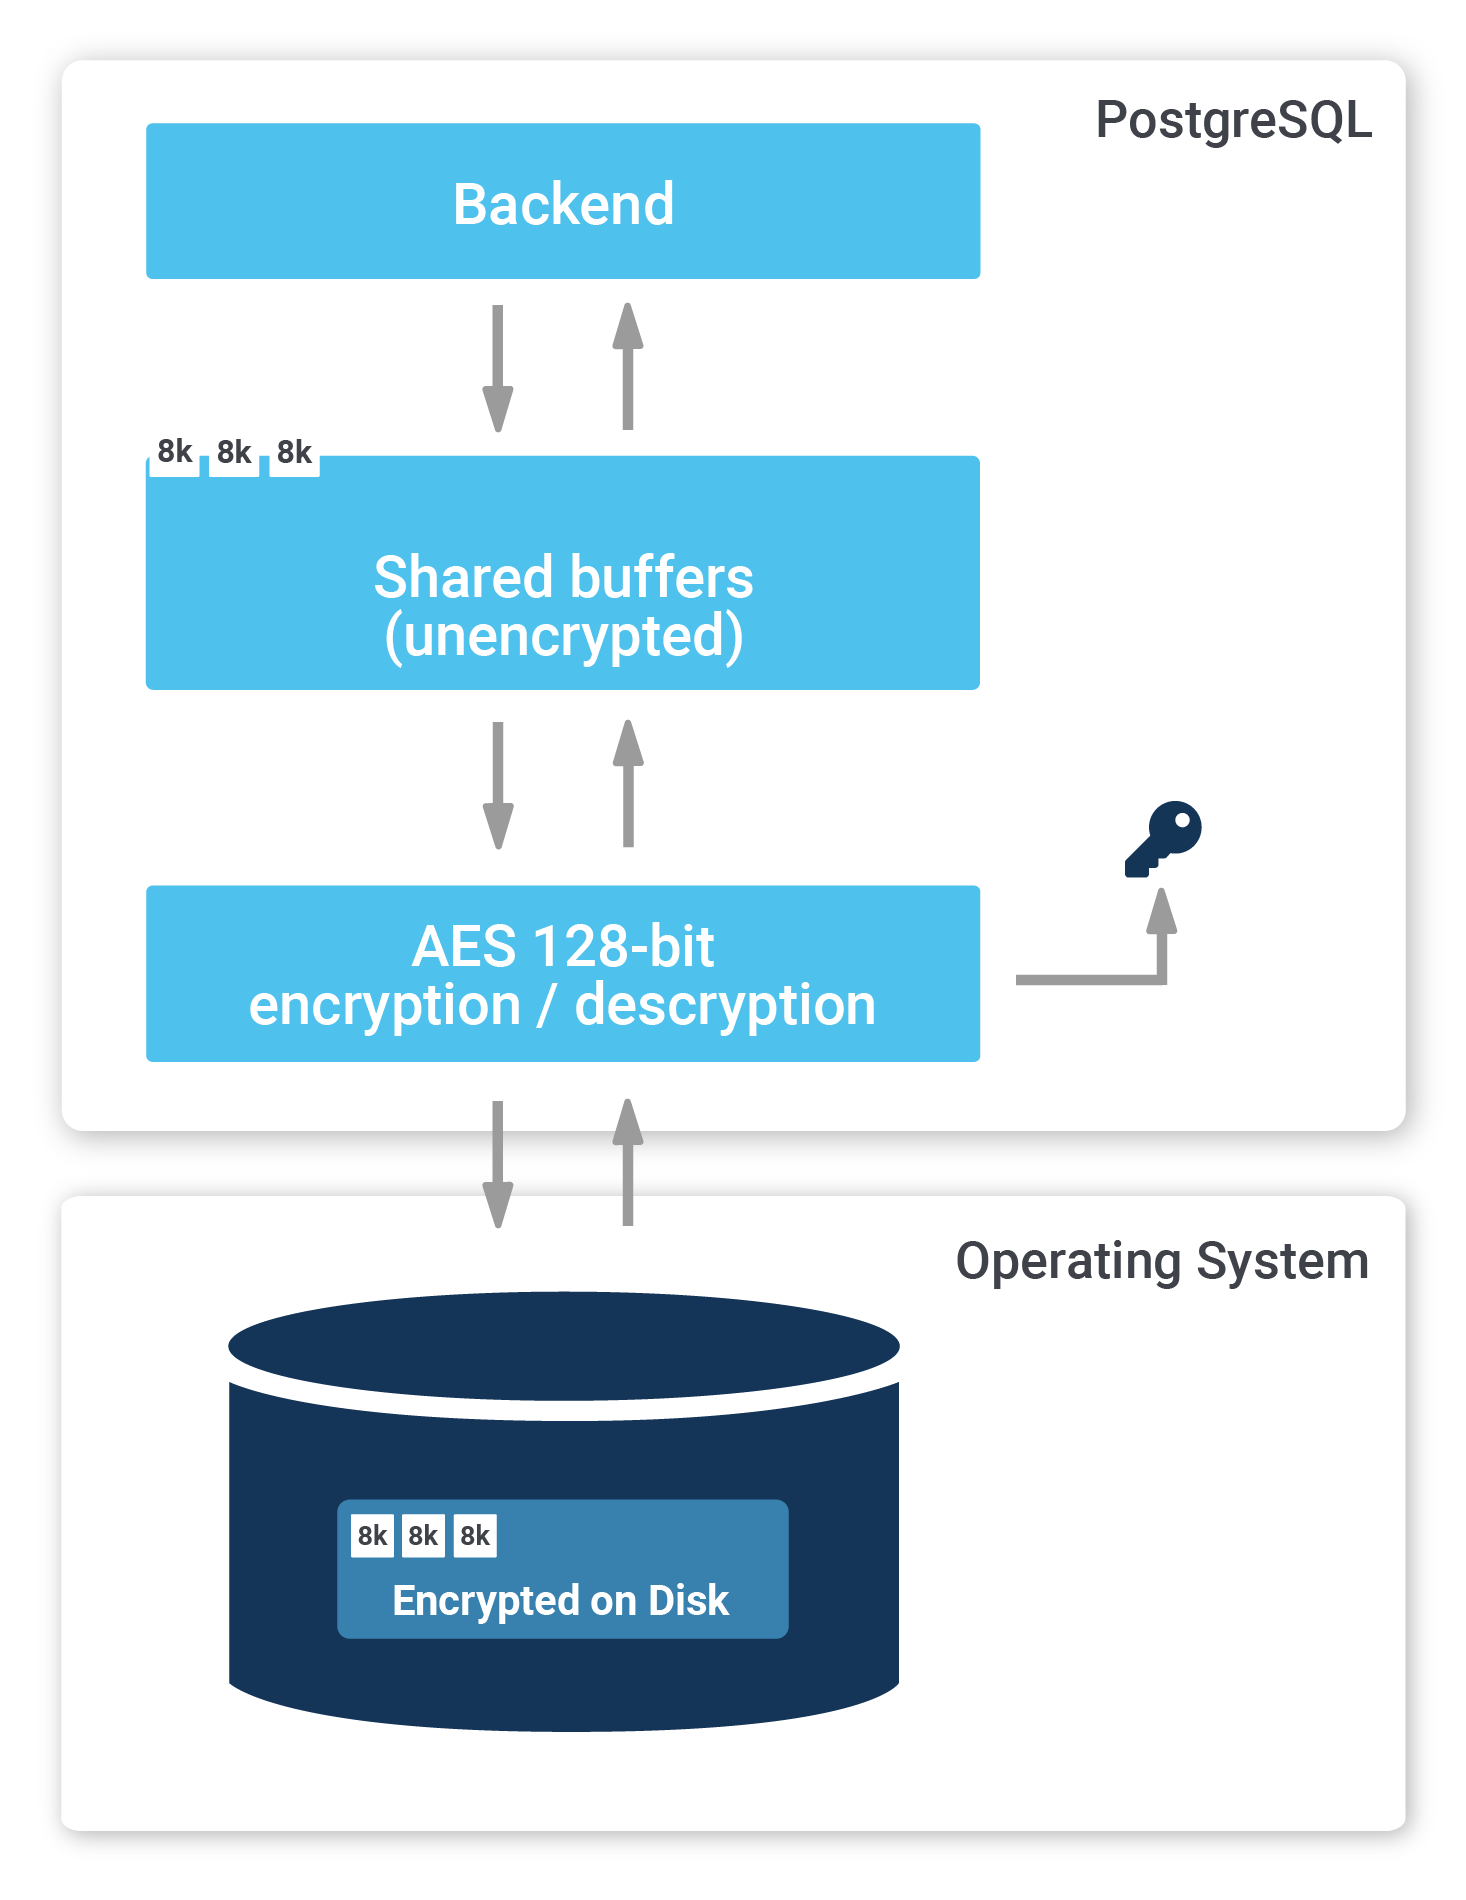
To find out more, check out our website about PostgreSQL TDE. We offer a fully encrypted stack to help you achieve maximum security. PostgreSQL TDE is available for free (Open Source).
More recent information about encryption keys: Manage Encryption Keys with PostgreSQL TDE
Materialized views are an important feature in most databases, including PostgreSQL. They can help to speed up large calculations, or at least to cache them.
If you want to make sure that your materialized views are up-to-date, and if you want to read more about PostgreSQL right now, check out our blog about pg_timetable, which shows you how to schedule jobs in PostgreSQL. Why is pg_timetable so useful? Our scheduler makes sure that identical jobs cannot overlap, but simply don’t execute again in case the same job is already running. In the case of long jobs, using a scheduler is super important - especially if you want to use materialized views.
Thank you very much for sharing this sir. I have been trawling the web with no success trying to find this information. Whats worse, information on how to perform SSL authentication on official POSTGRESQL website is sparse and very poor
This has helped me quite a lot. However I am not sure what 'root' refers to. If I have multiple clients (developers and applications). Can I use the same root.crt for all of them, or do I need to use different certificates for each of them (e.g. username.crt, developer.crt, or application.crt)?
Additionally how do I use the root.crt in a db-uri connection string? Thanks a lot!
Hey Michael,
first, you need to decide what you want to accomplish:
1) do you want TLS only?
2) do you want 1) and your clients to verify the authenticity of the server?
3) do you want 2) and your server to verify the authenticity of the clients?
In the first case, it would suffice to provide the server with a certificate and key, and tell the clients to use sslmode=require. That way the traffic will be encrypted.
In the second case, you'd need to give the clients the certificate, so that they can verify the authenticity of the server. If you have a certificate from a third party, e.g. LetsEncrypt, you'll need to make sure that the clients can verify the whole chains, from the root certificate of LetsEncrypt to your server's certificate.
In the third case, you should have different certificates and keys, ideally one for each client, so that no client can impersonate the server or other clients. If you give somebody/something else the private key for your server, you'll throw any authenticity guarantees for your server out of the window.
To clarify the terms a little better:
The "root" refers to a certificate (and key) that is used either on its own or that was used to sign off any "child" certificates. In that case, the root is usually called CA (certificate authority). If you want to verify any child certificates you'll need to check the CA certificate as well.
A common place where the root certificate is used on its own is in SSH key authentication. For (web)servers and clients it is rather uncommon to have them use the root certificate. Usually you'll buy or generate a child certificate (and key) that can be given to your servers or clients, while the root key is kept secret. This allows you to exchange the certificates and keys of servers or clients, without needing to give the parties on the other end a new certificate to verify against. They can continue verifying against the CA certificate.
Hope this clears some things up!
Julian
You might also find this useful:
https://www.cybertec-postgresql.com/tls-demystifying-communication-encryption-in-postgresql/
1. is it also possible to access a postgres-server that has ssl=on set up from a client without ssl?
2. @julianmarkwort:disqus in regards to 1)
sslmode=requireis set in postgres.conf of the client? I never came accros such a setting. that's why I am askingsslmode=require also throws an error at starting postgres. Wo can you elaborate on that?
Hey,
ssl=onis a configurable for the server, it just enables the server to _additionally_ serve SSL encrypted connections, but you can still use normal connections.Any restrictions in being able to use only SSL are tied to whatever is written in the
pg_hba.conf🙂 .sslmode=requireis an option that you can pass in the connection string when initiating a connection using a libpq based client (e.g. `psql -d 'dbname=mydb host=myhost sslmode=require' ), see: https://www.postgresql.org/docs/current/libpq-connect.html#LIBPQ-PARAMKEYWORDS