This article has been updated to reflect recent changes and improvements to the CYBERTEC Migrator.
Table of Contents
We at CYBERTEC are proud to release the CYBERTEC Migrator Trial Edition, one of the fastest tools to migrate a database to PostgreSQL.
What? Another tool to migrate databases to PostgreSQL? We already have free tools to migrate Oracle databases to PostgreSQL and they are even open source. So why should I care?
If you are feeling curious and don’t care about the why, skip the next section and jump to the interesting part of this blog post. There, we walk you through the migration of Oracle's HR schema using the CYBERTEC Migrator Trial Edition, covering challenges you may face, possible solutions, and how the CYBERTEC Migrator reduces both your effort and the risks of botched migrations.

So you haven’t skipped this section and are curious. Why did we develop the CYBERTEC Migrator?
The simplest answer would be to have an additional option on how to migrate a database to PostgreSQL. Of course, we all agree on one truth: “A world with one Oracle database less and one PostgreSQL database more is a better world”.
As you may know, we at CYBERTEC use open source tools and even contribute to the open source community. One of our most used software products - the Foreign Data Wrapper for Oracle - is used in many open source projects.
So why develop the Migrator?
At the beginning, there was speed! Or, more accurately, the lack of speed. "Necessity is the mother of invention."
Here at CYBERTEC, we often see customers with extreme requirements. We assume that’s likely the reason they come to us, because people out there tell them “If someone knows how to do this with PostgreSQL, and is crazy enough to try it out, it's CYBERTEC!”. We are their last hope to solve their problems.
Long story short - some of our customers have databases in the terabyte regions. And they ask for ways to reduce the service downtime imposed by a database migration.
Previously, we didn’t have the resources necessary to implement an asynchronous data replication pipeline. (Such a pipeline captures data changes in the source database during the migration, and synchronizes those changes to PostgreSQL after the migration finishes).
This left us with the option of reducing migration time by improving the speed of the data transfer. The solution to this problem was ora_migrator, a plugin based on our Foreign Data Wrapper for Oracle. However, this solution had some disadvantages:
Looking back at what features we implemented, the why and the how, we noticed another motivation for the existence of our Migrator: convenience.
We do not like to do repetitive, boring tasks. We want to concentrate on the challenges rather than the kinds of mundane tasks we had to do when we used the existing tooling.
And since we are faced with migrating databases to PostgreSQL on a daily basis, we want to have tools that get the boring stuff out of the way. We want to be productive where it matters, so we need tools that provide a working solution.
Don’t get me wrong, using vim (or as some may call it: the only true editor) makes me productive. However, switching between different terminals, exporting code to the file system, checking log files on another machine, and … “what state was the migration in before I left for coffee?” all wrapped up in a plethora of shell and SQL scripts, which at the end may fail because the production system differs from the test system, is not productive.
The raison d'etre of the CYBERTEC Migrator is ensuring that customers do not have to know how to map Oracle data types to PostgreSQL, or all the details explained in the technical guide on how to migrate from Oracle to PostgreSQL.
If you want a tool that frees the cognitive capacity of your brain from the boring things, so you can use it on porting the database over to PostgreSQL, that’s what the CYBERTEC Migrator is - The easiest way to migrate to PostgreSQL - in a professional way.
And by the way - it is also the fastest way to PostgreSQL!
The CYBERTEC Migrator Professional and Enterprise Edition are meant for customers with stringent database SLAs and high availability. More details about the differences between the editions can be found on the CYBERTEC Migrator web page.
First, you'll see how to install the CYBERTEC Migrator Trial Edition. Then, we'll walk you through the migration of Oracle’s HR demo database to PostgreSQL.
The CYBERTEC Migrator is a so-called web application, which means that its main functionality, the Migrator core, runs on a server. The user configures and controls the database migration via a graphical user interface that runs in your web browser.
As we mentioned above, one of the hassles we had with existing tools was a complicated installation process. The CYBERTEC Migrator is deployed as a set of container images. CYBERTEC provides a public Github repository (cybertec_migrator) which facilitates the installation process. We use Docker Compose to configure and orchestrate the containers. The images for the Migrator Professional and Enterprise Edition are pulled from our private Docker Hub container registry.
As a side note - we also have customers who run the Migrator on Kubernetes in their private cloud, mainly on OpenShift.
For an installation on an air gapped system, we provide an archive file that contains the git repository mentioned above, including the container images. The CYBERTEC Migrator Trial Edition is available as an archive file. Visit this CYBERTEC Migrator link to get it.
Desktop systems like Docker Desktop for Mac and Windows include Docker Engine and Docker Compose as part of those desktop installs. If you use an MS Windows desktop system, install Docker for Desktop with the WSL 2 backend.
Git comes installed with most of the Windows Subsystem for Linux distributions. Should this not be the case for you, open a shell in Ubuntu/Debian and enter the command:
|
1 |
$ sudo apt-get install git |
Assuming all preconditions are met, follow the instructions provided in the offline installation section:
|
1 2 3 4 5 6 7 8 9 10 11 12 13 14 15 16 17 18 19 |
➜ tar xf cybertec_migrator-trial-v3.20.0.tar.gz ➜ cd cybertec_migrator ➜ ./migrator install [INFO] You are about to be asked to enter some information relevant to the installation. [INFO] The allowed values are in normal brackets, the default value in square brackets. Migrator Edition (trial, professional, enterprise) [trial]: Container runtime (docker, podman) [docker]: [INFO] Generating environment file [INFO] Loading container images [INFO] Generating self-signed TLS/SSL certificate [OK] Install finished. To start the CYBERTEC Migrator, run ./migrator up ➜ ./migrator up Recreating cybertec_migrator_core_db_1 ... done Recreating cybertec_migrator_core_1 ... done Recreating cybertec_migrator_web_gui_1 ... done [OK] Started on 'https://orcus' |
Note: the Migrator version and the hashes may differ from the file you downloaded.
orcus is the name of the host, it will differ from the one you installed. Open the web browser of your choice and visit the URL shown in the terminal, in this case https://orcus. If you can’t reach the Migrator on the URL provided due to name resolution problems in your Docker setup, try https://localhost - this should work.
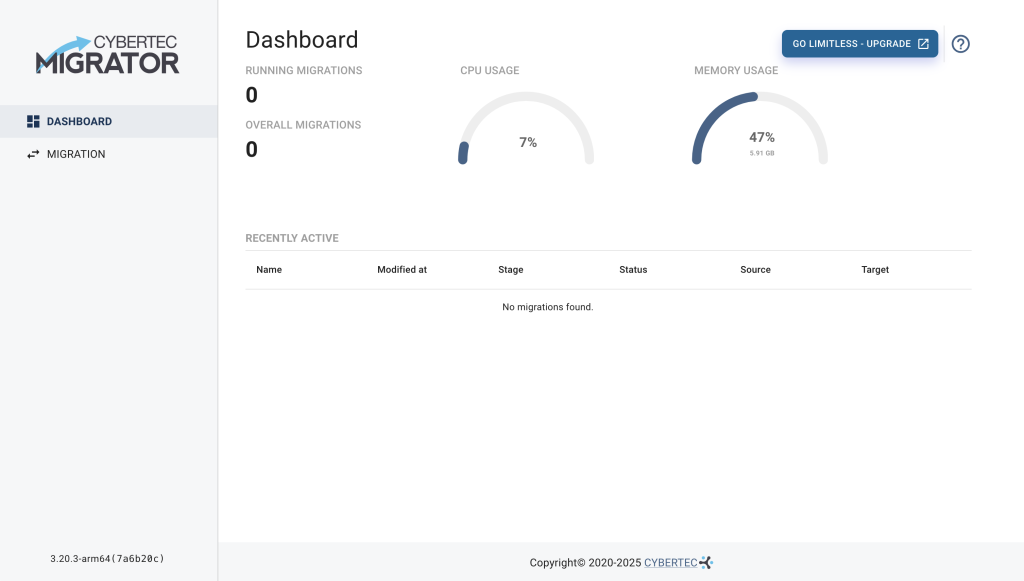
If all went well, you should see the Migrator Dashboard, which provides the status of CPU's and RAM of the host where the Migrator is running. The dashboard also displays the most recently changed migrations. Since we haven’t created one yet, the page is empty.
In case the Migrator failed to start due to the error Bind for 0.0.0.0:443 failed: port is already allocated, you have to change the default port configuration since the default port 443 is already in use. Change the value of the environment variable EXTERNAL_HTTPS_PORT in the .env file located in the directory to an unused port.
Migrator installed and running - check.
For the demo, we need an Oracle database containing the HR sample schema and a PostgreSQL database. In case you have access to both, you are set up for the demo and you can skip to the next section, Database Users and Privileges.
If you don't have access to both databases servers, we provide a git repository containing a helper script demo-env, which facilitates the setup of the demo environment. Clone the git repository of the demo database environment:
|
1 |
$ git clone https://github.com/cybertec-postgresql/cybertec_migrator_demo demo |
The following command will start a PostgreSQL server demo_db, providing a demo database owned by the demo user, having the password demo. Easy to remember, right?
|
1 2 |
$ ./demo/demo-env up demo_db Creating demo_demo_db_1 ... done |
In case you get an error due to the port already being in use, change the environment variable EXTERNAL_DEMO_POSTGRES_PORT in the demo/.env file.
All we are missing now is the Oracle source database with the HR schema. The following command is going to pull Oracle’s Express Edition provided by Oracle's Container Registry. Be aware that you need around 3 GB for the Oracle container. And yes, Oracle is bigger and slower than an elephant.
|
1 2 3 4 5 6 7 8 9 10 11 12 13 14 15 16 17 18 19 20 21 22 23 24 25 26 27 |
$ ./demo/demo-env up oracle [+] Running 23/23 ✔ oracle Pulled ✔ 67273d20686c Pull complete ✔ fb5a2405efd1 Pull complete ✔ 7ce287ddcf02 Pull complete ✔ 769e9048b21f Pull complete ✔ 18c61db4fa1a Pull complete ✔ 3c19df83dc53 Pull complete ✔ 60b151ee286c Pull complete ✔ 2848595a8195 Pull complete ✔ 7cddbcf7b07f Pull complete ✔ a723d4eb80ab Pull complete ✔ 4be01f5508ce Pull complete ✔ 2b69d3f60317 Pull complete ✔ c321a0e5c325 Pull complete ✔ 376386880722 Pull complete ✔ 11a1c1f55c59 Pull complete ✔ 09677a4c8b1d Pull complete ✔ 8324f2f6589b Pull complete ✔ da1698473041 Pull complete ✔ 954a67596b3b Pull complete ✔ 836b5e4a0439 Pull complete ✔ 1ed5527365e9 Pull complete ✔ 9339d36e49cd Pull complete [+] Running 2/2 ✔ Container demo-oracle-1 ... done |
We have to wait until Oracle is up and running, showing the status as healthy.
Once again, in case the Oracle default port 1521 is already occupied, the command above will fail. You know the drill, simply adjust the environment variable EXTERNAL_DEMO_ORACLE_PORT in the directory demo/.env.
|
1 |
$ docker ps --format '{{ .Names }}\t{{ .Status }}\t{{ .Ports }}'<br />demo-demo_db-1 Up 2 seconds 0.0.0.0:5432->5432/tcp, [::]:5432->5432/tcp<br />demo-oracle-1 Up 4 minutes (healthy) 0.0.0.0:1521->1521/tcp, [::]:1521->1521/tcp<br />cybertec_migrator-web_gui-1 Up About an hour 8080/tcp, 0.0.0.0:443->8443/tcp, [::]:443->8443/tcp<br />cybertec_migrator-core-1 Up About an hour<br />cybertec_migrator-core_db-1 Up About an hour (healthy) 5432/tcp |
The output shows the mapped ports for the various services:
demo_db on port 5432 providing the database demofreepdb1Both database services started by the demo environment do not use volume containers. In case you're not familiar with containers, it means that the data is not persisted. On restarting the demo environment, you end up with an empty PostgreSQL demo database.
After you finish the demo, you can shut down the demo environment with
|
1 |
$ ./demo/demo-env down |
The Oracle database user we are going to employ needs read-only privileges. No changes to the source database are necessary when migrating the database:
SELECT_CATALOG_ROLE grants users SELECT privileges on data dictionary views.SELECT ANY TABLE privileges users to access views and tables in other schemas.FLASHBACK ANY TABLE enables users to issue an Oracle Flashback Query. This guarantees that we migrate a consistent snapshot at a specific point in time (SCN).The demo environment from the previous chapter provides a user "migrator" with the above privileges.
|
1 2 3 |
-- On the Oracle database CREATE USER migrator IDENTIFIED by migrator; GRANT CONNECT, SELECT_CATALOG_ROLE, SELECT ANY TABLE, FLASHBACK ANY TABLE TO migrator; |
For the target database, the CYBERTEC Migrator expects to have a PostgreSQL database and a user with CREATE privilege on the database. The demo user provided with the database demo environment was created with the following statements:
|
1 2 3 4 |
-- As PostgreSQL super user CREATE DATABASE demo; CREATE USER demo WITH PASSWORD 'demo'; GRANT CREATE ON DATABASE demo TO demo; |
If you use the demo environment, we are ready to go.
So, the Migrator is installed, and the demo environment is set up. Let's migrate Oracle’s HR demo database to PostgreSQL. We start by creating a migration.
On the left side of the Dashboard select MIGRATION to switch to the migrations page. Select the button “ADD NEW MIGRATION”, which opens the wizard for creating a migration.
oracle://oracle:1521/freepdb1migratormigratorIn case you don't wish to use the database demo environment, you will need to adjust the values to your environment.
Selecting CHECK performs a connectivity check from the Migrator core with the source connection provided. If the connection is successful, we can proceed to the Schema Selection with NEXT.
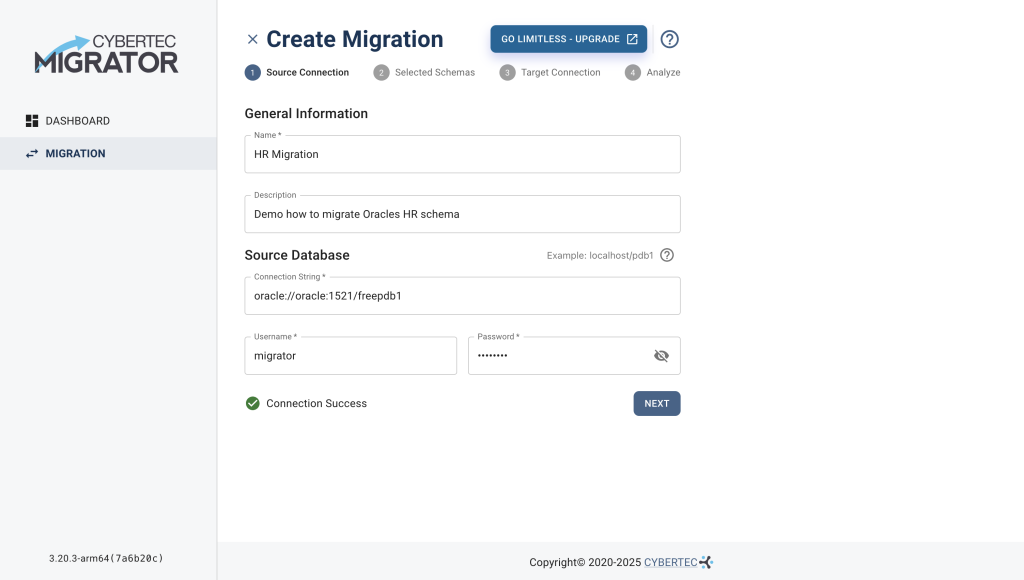
In case the connectivity check fails, an error message is displayed. Check the connection string and your credentials. In case the database user is missing privileges, they are shown.
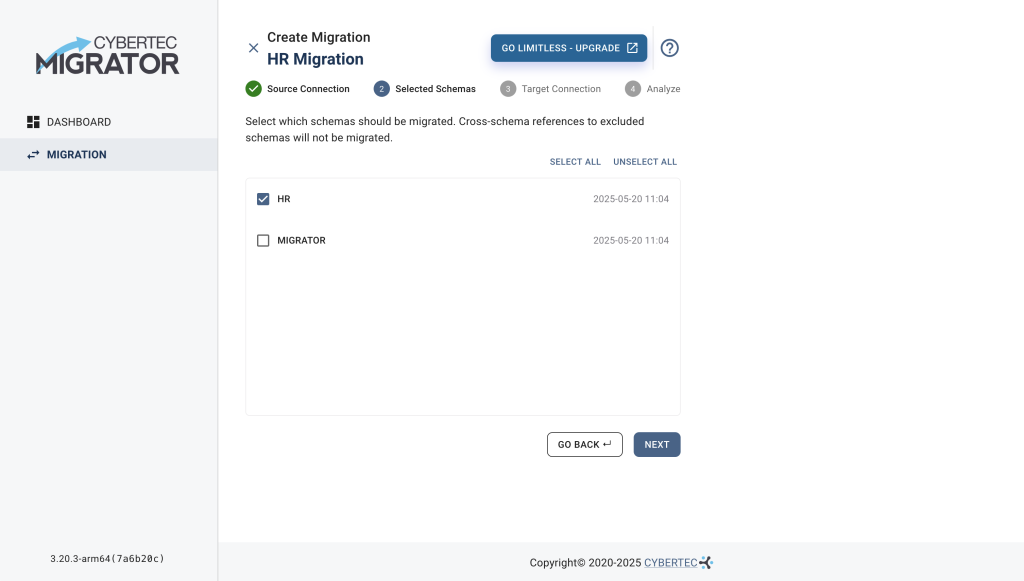
Let’s now select the Oracle HR demo schema we want to migrate, and proceed with NEXT to provide the Target Connection.
Now we have to provide the connection to the target database and check the connectivity:
postgresql://demo_db:5432/demodemodemo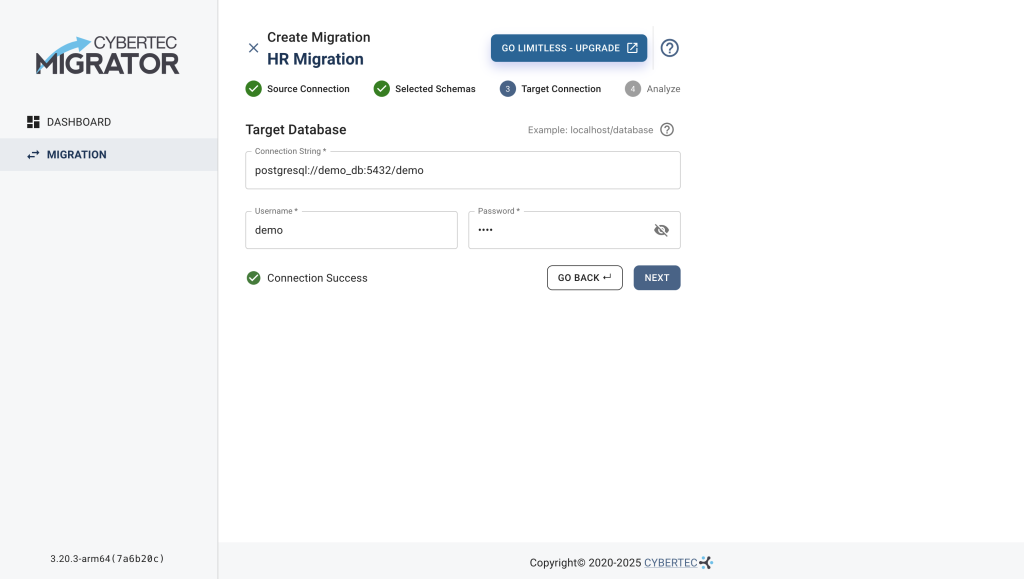
On selecting NEXT, the Migrator reads the meta-data from the Oracle system catalogs. Assuming we don’t encounter an unexpected error (yes, sometimes Oracle databases have a screwed up system catalog), the Migrator persists the meta-data of the source database and creates a configuration based on it.
The migration configuration is later used to migrate the data structure to PostgreSQL. It takes care of mapping data types, table structure, constraints and default values, adjusting indexes, and much more.
The creation of the migration configuration is the result of the cumulative knowledge gathered over years of migrating hundreds of databases to PostgreSQL.

As you can see in the screenshot above, one of the few features the Trial Edition does not contain is the migration of partitioned tables. The Trial Edition will migrate partitioned tables as normal tables.
Selecting NEXT creates a migration for the HR schema and we end up in the migration overview page.
When we create a migration, a set of data consists of:
Note that once a migration is created, you can not change the source, nor the target database, nor the meta-data of the source database. This is an important concept, which has an impact on how to roll out migrations to production systems. The life cycle of a migration and how it is used merits its own article.
The screenshot below shows the landing page of the newly created migration for the HR schema.
The migration page is divided into four areas:
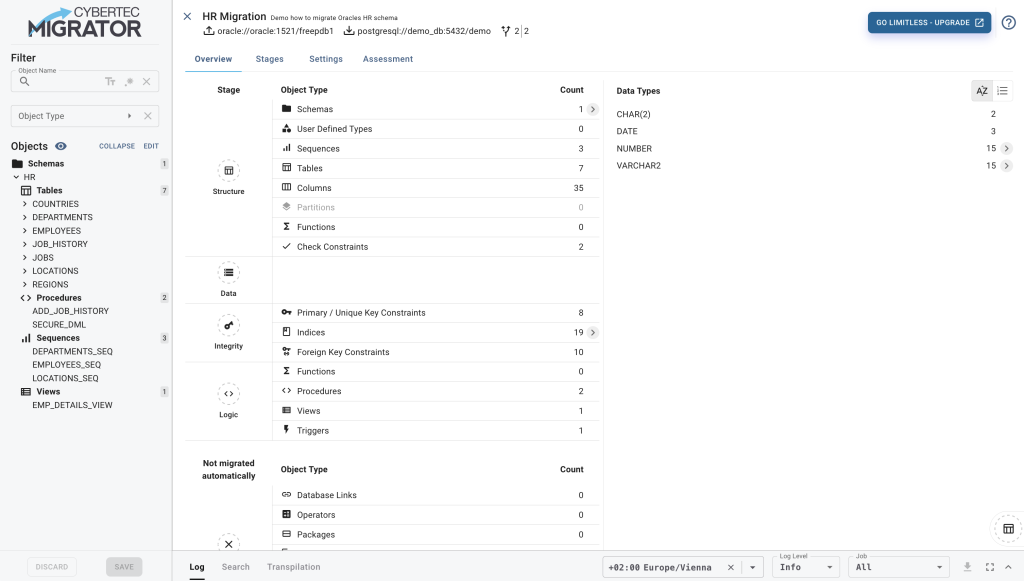
For now, let's take a detailed look at the overview page.
The Overview tab shows analytical information about the source database. The left hand side shows a table with the database objects grouped by object type, their cardinality and the stage (more about stages in the next sections), and the order in which they are going to be migrated. The right hand side of the overview page provides information about the column data types and their cardinality. In both tables we may drill down to get more specific information.
Our PostgreSQL experts are able to use the Overview page to make a rough assessment of how much effort it will take to migrate the database.
Wait, what? Do we need an expert to make the assessment?
Don’t worry - there is a dedicated Assessment tab for each migration, providing you with a detailed breakdown of the estimated migration effort for each database object. While it's far from perfect, the analysis is continuously being worked on and fine-tuned. But enough about “what's going to be” - let’s start with the migration.
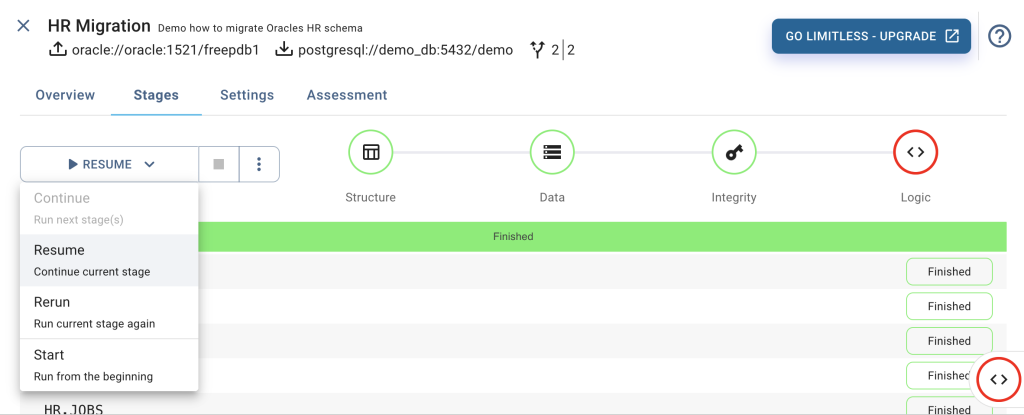
Selecting the Stages tab will lead you to the heart of our Migrator. This is the place where you run, change, resume, and replay a migration.

Before we start with the migration of the HR schema, let's have a word about migration stages. The CYBERTEC Migrator divides the execution of a migration into so-called migration stages, natural synchronization points in the migration process:
The list below the control menu keeps track of the migration status of each table. You will see them changing later.
Now, for a demonstration...
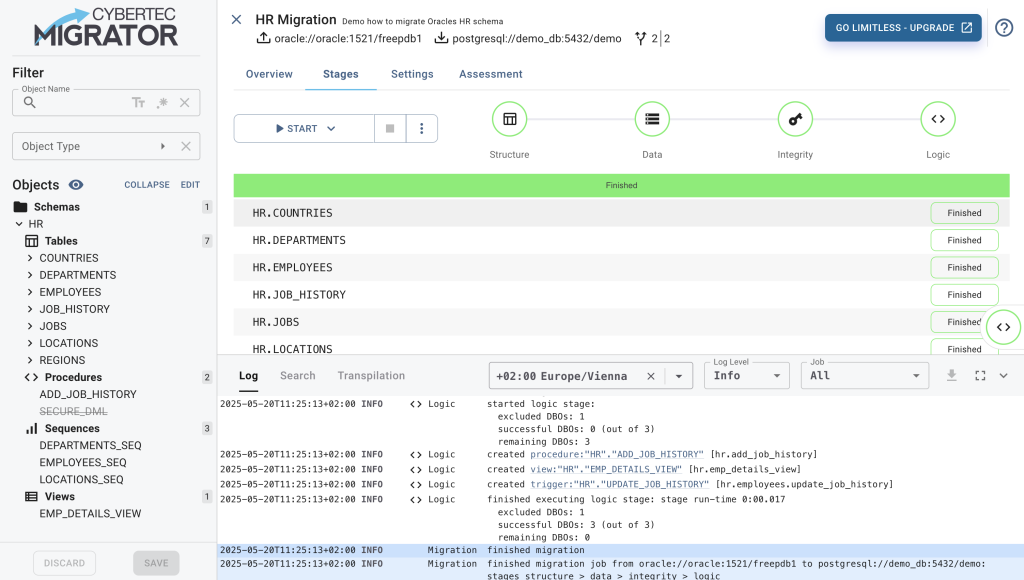
Select the START button, which - you guessed right - starts the migration. Starting a migration job will automatically open the Log view and follow the log messages showing what’s currently happening. Migrating the HR schema, we end up with an error at the Logic stage.
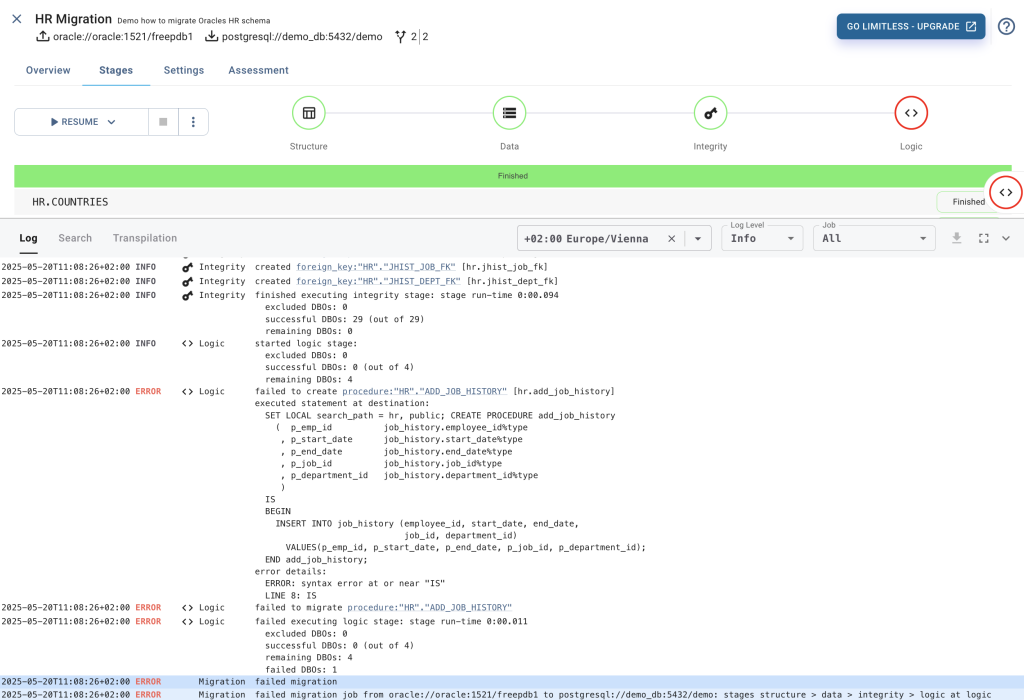
In the default settings, starting a migration executes all the stages until it succeeds with a complete migration or it reaches the first error. In our example, the Migrator executed the Structure, Data, and Integrity stages successfully. However, it hit an error in the Logic stage on migrating procedure:”HR”.”ADD_JOB_HISTORY”. This means that our PostgreSQL demo database contains the migrated tables with the data, constraints, and indexes.
The HR schema contains only a few rows of data. This means the Data and Integrity stages are fast.
The takeaways here are:
The CYBERTEC Migrator Trial Edition transfers at maximum three tables in parallel. The same goes for creating indexes and foreign keys. If you need a faster migration, you can upgrade to the Migrator Professional Edition.
Back to our demo in the log view.

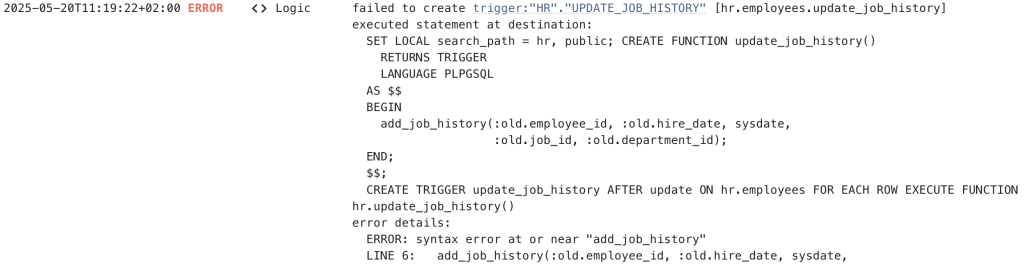
Reading the log view from the bottom up, we can see that
procedure:”HR”.”ADD_JOB_HISTORY”IS”Note that all DBO's in the log view are hyperlinked. Selecting the hyperlink for the procedure:”HR”.”ADD_JOB_HISTORY” opens the code editor for the stored procedure. Hyperlinking error messages to the DBO that caused them saves me at least a of couple weeks of work (and frustration) each year.
The screenshot below shows the code editor of the erroneous procedure.
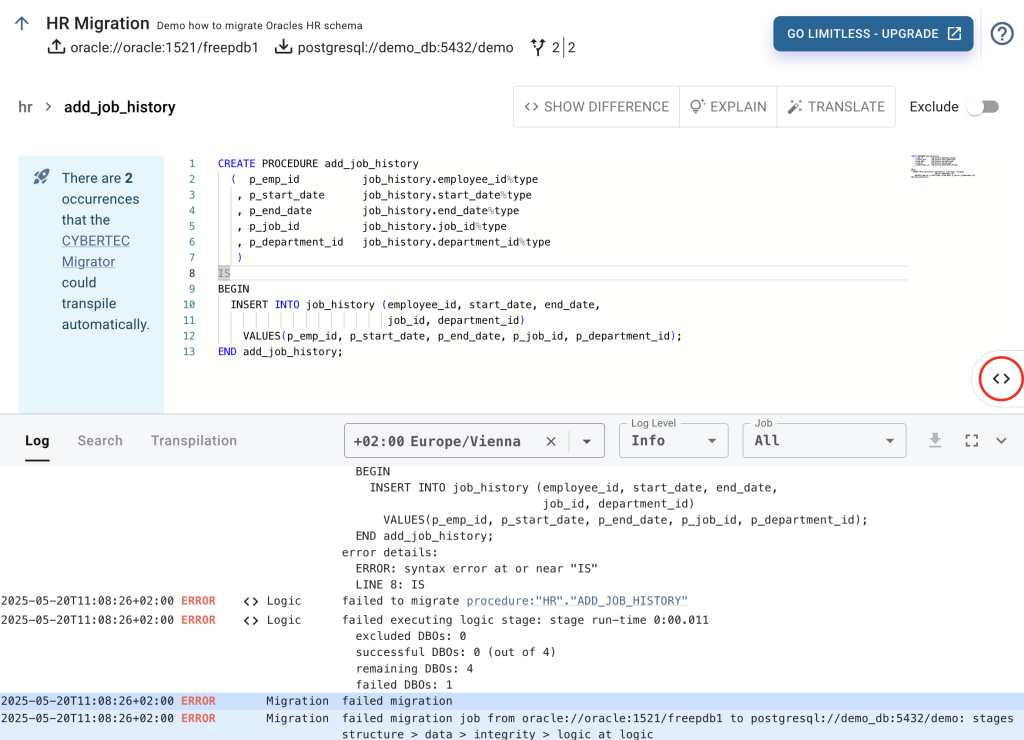
At the top of the editor, we see the DBO’s fully qualified name as provided in the source database. In our case HR > ADD_JOB_HISTORY. The code editor contains the PL/SQL extracted from the Oracle source database, which visually marks the same syntax error reported by the migration.
So why this error? Anyone with experience porting code from Oracle PL/SQL to PL/pgSQL knows that the SQL procedural languages between database technologies are not 100% compatible. Therefore, Oracle's PL/SQL code has to be translated to PL/pgSQL, PostgreSQL’s SQL procedural language.
But Kieran, why doesn't the CYBERTEC Migrator translate PL/SQL code to PL/pgSQL automatically?
The answer is simple: Our in-house PostgreSQL experts are skeptical about automatic code conversion tools. This likely stems from the fact that at CYBERTEC, we mostly deal with databases with complex PL/SQL code. We have developed a specialized parser with the ability to transpile code automatically, as well as integrated an LLM assistant feature that is able to explain and translate code. In both cases, it falls to the user to accept and apply the suggested changes.
That is why our experts use the Migrator Search and Replace feature.
For now, let’s change the code in the editor by replacing “IS BEGIN” with “LANGUAGE SQL AS $$” and “END add_job_history;” with “$$” (without double quotes). Selecting SHOW DIFFERENCE shows the difference between the original Oracle code and the changed procedure code.
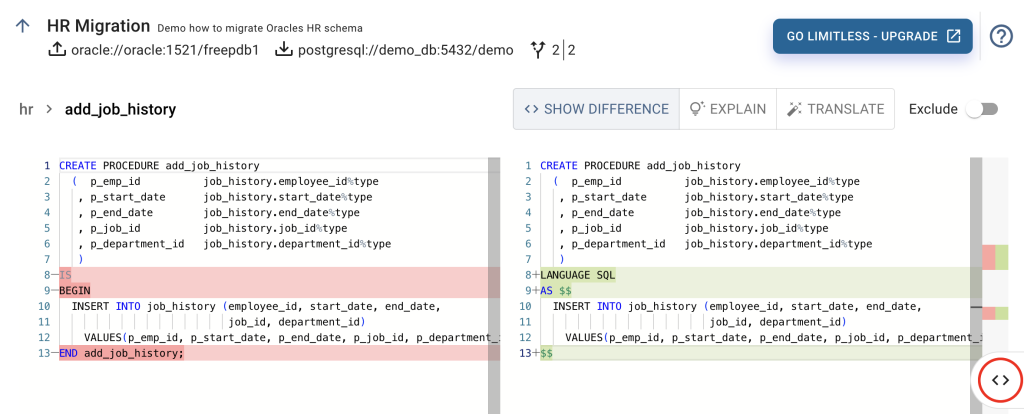
What you do not see here, is what happens behind the scenes. In the background, the CYBERTEC Migrator Trial Edition validates the content of the code editor against the target database. It drops and recreates the procedure and in case of an error shows it in the editor. Don’t worry about unwanted changes as, due to PostgreSQL transactional DDL's, the validation is performed in a transaction with rollback.
The background validation might not be of much use in a stored procedure, but saves a lot of time when adapting views. It prevents unnecessary round trips due to typos in column or table names.
Save the changes by selecting the SAVE button (or use the Ctrl+S shortcut), which persists the changes we just made in the Migrator’s internal database. Leave the editor and go back to the "Stages" tab by selecting ↑ on top of the page, near the migration name.
The migration controls provide us with the following options:
Here, we want to resume the migration where it was stopped due to the first error. To avoid the “resume, show error, fix error”-cycle over and over again, we disable “Abort stage on first error”. This will execute the stage until its end and report all detected errors.
Select RESUME. This will create the fixed procedure but leave us with errors in another procedure, view, and trigger.

Let's fix the trigger and select the link in the error log line of trigger:”HR”.”UPDATE_JOB_HISTORY”, which opens the code editor.
An Oracle trigger is migrated to PostgreSQL by wrapping the trigger code into a PostgreSQL function that is called by the trigger. The function name matches the trigger name.
The error lies near the call to add_job_history. PostgreSQL is picky when calling a function with no return value. So, let’s change the code to PERFORM add_job_history. This will lead to PostgreSQL indicating a syntax error at or near “:”.
:old and :new are unknown variables to PostgreSQL data triggers. Since this shows up multiple times, we are going to use the Search and Replace functionality. At the bottom of the migration window, open the Search view.
We are going to use regular expressions to replace all occurrences of :old with old, and :new with new.
Select the "regex" mode by selecting .* and search for :(new|old). This uses regex capture groups to capture the parameter $1, which we use as a replacement, removing the colon.
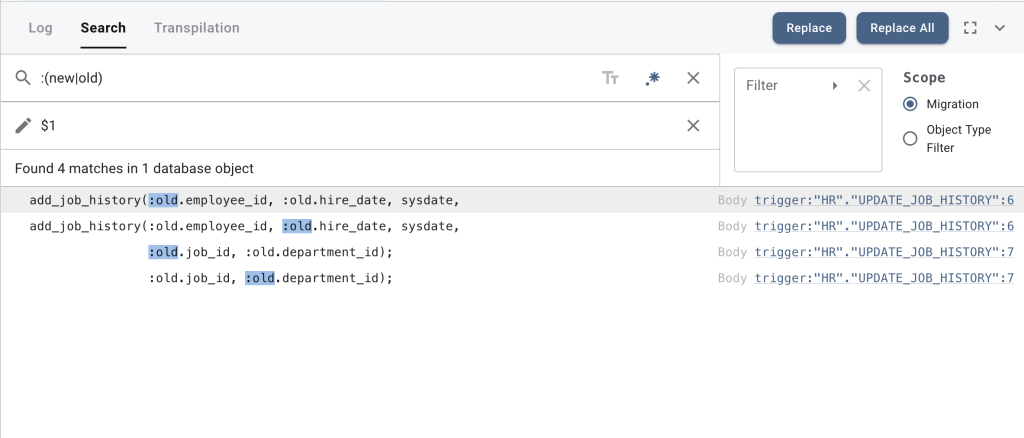
In the HR schema we have only one trigger function, so there is not much to replace. Note that the scope for the Search and Replace operation can be tweaked on the right hand side. The use of the Search and Replace feature deserves its own article.
Selecting Replace All fixes the rest of the errors in the trigger function.
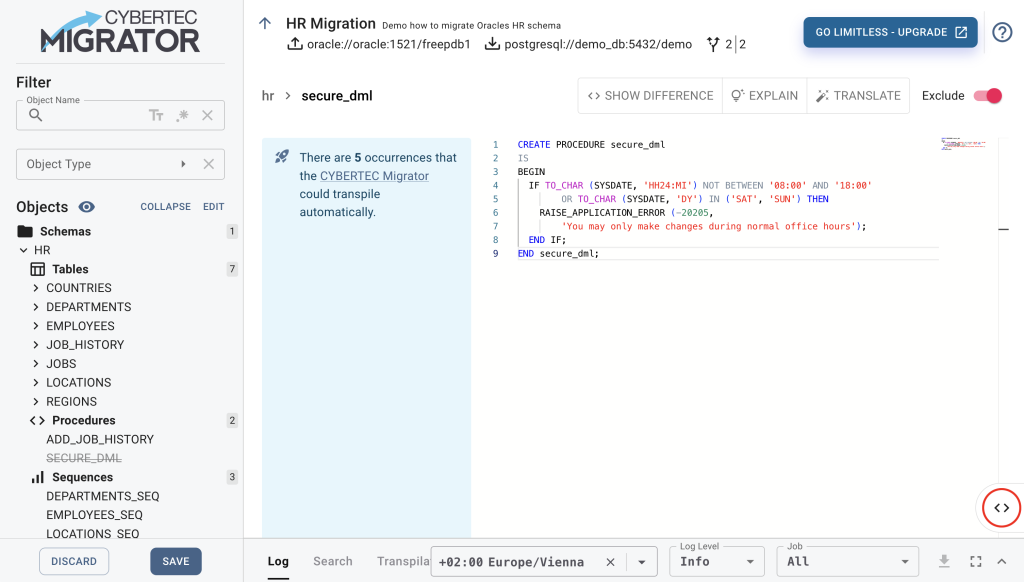
Let’s now fix the remaining errors. Switch back to the log view and select the view:"HR"."EMP_DETAILS_VIEW" link, which opens the code editor with the erroneous view. Scroll to the bottom and remove the last line WITH READ ONLY, which has no equivalent in PostgreSQL, and select the last erroneous DBO procedure:"HR"."SECURE_DML" in the log view.
Let's assume we are not interested in migrating this procedure and exclude it from the migration by enabling Exclude in the editor's upper right corner. The sidebar shows the exclusion of the procedure with SECURE_DML.
Now we SAVE our changes and resume the execution. Try the floating migration control on the right side of the screen to resume the migration. It comes in handy when you don’t want to return to the Stages tab.
Congratulations - you just migrated your first database using the CYBERTEC Migrator. If you go back to the migration page, all your stages will show up green.
If needed, you can download the content of the log view by selecting the ↓ for audit purposes. Yes, some customers need this.
If you reached this part of the article and followed all the steps - kudos.
One important part left to demonstrate is the table editor. Selecting one of the tables on the sidebar will open the table editor. This is the place where you can change the database objects that end up in PostgreSQL.
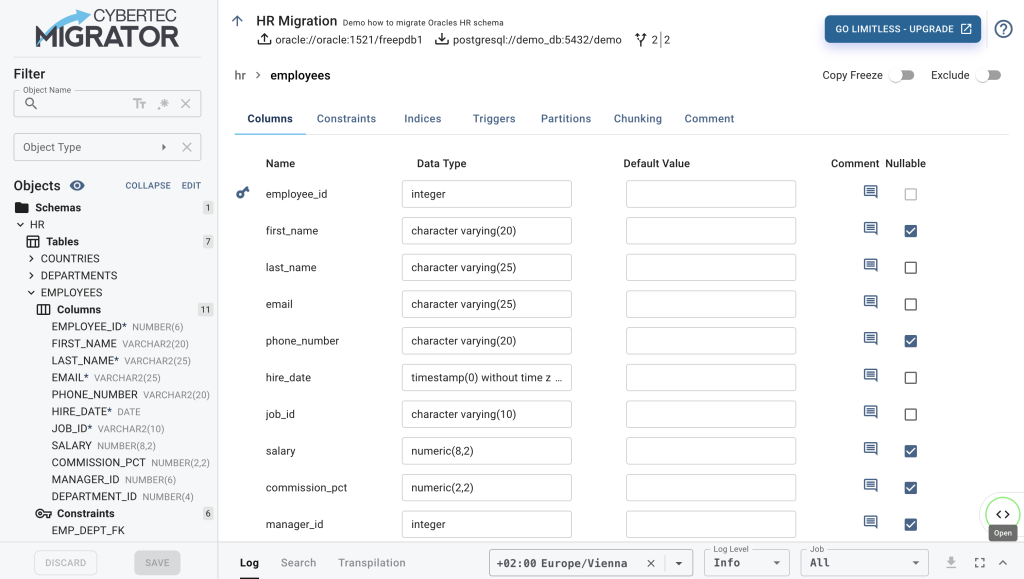
Here, you can exclude one or more columns from the table, or even the whole table. You can change the data type, the nullable attribute, and default values. Constraints, indices, triggers and partitions can be adapted, and the table may even be chunked for improved data transfer performance.
There are a couple of features left to mention. These will be featured in future articles:
We at CYBERTEC are constantly improving the Migrator. The priority of the features included depends on customer feedback and the migration projects CYBERTEC is currently working on.
How many of these features and in which order we can implement them depends on the resources we can reserve.
If you want to help out the PostgreSQL community, download the free Migrator, try it out, provide feedback, and spread the word about a new tool to migrate databases to PostgreSQL.
Leave a Reply