Patroni is a cluster manager used to customize and automate deployment and maintenance of PostgreSQL HA (High Availability) clusters. It uses distributed configuration stores like etcd, Consul, ZooKeeper or Kubernetes for maximum accessibility.
In this tutorial, we will be using a single local etcd instance and two local Patroni instances on a single host instead of a more complex multi-host setup.
I assume that you’re comfortable with PostgreSQL Streaming Replication, so let’s proceed with the installation.
If you're not sure what this all is about, I highly recommend giving this brief introduction a read:
PostgreSQL High-Availability and Patroni – an Introduction.
A Patroni cluster requires not only executables for Patroni, but also for PostgreSQL of some version (at least 9.5 or above) and the configuration store of your choice (we'll use etcd).
Cybertec provides .rpm packages of Patroni 1.6.0 for both Fedora 30 and CentOS/RHEL 7 on Github.
|
1 2 3 4 5 6 7 |
# install postgresql.org repo dnf install https://download.postgresql.org/pub/repos/yum/reporpms/F-30-x86_64/pgdg-fedora-repo-latest.noarch.rpm dnf install postgresql11 postgresql11-server dnf install etcd # get patroni package from github wget https://github.com/cybertec-postgresql/patroni-packaging/releases/download/1.6.0-1/patroni-1.6.0-1.fc30.x86_64.rpm dnf install patroni-1.6.0-1.fc30.x86_64.rpm |
|
1 2 3 4 5 6 7 8 9 |
# install postgresql.org repo yum install https://download.postgresql.org/pub/repos/yum/reporpms/EL-7-x86_64/pgdg-redhat-repo-latest.noarch.rpm yum install postgresql11 postgresql11-server yum install etcd #install epel, for python36-psycopg2 needed by patroni yum install https://dl.fedoraproject.org/pub/epel/epel-release-latest-7.noarch.rpm # get patroni package from github wget https://github.com/cybertec-postgresql/patroni-packaging/releases/download/1.6.0-1/patroni-1.6.0-1.rhel7.x86_64.rpm dnf install patroni-1.6.0-1.rhel7.x86_64.rpm |
|
1 2 3 4 5 |
# Ubuntu 19.04 and Debian Buster already have PostgreSQL 11 apt update apt install --no-install-recommends postgresql-11 postgresql-client-11 apt install etcd apt install patroni |
Here we start a single member etcd cluster.
This etcd will listen to client requests on port 2379 and stores data in the default directory: ./default.etcd .
|
1 |
etcd > etcd_logfile 2>&1 & |
To check the etcd member list, run:
|
1 |
etcdctl member list |
Please be aware that this is only a basic setup guide. In a production environment, a single member etcd cluster would be a problematic failure point. If that etcd stops working, Patroni would have to stop the primary and secondary PostgreSQL instances.
There will be another post describing the details of etcd and how to set up clusters containing at least three members, which should be the minimum for a production setup.
Everything that we create and modify from now on should be done by the user postgres, as postgres should own the config files, data directories and the Patroni and PostgreSQL processes.
Each Patroni instance needs its own config file. This config file tells it where to contact the DCS (Distributed Configuration Store - etcd in our case), where and how to start the database and how to configure it.
For simplicity, sample config files are provided for this tutorial for both Debian/Ubuntu and Fedora/RHEL/CentOS.
The REST API port and postgresql port are different in the config file for the second cluster member to avoid conflicts since we are running two members on the same host.
Please note that the provided config files differ in two aspects: the directory that contains binaries for PostgreSQL and the directory that contains your database's data.
So please, use the files that match your distribution, as shown in the wget calls below.
To start both nodes:
|
1 2 3 4 5 |
sudo -iu postgres wget https://download.cybertec-postgresql.com/patroni_example_configs/rhel_patroni_1.yml wget https://download.cybertec-postgresql.com/patroni_example_configs/rhel_patroni_2.yml patroni rhel_patroni_1.yml > patroni_member_1.log 2>&1 & patroni rhel_patroni_2.yml > patroni_member_2.log 2>&1 & |
Before starting the Patroni cluster, make sure the default PostgreSQL cluster has been stopped and disabled.
This can usually be done with a service postgresql stop .
|
1 2 3 4 5 |
sudo -iu postgres wget https://download.cybertec-postgresql.com/patroni_example_configs/deb_patroni_1.yml wget https://download.cybertec-postgresql.com/patroni_example_configs/deb_patroni_2.yml patroni deb_patroni_1.yml > patroni_member_1.log 2>&1 & patroni deb_patroni_2.yml > patroni_member_2.log 2>&1 & |
If you examine the produced logfiles, you will find that one of the patroni processes has bootstrapped (i.e. ran initdb) and started as a leader.
|
1 2 3 4 5 6 7 8 9 10 11 12 13 14 |
2019-07-30 13:45:45,168 INFO: Selected new etcd server http://localhost:2379 2019-07-30 13:45:45,193 INFO: Lock owner: None; I am member_1 2019-07-30 13:45:45,198 INFO: trying to bootstrap a new cluster ... 2019-07-30 13:45:47,260 INFO: postmaster pid=25866 ... 2019-07-30 13:45:48,328 INFO: establishing a new patroni connection to the postgres cluster 2019-07-30 13:45:48,336 INFO: running post_bootstrap 2019-07-30 13:45:48,361 INFO: initialized a new cluster 2019-07-30 13:45:58,350 INFO: Lock owner: member_1; I am member_1 2019-07-30 13:45:58,360 INFO: Lock owner: member_1; I am member_1 2019-07-30 13:45:58,437 INFO: no action. i am the leader with the lock 2019-07-30 13:46:08,351 INFO: Lock owner: member_1; I am member_1 2019-07-30 13:46:08,362 INFO: no action. i am the leader with the lock |
The other process noticed that there is already another leader and configured itself to receive streaming replication from it:
|
1 2 3 4 5 6 7 8 9 10 11 12 13 14 15 16 |
2019-07-30 13:45:52,751 INFO: Selected new etcd server http://localhost:2379 2019-07-30 13:45:52,783 INFO: Lock owner: member_1; I am member_2 2019-07-30 13:45:52,784 INFO: Lock owner: member_1; I am member_2 2019-07-30 13:45:52,787 INFO: trying to bootstrap from leader 'member_1' 2019-07-30 13:45:54,616 INFO: replica has been created using basebackup 2019-07-30 13:45:54,618 INFO: bootstrapped from leader 'member_1' 2019-07-30 13:45:54,643 INFO: postmaster pid=25897 ... 2019-07-30 13:45:56,725 INFO: Lock owner: member_1; I am member_2 2019-07-30 13:45:56,731 INFO: Lock owner: member_1; I am member_2 2019-07-30 13:45:56,731 INFO: does not have lock 2019-07-30 13:45:56,731 INFO: establishing a new patroni connection to the postgres cluster 2019-07-30 13:45:56,747 INFO: no action. i am a secondary and i am following a leader 2019-07-30 13:45:58,365 INFO: Lock owner: member_1; I am member_2 2019-07-30 13:45:58,366 INFO: does not have lock 2019-07-30 13:45:58,369 INFO: no action. i am a secondary and i am following a leader |
Check the status of the cluster with patronictl:
|
1 2 3 4 5 6 7 8 |
patronictl -d etcd://localhost:2379 list patroni_cluster_1 +---------+-------------+----------------+--------+---------+----+-----------+ | Cluster | Member | Host | Role | State | TL | Lag in MB | +---------+-------------+----------------+--------+---------+----+-----------+ | patroni_cluster_1 | member_1 | 127.0.0.1:5432 | Leader | running | 1 | 0.0 | | patroni_cluster_1 | member_2 | 127.0.0.1:5433 | | running | 1 | 0.0 | +---------+-------------+----------------+--------+---------+----+-----------+ |
Now you can simply connect to your new database using the port where your cluster's leader currently is:
|
1 |
psql -p 5432 -h 127.0.0.1 |
The steps above can be easily modified to create a cluster that spans several hosts.
Just change the IP addresses for the advertised and initial cluster arguments for etcd and for Patroni and PostgreSQL in the Patroni config files and make sure that all necessary ports are opened, if you're running systems with a firewall.
Once the key concept of Patroni is well understood, it is easy to deploy and manage bigger clusters.
This post is part of a series.
Besides this post the following articles have already been published:
– PostgreSQL High-Availability and Patroni – an Introduction.
The series will also cover:
– setting up multi-member etcd clusters
– configuration and troubleshooting
– failover, maintenance, and monitoring
– client connection handling and routing
– WAL archiving and database backups using pgBackrest
– PITR a patroni cluster using pgBackrest
Large companies and professional business have to make sure that data is kept secure. It is necessary to defend against internal, as well as external threats. PostgreSQL provides all the necessities a company needs to protect data and to ensure that people can only access what they are supposed to see. One way to protect data is “Row Level Security”, which has been around for a few years now. It can be used to reduce the scope of a user by removing rows from the result set automatically. Usually people apply simple policies to do that. But PostgreSQL Row Level Security (RLS) can do a lot more. You can actually control the way RLS behaves using configuration tables.
Imagine you are working for a large cooperation. Your organization might change, people might move from one department to the other or your new people might join up as we speak. What you want is that your security policy always reflects the way your company really is. Let us take a look at a simple example:
|
1 2 3 4 5 6 7 8 9 10 11 12 13 14 |
CREATE TABLE t_company ( id serial, department text NOT NULL, manager text NOT NULL ); CREATE TABLE t_manager ( id serial, person text, manager text, UNIQUE (person, manager) ); |
I have created two tables. One will know, who is managing which department. The second table knows, who will report to him. The goal is to come up with a security policy, which ensures that somebody can only see own data or data from departments on lower levels. In many cases row level policies are hardcoded – in our case we want to be flexible and configure visibility given the data in the tables.
Let us populate the tables:
|
1 2 3 4 5 6 7 8 9 10 |
INSERT INTO t_manager (person, manager) VALUES ('hans', NULL), ('paula', 'hans'), ('berta', 'hans'), ('manuel', 'paula'), ('mike', 'paula'), ('joe', 'berta'), ('jack', 'berta'), ('jane', 'berta') ; |
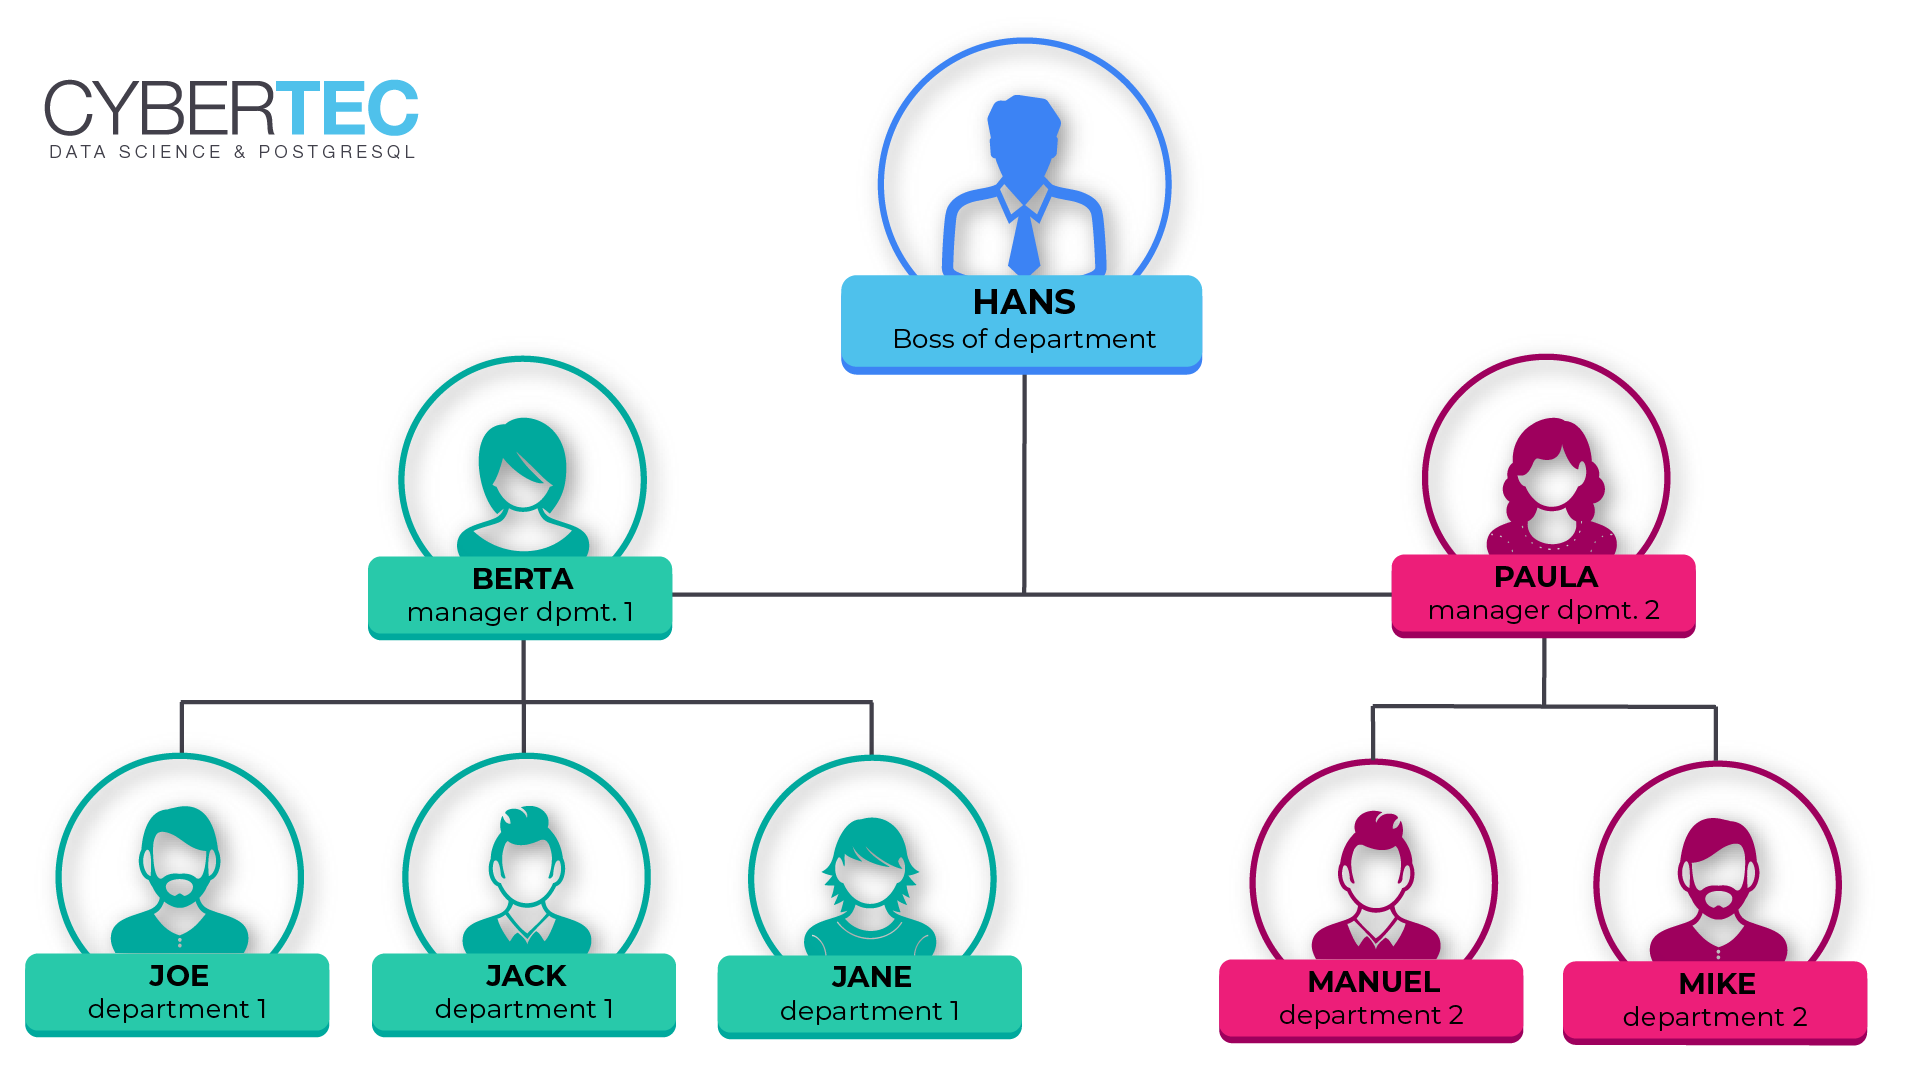
As you can see “hans” has no manager. “paula” will report directly to “hans”. “manuel” will report to “paula” and so on.
In the next step we can populate the company table:
|
1 2 3 4 5 6 7 8 9 10 |
INSERT INTO t_company (department, manager) VALUES ('dep_1_1', 'joe'), ('dep_1_2', 'jane'), ('dep_1_3', 'jack'), ('dep_2_1', 'mike'), ('dep_2_2', 'manuel'), ('dep_1', 'berta'), ('dep_2', 'paula'), ('dep', 'hans') ; |
For the sake of simplicity, I have named those departments in a way that they reflect the hierarchy in the company. The idea is to make the results easier to read and easier to understand. Of course, any other name will work just fine as well.
To enable row level security (RLS) you have to run ALTER TABLE … ENABLE ROW LEVEL SECURITY:
|
1 |
ALTER TABLE t_company ENABLE ROW LEVEL SECURITY; |
What is going to happen is that all non-superusers, or users who are marked as BYPASSRLS, won’t see any data anymore. By default, PostgreSQL is restrictive and you have to define a policy to configure the desired scope of users. The following policy uses a subselect to travers our organization:
|
1 2 3 4 5 6 7 8 9 10 11 12 13 14 15 16 |
CREATE POLICY my_fancy_policy ON t_company USING (manager IN ( WITH RECURSIVE t AS ( SELECT current_user AS person, NULL::text AS manager FROM t_manager WHERE manager = CURRENT_USER UNION ALL SELECT m.person, m.manager FROM t_manager m INNER JOIN t ON t.person = m.manager ) SELECT person FROM t ) ) ; |
What you can see here is that a policy can be pretty sophisticated. It is not just a simple expression but can even be a more complex subselect, which uses some configuration tables to decide on what to do.
Let us create a role now:
|
1 2 3 |
CREATE ROLE paula LOGIN; GRANT ALL ON t_company TO paula; GRANT ALL ON t_manager TO paula; |
paula is allowed to log in and read all data in t_company and t_manager. Being able to read the table in the first place is a hard requirement to make PostgreSQL even consider your row level policy.
Once this is done, we can set the role to paula and see what happens:
|
1 2 3 4 5 6 7 8 9 10 |
test=> SET ROLE paula; SET test=>; SELECT * FROM t_company; id | department | manager ----+------------+--------- 4 | dep_2_1 | mike 5 | dep_2_2 | manuel 7 | dep_2 | paula (3 rows) |
As you can see paula is only able to see herself and the people in her department, which is exactly what we wanted to achieve.
Let us switch back to superuser now:
|
1 2 3 |
SET ROLE postgres; We can try the same thing with a second user and we will again achieve the desired results: |
|
1 2 3 4 |
CREATE ROLE hans LOGIN; GRANT ALL ON t_company TO hans; GRANT ALL ON t_manager TO hans; |
The output is as expected:
|
1 2 3 4 5 6 7 8 9 10 11 12 13 14 |
test=# SET role hans; SET test=> SELECT * FROM t_company; id | department | manager ----+------------+--------- 1 | dep_1_1 | joe 2 | dep_1_2 | jane 3 | dep_1_3 | jack 4 | dep_2_1 | mike 5 | dep_2_2 | manuel 6 | dep_1 | berta 7 | dep_2 | paula 8 | dep | hans (8 rows) |
Keep in mind: A policy is basically a mandatory WHERE clause which is added to every query to ensure that the scope of a user is limited to the desired subset of data. The more expensive the policy is, the more impact it will have on performance. It is highly recommended to think twice and to make sure that your policies are reasonably efficient to maintain good database performance.
The performance impact of row level security in PostgreSQL (or any other SQL database) cannot easily be quantified because it depends on too many factors. However, keep in mind – there is no such thing as a free lunch.
If you want to learn more about Row Level Security check out my post about PostgreSQL security.
In order to receive regular updates on important changes in PostgreSQL, subscribe to our newsletter, or follow us on Facebook or LinkedIn.
As you all may know, our main blog is a very appreciable source for various PostgreSQL-relevant guides and tips. Our PostgreSQL experts publish content about different topics - e.g. Patroni, advanced PostgreSQL features, configuration settings, security, etc.
All of those posts have one thing in common: they are data- or database-centric. That's why, that's the theme of our main blog - it's all about PostgreSQL & Data Science.
However, over time, the IT staff @ Cybertec has accumulated lots of knowledge on widely diverse topics. These topics can range from docker tips & tricks to parameters for psql. We'd like to share this knowledge with you, but it just doesn't fit the theme of our main blog.
With that in mind, we created a new website: Today I learned @ Cybertec
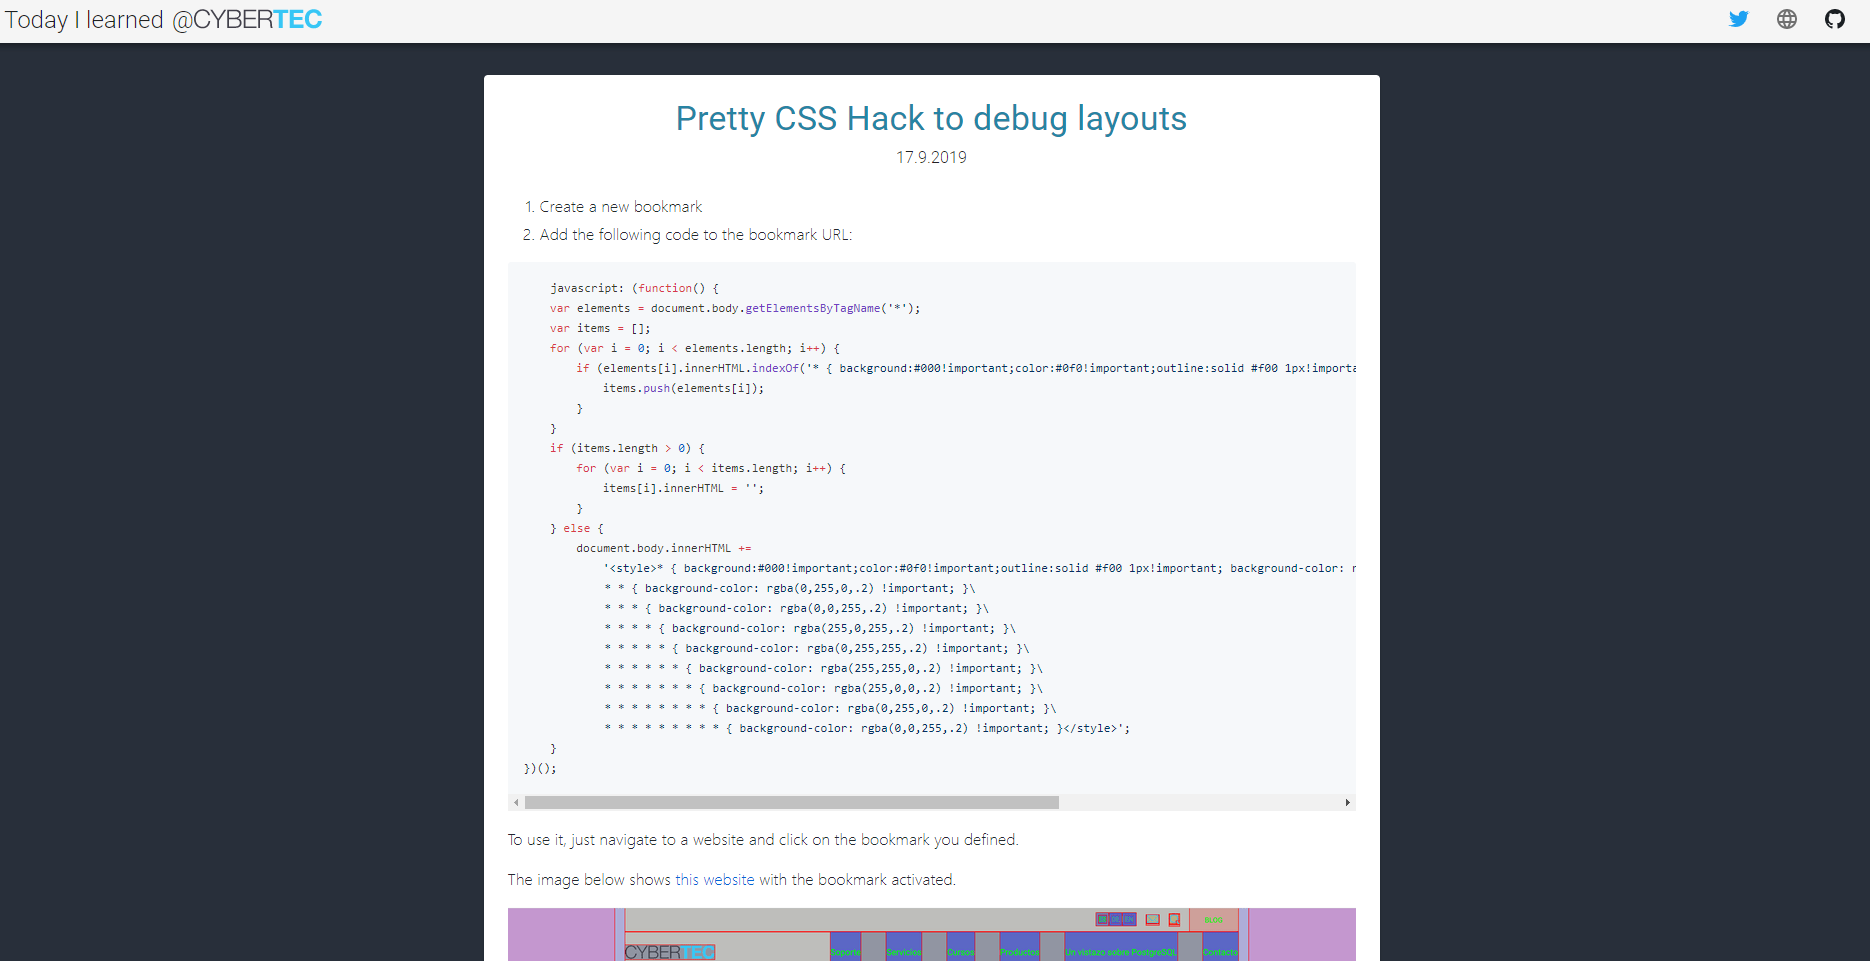
Whether it's a bug fix, a lesser known parameter of a command-line tool or a cool program we find useful - you'll find something you're interested in at Today I learned @ Cybertec.
The website is updated every day at 12:00 GMT+0, so remember to check it daily.
With PostgreSQL as our core business, we have open-source in mind. For that reason, the website and its content are completely open-source, check it out here.
If you have ideas to enhance the website, just create an issue on Github.
We hope this website will help a lot of people in their ongoing journey as developers!
The website is powered by GatsbyJS. We use Github to manage our source code and content. The website itself is hosted on Github Pages.
Authors use Github Pull requests (PRs) to write new posts.
For each PR, we use ZEIT Now to create a preview.
Each day (at 12:00 GMT+0), a bot executed through a Github Action merges one post from our backlog (= approved PRs) into master.
As soon as a new commit lands on master, the website is rebuilt and published by another Github action.
The whole process is public, you can watch everything happen here.

(This article and the extension pg_cgroups was written for cgroups v1. The extension won't work with cgroups v2, but the rest is still useful information.)
In another blog post, I described how Linux control groups work and how they are useful for PostgreSQL.
Here I will present my little PostgreSQL plugin pg_cgroups which makes this simple to handle for the DBA.
If you have a machine dedicated to a single PostgreSQL cluster, you normally do not want to limit PostgreSQL's resource usage.
But sometimes you have more than one cluster running on a single machine, or you have an application server running on the same machine.
In that case, you may want to prevent one PostgreSQL cluster from using up so many resources that it starves the other programs on the same machine.
To some extent, the CPU and I/O schedulers can take care of that, but it can be nice to have some control. For example, you may want a small, unimportant database to not use up more than 10 percent of your CPU time and I/O bandwidth. And while you can limit PostgreSQL's memory usage through shared_buffers and work_mem, it might be nice to keep one cluster from blowing other cluster's data out of the file system cache.
I won't describe the complete setup here (see the project page for that), but here is a short description how it works:
/etc/cgconfig.conf so that an empty control group /postgres is created at boot time. This control group can be administrated by the postgres operating system user.shared_preload_libraries in postgresql.conf and restart PostgreSQL.pg_cgroups creates a new control group under /postgres postgres and moves the postmaster to this group. All PostgreSQL processes will automatically inherit the control group.
Now you can set and adjust resource consumption limits on the fly simply by changing parameters in postgresql.conf! There is support for limits on memory consumption, CPU time and I/O bandwidth. One particularly nice feature: this is the only way to limit the amount of file system cache that is used for PostgreSQL!
pg_cgroups makes this magic happen by modifying the control group limits whenever the parameter settings are changed.
Of course, pg_cgroups is not the only way to manage Linux control groups. Alternatives include:
You can manage control groups directly via the /sys/fs/cgroup file system or using libcg tools like cgexec.
This usually requires root access to the machine, which DBAs often don't have. Sure, you can set up a control group hierarchy managed by the postgres user (like pg_cgroups does), but you still have to memorize the cgroup file hierarchy and commands.
systemdsystemd services allow setting control group limits via directives in the service file.
This is a great way of setting limits for PostgreSQL, but there are some disadvantages:
root to change the settings.Docker uses Linux control groups to enforce resource limits. So if you are already running PostgreSQL in a dockerized environment, that may be your first choice.
However, not everybody wants the added complexity of docker.
The software is still in beta.
But since it is fairly simple and is not deeply tangled with PostgreSQL server code (all it does is define a few magic parameters), I don't expect many nasty bugs.
If you run into trouble, I am happy to help.
I think this nice little piece of software is useful for everybody who runs more than one PostgreSQL cluster per machine. I hope it makes the DBA's life a better one.
Are you running PostgreSQL databases or plan to do so? Have you thought about disaster recovery? What happens if your database crashes or - more likely - the (virtual) server it runs on stops working? The best option is probably a copy of your database, that is able to take over operations, as soon as something goes wrong. This concept is commonly referred to as high availability.
Let’s talk about some general concepts that everyone should know about highly available PostgreSQL clusters. This post will first introduce the concept of replication and show which types of replication can be used with PostgreSQL. As the configuration of replication can be quite complicated, I will further discuss how many challenges can be overcome by using an application called Patroni.
A replica is a secondary copy of your data (the primary copy), i.e. of your databases. In the event of a failure, it is possible to continue business operations on the replica. During normal operations, both the primary and the secondary copy can be read from to boost performance.
As your data changes all the time, it is seldomly sufficient to create only a snapshot in time; You'd probably want a mechanism that keeps your replica up to date. This process is called replication, whereby the replica is periodically informed of any updates to the original data and applies them to the copy.
In the context of (PostgreSQL) databases, the database cluster that you're copying is called the primary, or sometimes leader. The copy of your database cluster is usually referred to by the name replica. You'll also often find the names "master" for the former and "slave" for the latter in some literature, but due to the negative connotation that these words carry, we dislike using them. Instead, primary and standby are the used terms.
Creation of a replica in PostgreSQL is very simple. Shut down your database in a controlled manner (so that it creates a checkpoint), copy the data directory to the device where you want to run your replica, start the primary and the replica as usual.
But if you want to be able to continually update your replica with all modifications that occur on the primary, you will need a replication mechanism as described above.
There are a couple of possible replication mechanisms for PostgreSQL.
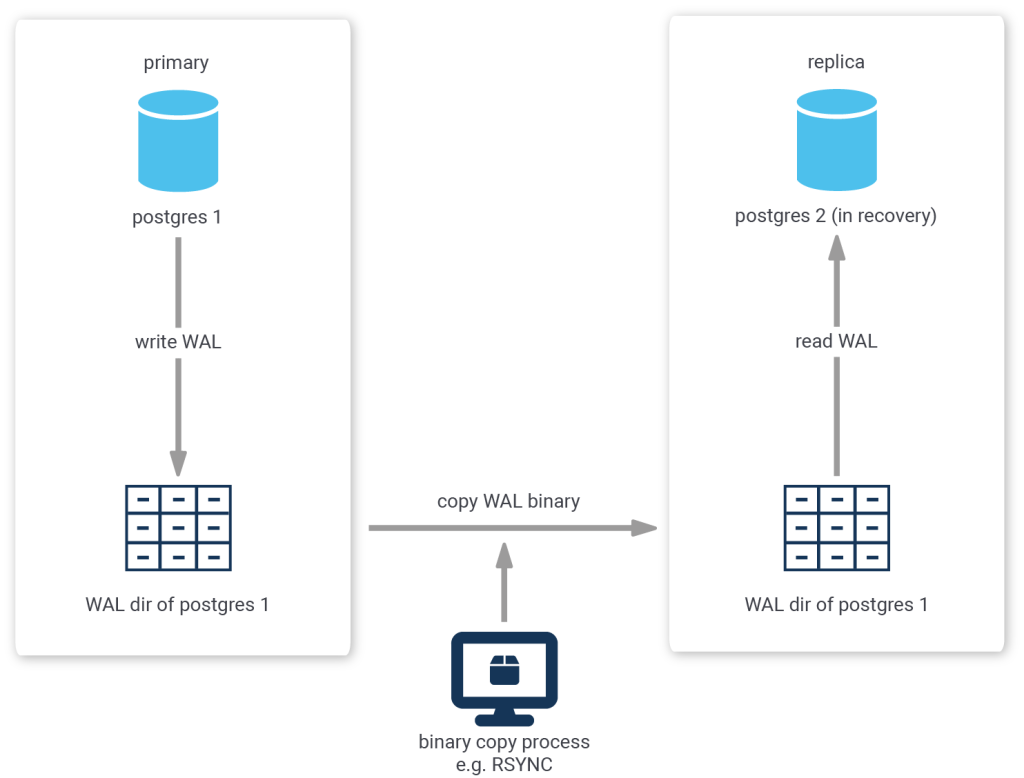
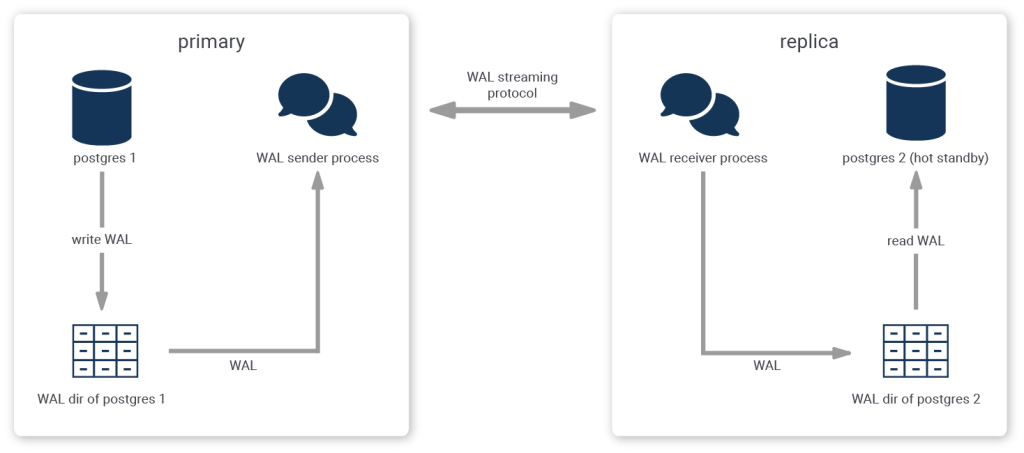
Because PostgreSQL uses a transaction log to enable replay or reversal of transactions, you could continually copy the contents of the transaction log (located in the pg_wal or pg_xlog directory) as it is produced by the primary server to the replica, where you configure the replica to replay any new transaction log files that are copied to it's own pg_wal or pg_xlog directory.
The biggest disadvantage to this method is the fact that transaction log is contained in chunks of usually 16MB. So, if you were to wait for the primary to switch to the next chunk before copying the finished one, your replica would always be 16MB worth of log delayed.
One less obvious disadvantage of this method is the fact that the copying is usually done by a third-party process, i.e. PostgreSQL is not aware of this process. Thus, it is impossible to tell the primary to delay the acceptance or rejection of a commit request until the replica has confirmed that it has copied all prior transaction log messages.
While this method is useful for scenarios where the Recovery Point Objective (RPO, i.e. the time span within which transactions may be lost after recovery) or the Recovery Time Objective (RTO, i.e. the time it takes from failure to successful recovery) are quite large, it is not sufficient for some high-availability requirements, which sometimes require an RPO of zero and RTO in the range of a couple seconds only.
Another approach that is more sophisticated is called streaming replication.
When using streaming replication, single transaction log messages are reproduced to the replica and synchronicity requirements can be handled on a per-message basis.
Streaming replication needs more setup - usually this involves creating a replication user and initiating the replication stream - but this pays off in terms of the recovery objectives.
When streaming replication is employed with the additional requirement of synchronicity, the replica must confirm that it has received (and written) all prior log messages before the primary can confirm or reject a client's commit request. As a result, after a failure on the primary, the replica can instantly be promoted and business can carry on as usual after all connections have been diverted to the replica.
Patroni is a tool that can be used to create, manage, maintain and monitor highly available PostgreSQL cluster setups using streaming replication.
Patroni is distributed under the MIT license and can be easily installed via PIP. For Ubuntu and Debian, it is obtainable via the system repositories and for Fedora, CentOS, or RHEL, RPM packages are provided by CYBERTEC.
Basically, everything you need to run highly available PostgreSQL clusters!
Patroni creates the cluster, initiates streaming replication, handles synchronicity requirements, monitors liveliness of primary and replica, can change the configuration of all cluster members, issues reload commands and restarts selected cluster members, handles planned switchovers and unplanned failovers, rewinds a failed primary to bring it back in line and reinitiates all replication connections to point to the newly promoted primary.
Patroni is engineered to be very fault tolerant and stable; By design, split-brain scenarios are avoided. Split-brain occurs when two members of the same cluster accept writing statements.
It guarantees that certain conditions are always fulfilled and despite the automation of so many complex tasks, it shouldn't corrupt the database cluster nor end in a situation where recovery is impossible.
For example, Patroni can be told never to promote a replica that is lagging behind the primary by more than a configurable amount of log.
It also fulfils several additional requirements; for example, certain replicas should never be considered for promotion if they exist only for the purpose of archiving or data lake applications and not business operations.
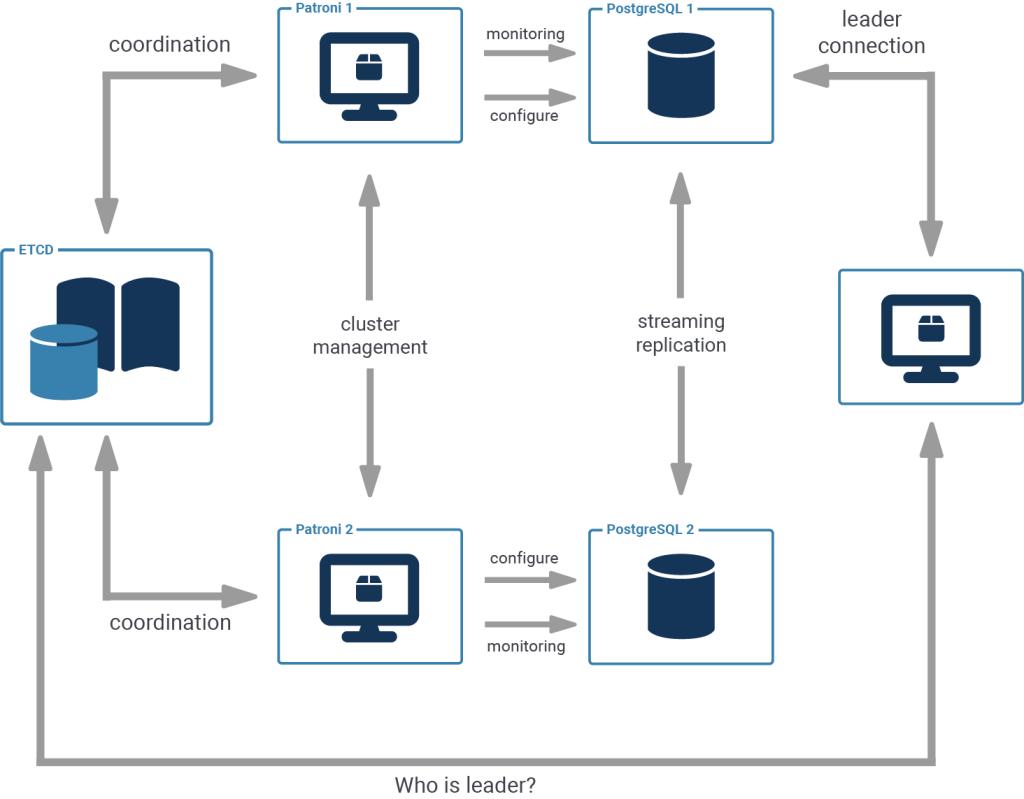
The architecture of Patroni is such that every PostgreSQL instance is accompanied by a designated Patroni instance that monitors and controls it.
All of the data that Patroni collects is mirrored in a distributed key-value store, and based on the information present in the store, all Patroni instances agree on decisions, such as which replica to promote if the primary has failed.
The distributed key-value store, for example etcd or consul, enables atomic manipulation of keys and values. This forwards the difficult problem of cluster consensus (which is critical to avoid the split-brain scenario) to battle tested components, proven to work correctly even under the worst circumstances.
Some of the data collected by Patroni is also exhibited through a ReST interface, which can be useful for monitoring purposes as well as for applications to select which PostgreSQL instance to connect to.
Adding a replica to your PostgreSQL cluster can both improve availability and performance. While the configuration of replication is not an easy task (due to the obvious complexity involved with rather sophisticated streaming replication), a solution exists that avoids many pitfalls and enables simple configuration, while also catering to extraordinary demands: Patroni.
This post is part of a series. Apart from this brief introduction, the series covers:
We all know that in PostgreSQL we cannot drop an object if there are view dependencies on it:
|
1 2 3 4 5 6 7 8 9 10 11 12 13 |
CREATE TABLE t (id integer PRIMARY KEY); CREATE VIEW v AS SELECT * FROM t; DROP TABLE t; ERROR: cannot drop table t because other objects depend on it DETAIL: view v depends on table t HINT: Use DROP ... CASCADE to drop the dependent objects too. ALTER TABLE t DROP id; ERROR: cannot drop column id of table t because other objects depend on it DETAIL: view v depends on column id of table t HINT: Use DROP ... CASCADE to drop the dependent objects too. |
Some people like it because it keeps the database consistent; some people hate it because it makes schema modifications more difficult. But that's the way it is.
In this article I want to explore the mechanics behind view dependencies and show you how to track what views depend on a certain PostgreSQL object.
Imagine you want to modify a table, e.g. change a column's data type from integer to bigint because you realize you will need to store bigger numbers.
However, you cannot do that if there are views that use the column. You first have to drop those views, then change the column and then run all the CREATE VIEW statements to create the views again.
As the example shows, editing tables can be quite a challenge if there is a deep hierarchy of views, because you have to create the views in the correct order. You cannot create a view unless all the objects it requires are present.
Before I show you how to untangle the mess, I'd like to tell you what mistakes to avoid when you are using views in your database design (excuse my switching to teacher mode; I guess holding courses has that effect on you).
Views are good for two things:
Neither of these applications require you to “stack” views, that is, define views over views.
There are two patterns of using views that tend to be problematic, and they both stem from the mistaken idea that a view works exactly like a table, just because it looks like one:
WHERE conditions work well, but others take impossibly long.Never forget that a view is just a “crystallized” SQL statement and gets replaced by its definition when the query is executed.
A view in PostgreSQL is not that different from a table: it is a “relation”, that is “something with columns”.
All such objects are stored in the catalog table pg_class.
As the documentation states, a view is almost the same as a table, with a few exceptions:
relkind is “v” rather than “r”ON SELECT rule called “_RETURN”This “query rewrite rule” contains the definition of the view and is stored in the ev_action column of the pg_rewrite catalog table.
Note that the view definition is not stored as a string, but in the form of a “query parse tree”. Views are parsed when they are created, which has several consequences:
CREATE VIEW, so the current setting of search_path applies.Note that the way PostgreSQL handles views quite different from the way PostgreSQL handles functions: function bodies are stored as strings and not parsed when they are created. Consequently, PostgreSQL cannot know on which objects a given function depends.
All dependencies (except those on “shared objects”) are stored in the catalog table pg_depend:
classid stores the object ID of the catalog table containing the dependent objectobjid stores the ID of the dependent objectobjsubid stores the column number if the dependency is for a columnrefclassid, refobjid and refobjsubid are like the three columns above, but describe the object referenced by the dependencydeptype describes the kind of dependencyIt is important to notice that there is no direct dependency of a view on the objects it uses: the dependent object is actually the view's rewrite rule. That adds another layer of indirection.
In the following, I'll use this schema to test my queries:
|
1 2 3 4 5 6 7 8 9 10 11 12 13 14 15 16 17 18 19 20 21 22 23 24 |
CREATE TABLE t1 ( id integer PRIMARY KEY, val text NOT NULL ); INSERT INTO t1 VALUES (1, 'one'), (2, 'two'), (3, 'three'); CREATE FUNCTION f() RETURNS text LANGUAGE sql AS 'SELECT ''suffix'''; CREATE VIEW v1 AS SELECT max(id) AS id FROM t1; CREATE VIEW v2 AS SELECT t1.val FROM t1 JOIN v1 USING (id); CREATE VIEW v3 AS SELECT val || f() FROM t1; |
I have thrown in a function, just to show that a view can depend on objects other than tables.
In the following I will concentrate on tables and columns, but the queries will work for functions too, if you replace the catalog pg_class that contains tables with the catalog pg_proc that contains functions.
To find out which views directly depend on table t1, you would query like this:
|
1 2 3 4 5 6 7 8 9 10 11 12 13 14 15 16 17 18 19 20 |
SELECT v.oid::regclass AS view FROM pg_depend AS d -- objects that depend on the table JOIN pg_rewrite AS r -- rules depending on the table ON r.oid = d.objid JOIN pg_class AS v -- views for the rules ON v.oid = r.ev_class WHERE v.relkind = 'v' -- only interested in views -- dependency must be a rule depending on a relation AND d.classid = 'pg_rewrite'::regclass AND d.refclassid = 'pg_class'::regclass AND d.deptype = 'n' -- normal dependency AND d.refobjid = 't1'::regclass; view ------ v2 v1 v3 v2 (4 rows) |
To find views with direct dependencies on the function f, simply replace “d.refclassid = 'pg_class'::regclass” with “d.refclassid = 'pg_proc'::regclass” and “refobjid = 't1'::regclass” with “refobjid = 'f'::regproc”.
Actually, the views will usually not depend on the table itself, but on the columns of the table (the exception is if a so-called “whole-row reference” is used in the view). That is why the view v2 shows up twice in the above list. You can remove those duplicates using DISTINCT.
We can modify the above query slightly to find those views that depend on a certain table column, which can be useful if you are planning to drop a column (adding a column to the base table is never a problem).
The following query finds the views that depend on the column val of table t1:
|
1 2 3 4 5 6 7 8 9 10 11 12 13 14 15 16 17 18 19 20 21 |
SELECT v.oid::regclass AS view FROM pg_attribute AS a -- columns for the table JOIN pg_depend AS d -- objects that depend on the column ON d.refobjsubid = a.attnum AND d.refobjid = a.attrelid JOIN pg_rewrite AS r -- rules depending on the column ON r.oid = d.objid JOIN pg_class AS v -- views for the rules ON v.oid = r.ev_class WHERE v.relkind = 'v' -- only interested in views -- dependency must be a rule depending on a relation AND d.classid = 'pg_rewrite'::regclass AND d.refclassid = 'pg_class'::regclass AND d.deptype = 'n' -- normal dependency AND a.attrelid = 't1'::regclass AND a.attname = 'val'; view ------ v3 v2 (2 rows) |
Now if you haven't heeded the advice I gave above and you went ahead and defined a complicated hierarchy of views, it doesn't stop with direct dependencies.
Rather, you need to recursively go through the whole hierarchy.
For example, let's assume that you want to DROP and re-create the table t1 from our example and you need the CREATE VIEW statements to re-create the views once you are done (dropping them won't be a problem if you use DROP TABLE t1 CASCADE).
Then you need to use the above queries in a recursive “common table expression” (CTE). The CTE is for tracking recursive view dependencies and can be reused for all such requirements; the only difference will be in the main query.
|
1 2 3 4 5 6 7 8 9 10 11 12 13 14 15 16 17 18 19 20 21 22 23 24 25 26 27 28 29 30 31 32 33 34 35 36 37 38 39 40 41 42 43 44 45 46 47 48 49 50 51 52 53 54 |
WITH RECURSIVE views AS ( -- get the directly depending views SELECT v.oid::regclass AS view, v.relkind = 'm' AS is_materialized, 1 AS level FROM pg_depend AS d JOIN pg_rewrite AS r ON r.oid = d.objid JOIN pg_class AS v ON v.oid = r.ev_class WHERE v.relkind IN ('v', 'm') AND d.classid = 'pg_rewrite'::regclass AND d.refclassid = 'pg_class'::regclass AND d.deptype = 'n' AND d.refobjid = 't1'::regclass UNION -- add the views that depend on these SELECT v.oid::regclass, v.relkind = 'm', views.level + 1 FROM views JOIN pg_depend AS d ON d.refobjid = views.view JOIN pg_rewrite AS r ON r.oid = d.objid JOIN pg_class AS v ON v.oid = r.ev_class WHERE v.relkind IN ('v', 'm') AND d.classid = 'pg_rewrite'::regclass AND d.refclassid = 'pg_class'::regclass AND d.deptype = 'n' AND v.oid <> views.view -- avoid loop ) SELECT format('CREATE%s VIEW %s AS%s', CASE WHEN is_materialized THEN ' MATERIALIZED' ELSE '' END, view, pg_get_viewdef(view)) FROM views GROUP BY view, is_materialized ORDER BY max(level); format ------------------------------------------- CREATE VIEW v3 AS SELECT (t1.val || f()) + FROM t1; CREATE VIEW v1 AS SELECT max(t1.id) AS id+ FROM t1; CREATE VIEW v2 AS SELECT t1.val + FROM (t1 + JOIN v1 USING (id)); (3 rows) |
We need the GROUP BY because a view may depend on an object in more than one ways: in our example, v2 depends on t1 twice: once directly, and once indirectly via v1.
Have questions? Need PostgreSQL support? You can reach us here.
In order to receive regular updates on important changes in PostgreSQL, subscribe to our newsletter, or follow us on Twitter, Facebook, or LinkedIn.
by Kaarel Moppel
It’s almost that time of year again—PostgreSQL's next major version, v12, is on the way! Upgrading databases, including Postgres, is a rare event for many users, leading to misconceptions about the difficulty of the process. In reality, upgrading is straightforward, which makes it surprising that many still use outdated versions. This article aims to encourage faster upgrades in the future. For a quick overview, check the TL;DR table at the end.
Some main points that come to my mind:
And to make it even more easy for you - there’s a really cool website (much kudos to Depesz!) where you can directly get a highlighted listing of all the changes between two target Postgres versions! Link here!
Minor version changes a.k.a. bugfix releases happen regularly and can be used as a warmp-up here. There is a minimum of 1 minor release per quarter, if no security-critical stuff is found. It is, of course, highly recommended to apply them as soon as they are released.
The good thing about minor releases is that they’re as fast as restarting your server! I recommend to “prefix” the restart with a hand-initiated “checkpoint” so that effective downtime for applications is minimized since “pg_ctl stop / restart” already does checkpointing in exclusive mode, after active sessions have been kicked from the server.
Caution! When using some distribution-specific Postgres packages some extra attention is needed. For example running “apt upgrade postgresql-X” might mean an imminent restart to the running instance, after new binaries have been pulled in! For RedHat / CentOS it’s usually a bit better though and there you need to restart explicitly.
Also when running a clustered streaming replication setup where downtime on the primary node is scarce and restarts are to be avoided, my recommendation is to immediately update all replicas to the latest minor version (minor versions don’t need to match, only major). That way, when some accidental server issue appears (e.g.reboot, hardware maintenance etc) you’ll already be promoted to the latest version with a sort of “free downtime”.
Let's now move on to the real thing - major upgrade options.
This is the original way of doing major version upgrades and it's the only option up until version 9.0 which introduced the binary / in-place option. Logical dumps use “pg_dumpall” or “pg_dump” / “pg_restore” tools, that basically “reverse engineer” the database state to normal SQL statements. When those statements are executed sequentially on a target DB, they re-create exactly the same state for all user-level objects as it was on the source cluster / DB. NB! “Pg_dumpall” works on the instance level and “pg_dump” on the database level.
One more recommendation - when dumping out the DB contents it’s usually best to use the tools from the latest Postgres version. Note that this might not be officially supported, if you fall out of the “5 latest releases supported” window. By the way, on the topic of dump / restore and Postgres versions, I’d recommend to read this nice FAQ by our colleague Pavlo. It’s a few years old, but still correct.
Binary in-place upgrades are quite different from the logical ones as they happen on the filesystem level (i.e. always on the same machine if no shared storage is in play) and are a multi-step process with some additional complexity. However, things are still quite straightforward - after installing the new binaries and following a bit of preparation, it basically boils down to running a single command that typically finishes in 10 to 20 seconds in “--link” mode!! That's also why it's the most common upgrade option nowadays: nobody wants extended downtimes.
High-level steps to take (see documentation for details):
1. Install new major version binaries.
2. Initialize the new instance with new binaries (with the same major settings as on the old instance).
3. Do a test run with “pg_upgrade”. FYI - I tend to test first on a completely spare replica or a P.I.T.R. restored instance.
4. Stop the old instance.
5. Run “pg_upgrade” with or without file linking. Using hard-linking of files from the old data directory into the new one is the fastest way to upgrade! Basically only system catalogs are dumped and reloaded. Without linking all data files are copied over and it boils down to filesystem speed vs instance size, with the benefit that the old cluster is not modified.
6. Start the instance (it is usually also necessary to change the port back to 5432).
7. Start the “analyze” script generated and hinted at by the “pg_upgrade” tool. Performance for complex queries might suffer until it finishes.
NB! Also note that some distributions provide wrapper scripts (like “pg_upgradecluster” on Debian-based systems) to assist with in-place upgrades. They might be worth a look.
Logical Replication (LR) is a new option for Postgres major version upgrades, available from version 10 and up, and unofficially from 9.4. It allows you to transfer data and changes from an old primary server to a newly created, independent master server without extended downtime. LR operates at the database level, decoupling from the binary format and using data objects similar to JSON. This enables near real-time syncing, allowing time to test and validate results before finalizing the switch. For more details, check the sample code here.
It looks awesome and relatively simple, doesn’t it? And it is mostly! To spoil the party a bit - there's also a lot of "small print" to read, and an out-of-the box LR process might not always be possible - it depends a bit on the data model being used. Some tweaking / changing might be needed.
| Upgrade method | Pro | Contra |
|---|---|---|
| Dump / restore |
|
|
| Binary in-place |
|
|
| Logical Replication |
|
|
Besides the obvious pre-upgrade DBA activities, such as testing, backups, and thoroughly analyzing the release notes, there are other important considerations. It’s beneficial to discuss application compatibility. Additionally, the compatibility of UI or monitoring tools with end users and application teams should also be addressed. All in all there is a very low risk factor involved in upgrading, main SQL features are backwards compatible.
I can't, of course, 100% recommend doing "lone ranger" types of covert database migrations. Although I’ve done my fair share of these, they do come with risks. In these scenarios, the database may disappear for a minute, only to reappear in a shiny new “coat” without anyone raising an eyebrow. However, if your schema consists only of a handful of plain tables with the most common data types, the situation may be different. If there are no stored procedures or other PostgreSQL-specific features like LISTEN / NOTIFY involved, and standard ANSI SQL is performed, then most likely everything will be just fine. This is due to the fact that the Postgres wire protocol has not been changed since v7-point-something. Changing it for basic SQL operations would be a massive problem for all users globally. That's why changing it has been avoided.
If you're not running an absolutely time-critical 24/7 operation (something like a space-shuttle) in my opinion there are no excuses not to upgrade at least once every couple of years. Keep in mind – if you ignore the topic for too long you’ll stop receiving security patches at some point. Then, when it is most needed, the upgrade process becomes slightly more tricky. This is because the PostgreSQL Global Development Group only supports releases from the previous five years in its tooling. If you've waited too long to upgrade, you might need to run "pg_upgrade" twice in a row. Additionally, there's some extra risk involved, as you may encounter corner case backward compatibility issues. This is particularly concerning because there is no testing for such scenarios. In short, better upgrade sooner than later!
Written by Granthana Biswas
In my previous post about pgBackRest, we saw how to install and setup pgBackRest and make a backup of a PostgreSQL database with it. It was a very basic single server setup, only intended to get the hang of the tool. Such setups are not used in a production environment, as it is not recommended (or rather does not serve the purpose) to perform the backup on the same server where the database is running. So: let's get familiar with how remote backup servers are set up with pgBackRest, and how a full and incremental backup is performed from the backup server and restored on the database server.
We need two servers. Let's call ours:
pgbackupdb1We need to install pgBackRest on the database and the backup server. Make sure you install the same version on both.
For the database server, please follow the installation steps from my previous post. The steps are slightly different for the backup server, since it is a better practice to create a separate user to own the pgBackRest repository.
pgbackrest user on the backup server|
1 |
sudo adduser --disabled-password --gecos '' pgbackrest |
|
1 2 3 |
sudo apt-get install libdbd-pg-perl sudo scp BUILD_HOST:/root/pgbackrest-release-2.14/src/pgbackrest /usr/bin/ sudo chmod 755 /usr/bin/pgbackrest |
pgbackup|
1 2 3 4 5 6 7 8 9 10 |
sudo mkdir -p -m 770 /var/log/pgbackrest sudo chown pgbackrest:pgbackrest /var/log/pgbackrest sudo mkdir -p /etc/pgbackrest sudo mkdir -p /etc/pgbackrest/conf.d sudo touch /etc/pgbackrest/pgbackrest.conf sudo chmod 640 /etc/pgbackrest/pgbackrest.conf sudo chown pgbackrest:pgbackrest /etc/pgbackrest/pgbackrest.conf sudo mkdir -p /var/lib/pgbackrest sudo chmod 750 /var/lib/pgbackrest sudo chown pgbackrest:pgbackrest /var/lib/pgbackrest |
Now we are ready to proceed with enabling communication between the database and the backup server. For that, pgBackRest requires a passwordless SSH connection.
We can do that by generating an SSH authentication key file using the
|
1 |
ssh-keygen |
command.
pgbackup server as pgbackrest user:|
1 2 3 |
sudo -u pgbackrest mkdir -m 750 /home/pgbackrest/.ssh sudo -u pgbackrest ssh-keygen -f /home/pgbackrest/.ssh/id_rsa -t rsa -b 4096 -N '' |
db1 as postgres user:|
1 2 3 |
sudo -u postgres mkdir -m 750 -p /var/lib/postgresql/.ssh sudo -u postgres ssh-keygen -f /var/lib/postgresql/.ssh/id_rsa -t rsa -b 4096 -N '' |
pgbackup:|
1 |
cat ~/.ssh/id_rsa.pub | ssh postgres@db1 'cat >> ~/.ssh/authorized_keys' |
db1:|
1 |
cat ~/.ssh/id_rsa.pub | ssh pgbackrest@pgbackup 'cat >> ~/.ssh/authorized_keys' |
Test the passwordless connection as follows:
|
1 2 3 |
root@pgbackup:~$ sudo -u pgbackrest ssh postgres@db1 root@db1:~$ sudo -u postgres ssh pgbackrest@repository |
You can find more details about passwordless SSH connection here.
On the pgbackup server, configure the pgBackRest configuration file with the database host and path, along with the repository path where the backups will be stored. We have added the database host as 'pg1-host' so that we can add more database hosts later as 'pg2-host' and so on. The same goes for pg1-path.
|
1 2 3 4 5 6 |
$ cat /etc/pgbackrest/pgbackrest.conf [demo] pg1-host=db1 pg1-path=/var/lib/postgresql/10/main [global] repo1-path=/var/lib/pgbackrest repo1-retention-full=2 start-fast=y |
The Start Fast Option (--start-fast) has been used to force a checkpoint to start the backup quickly. Otherwise, the backup will start after the next regular checkpoint.
On server db1, configure the pgBackRest configuration file with the database path and backup host as follows:
|
1 2 3 4 5 6 |
$ cat /etc/pgbackrest/pgbackrest.conf [demo] pg1-path=/var/lib/postgresql/10/main [global] log-level-file=detail |
On db1, update postgresql.conf to have the following changes:
|
1 2 3 4 5 6 |
archive_command = 'pgbackrest --stanza=demo archive-push %p' archive_mode = on listen_addresses = '*' log_line_prefix = '' max_wal_senders = 3 wal_level = replica |
Now restart PostgreSQL to reflect the configuration changes.
Create a stanza on the pgbackup server and check if it's working. Getting no result means the stanza has been created successfully.
|
1 2 |
sudo -u pgbackrest pgbackrest --stanza=demo stanza-create sudo -u pgbackrest pgbackrest --stanza=demo check |
Check if the stanza configuration is correct on db1:
|
1 |
sudo -u postgres pgbackrest --stanza=demo check |
With the setup ready, let's take our first remote backup from pgbackup. The default backup is incremental, but the first backup is always a full backup.
|
1 2 3 4 5 6 7 8 9 10 11 12 |
sudo -u pgbackrest pgbackrest --stanza=demo backup sudo -u pgbackrest pgbackrest --stanza=demo info stanza: demo status: ok cipher: none db (current) wal archive min/max (10-1): 000000010000000000000007/000000010000000000000008 full backup: 20190726-133657F timestamp start/stop: 2019-07-26 13:36:57 / 2019-07-26 13:37:07 wal start/stop: 000000010000000000000007 / 000000010000000000000007 database size: 22.5MB, backup size: 22.5MB repository size: 2.6MB, repository backup size: 2.6MB |
You will find directories and files being created in the backup location.
Taking a full backup was easy. Let's see some examples of incremental backup and recovery with a target:
Create a test database on db1:
|
1 2 3 4 5 6 7 8 9 10 11 |
postgres=# create database test; CREATE DATABASE postgres=# \l List of databases Name | Owner | Encoding | Collate | Ctype | Access privileges -----------+----------+----------+-------------+-------------+----------------------- postgres | postgres | UTF8 | en_US.UTF-8 | en_US.UTF-8 | template0 | postgres | UTF8 | en_US.UTF-8 | en_US.UTF-8 | =c/postgres postgres=CTc/postgres template1 | postgres | UTF8 | en_US.UTF-8 | en_US.UTF-8 | =c/postgres postgres=CTc/postgres test | postgres | UTF8 | en_US.UTF-8 | en_US.UTF-8 | (4 rows) |
Make another backup. By default, this will be incremental since it's the second backup and we are not specifying the type:
|
1 |
sudo -u pgbackrest pgbackrest --stanza=demo backup |
To restore, stop PostgreSQL on db1 and run pgbackrest with the restore command:
|
1 2 3 |
sudo service postgresql stop sudo -u postgres pgbackrest --stanza=demo --delta restore sudo service postgresql start |
If you check the database now, you will not find the test database. This is because the backup was restored from the first full backup.
|
1 2 3 4 5 6 7 8 |
postgres=# l List of databases Name | Owner | Encoding | Collate | Ctype | Access privileges -----------+----------+----------+-------------+-------------+----------------------- postgres | postgres | UTF8 | en_US.UTF-8 | en_US.UTF-8 | template0 | postgres | UTF8 | en_US.UTF-8 | en_US.UTF-8 | =c/postgres postgres=CTc/postgres template1 | postgres | UTF8 | en_US.UTF-8 | en_US.UTF-8 | =c/postgres postgres=CTc/postgres (3 rows) |
To restore the data up to the incremental backup, run the restore command with recovery_target in --recovery-option.
|
1 2 3 4 |
sudo service postgresql stop sudo -u postgres pgbackrest --stanza=demo --delta restore --recovery-option=recovery_target=immediate sudo service postgresql start |
Let's check the database now:
|
1 2 3 4 5 6 7 8 9 10 11 |
postgres=# l List of databases Name | Owner | Encoding | Collate | Ctype | Access privileges -----------+----------+----------+-------------+-------------+----------------------- postgres | postgres | UTF8 | en_US.UTF-8 | en_US.UTF-8 | template0 | postgres | UTF8 | en_US.UTF-8 | en_US.UTF-8 | =c/postgres + | | | | | postgres=CTc/postgres template1 | postgres | UTF8 | en_US.UTF-8 | en_US.UTF-8 | =c/postgres + | | | | | postgres=CTc/postgres test | postgres | UTF8 | en_US.UTF-8 | en_US.UTF-8 | (4 rows) |
I hope this exercise could help to get you started with remote backup and pgBackRest! To learn more commands, please visit the pgBackRest official site here.
Stay tuned for more tutorials and exercises with pgBackRest. If you are not sure how to use PostgreSQL efficiently or how to setup your systems in general consider checking out our support services.
In order to receive regular updates on important changes in PostgreSQL, subscribe to our newsletter, or follow us on Facebook or LinkedIn.
BY Kaarel Moppel - In order to prepare for the start of training season (you can see our “stock” training offerings here by the way), I’ve updated our small “Postgres features showcase” project, and thought I'd echo it out too. Main changes - coverage on some features of the current v11 release and also from the upcoming v12.
The project was introduced two years ago - the main idea of the project itself is to provide a compact and "hands-on" set of commented samples to help newcomers get up to speed with Postgres. Of course, one cannot beat official documentation but sadly, the documentation for Postgres doesn’t have a dedicated folder for working code samples. However, the tutorial can be helpful. So, the idea is to provide some commented SQL for the “code-minded” people to quickly see and “feel” the concepts to get the gist of it faster.
If you see that this project is somewhat useful but could be improved even more, we would be very glad if you take the time to provide your ideas as Github issues – or even better – directly as Pull Requests. Thanks!
In order to receive regular updates on important changes in PostgreSQL, subscribe to our newsletter!

You are currently viewing a placeholder content from Turnstile. To access the actual content, click the button below. Please note that doing so will share data with third-party providers.
More Information