Analysing data within PostGIS is just one side of the coin. What about publishing our datasets as maps that various clients can consume and profit from with Geoserver and PostGIS? Let’s have a look at how this can be accomplished with Geoserver. Geoserver acts in this regard as a full-fledged open source mapping server, supporting several OGC compliant services, such as OGC Web Mapping (WMS) or Web Feature Service (WFS).
OGC is an abbreviation for Open GIS Consortium, which is a community working on improving access to spatial information by developing standards in this area.
Table of Contents
Here’s a quick overview of this article’s structure:
Let’s first start by setting up Geoserver as a single, non-clustered instance. For our demo, I recommend using one of the available Docker images to start up quickly. The steps listed below show how to pull our geoserver image (kartoza) first, and subsequently start the container with its default configuration within a tmux session, which allows us to easily monitor geoserver’s output.
docker pull kartoza/geoserver:2.18.2
tmux
docker run -it --name geoserver -p 8080:8080 -p 8600:8080 kartoza/geoserver:2.18.2
If everything runs smoothly, Apache Tomcat reports back with
org.apache.catalina.startup.Catalina.start Server startup in XX ms
In one of my last blog posts, I imported a csv containing locations of airports (https://ourairports.com/data/airports.csv). Let’s build on this and use these point geometries as the main vector layer for our visualization.
By using kartoza’s image defaults, Apache Tomcat will listen on port 8080 serving Geoserver’s web-interface with http://10.0.0.216:8090/geoserver. So, let’s continue and login with geoserver/admin.

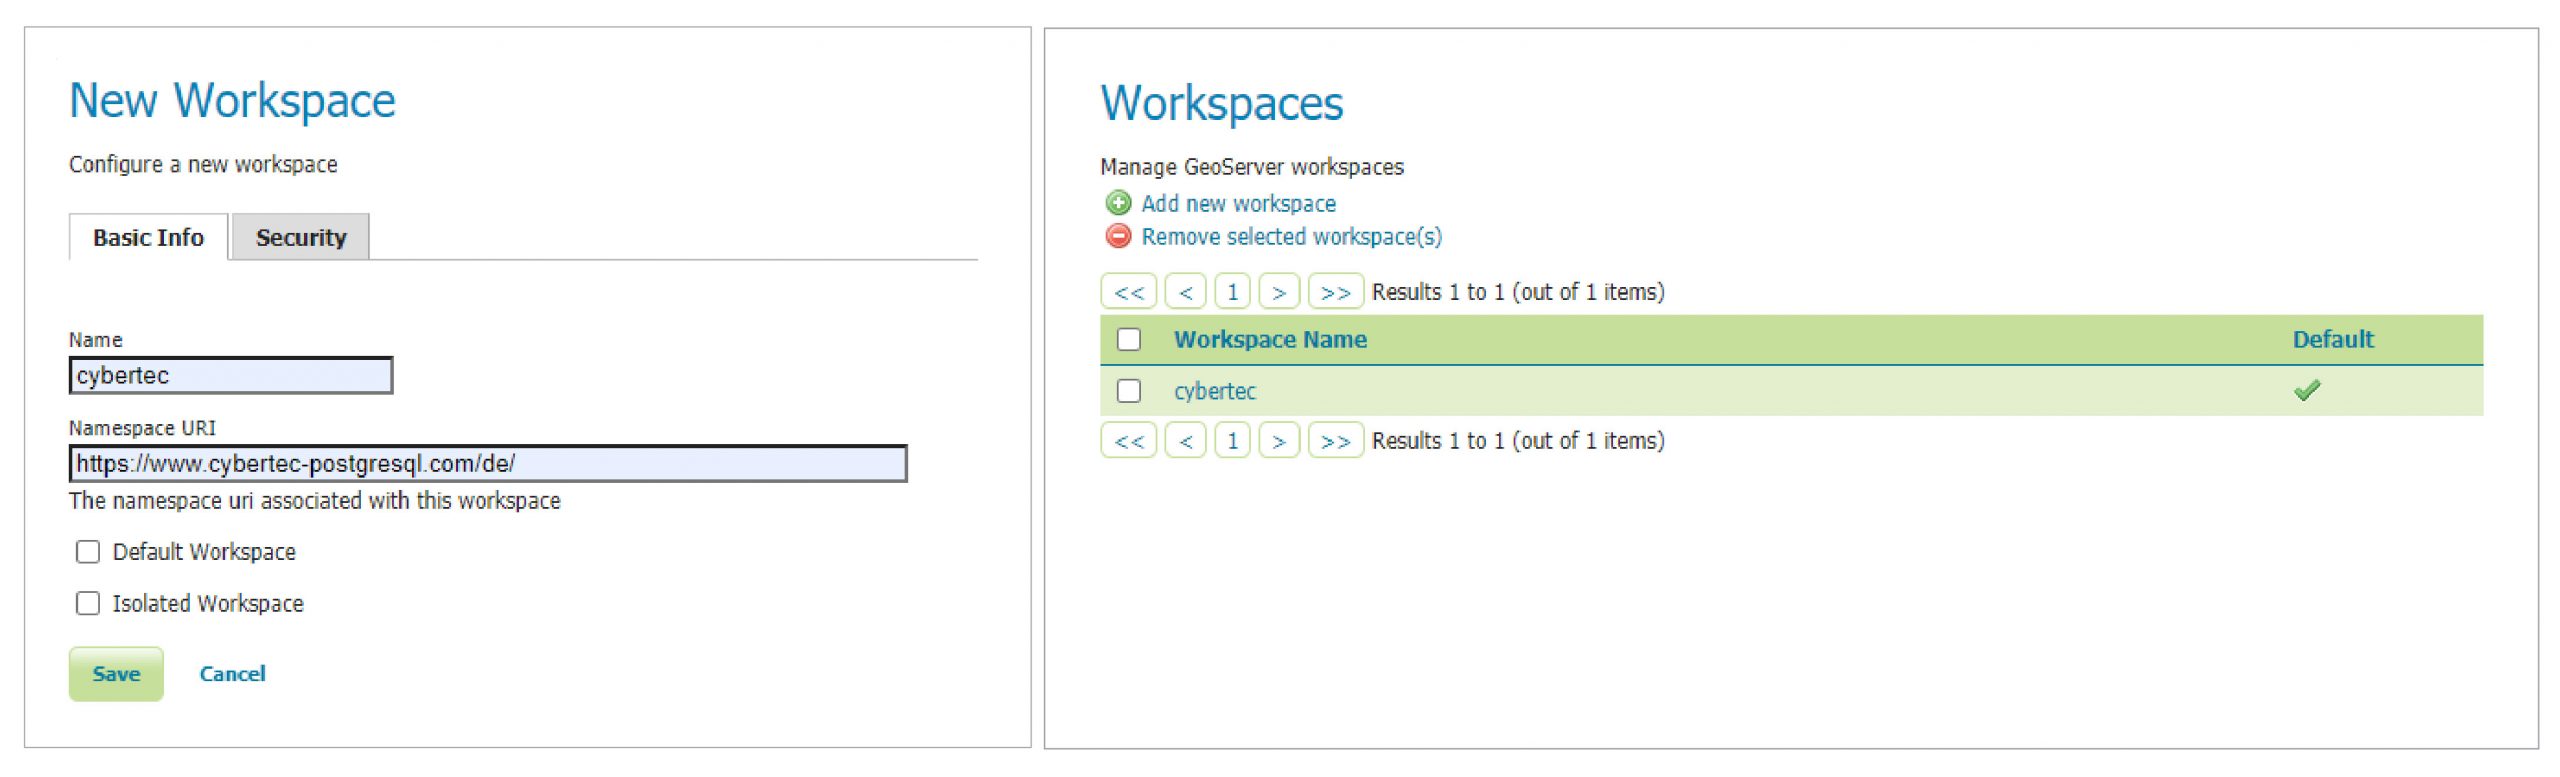
Figure 1 represents Geoserver’s main web screen after logging in. To publish our airport dataset, we must register our PostGIS database as a store (data source). To do so, I would first like to introduce the concept of workspaces within Geoserver. Workspaces are containers which data stores, layers and services belong to. Workspaces can be configured in detail in terms of accessibility and functionality.
Setting up at least one workspace is required. Check out Figure 2 and 3 to understand how this can easily be accomplished.
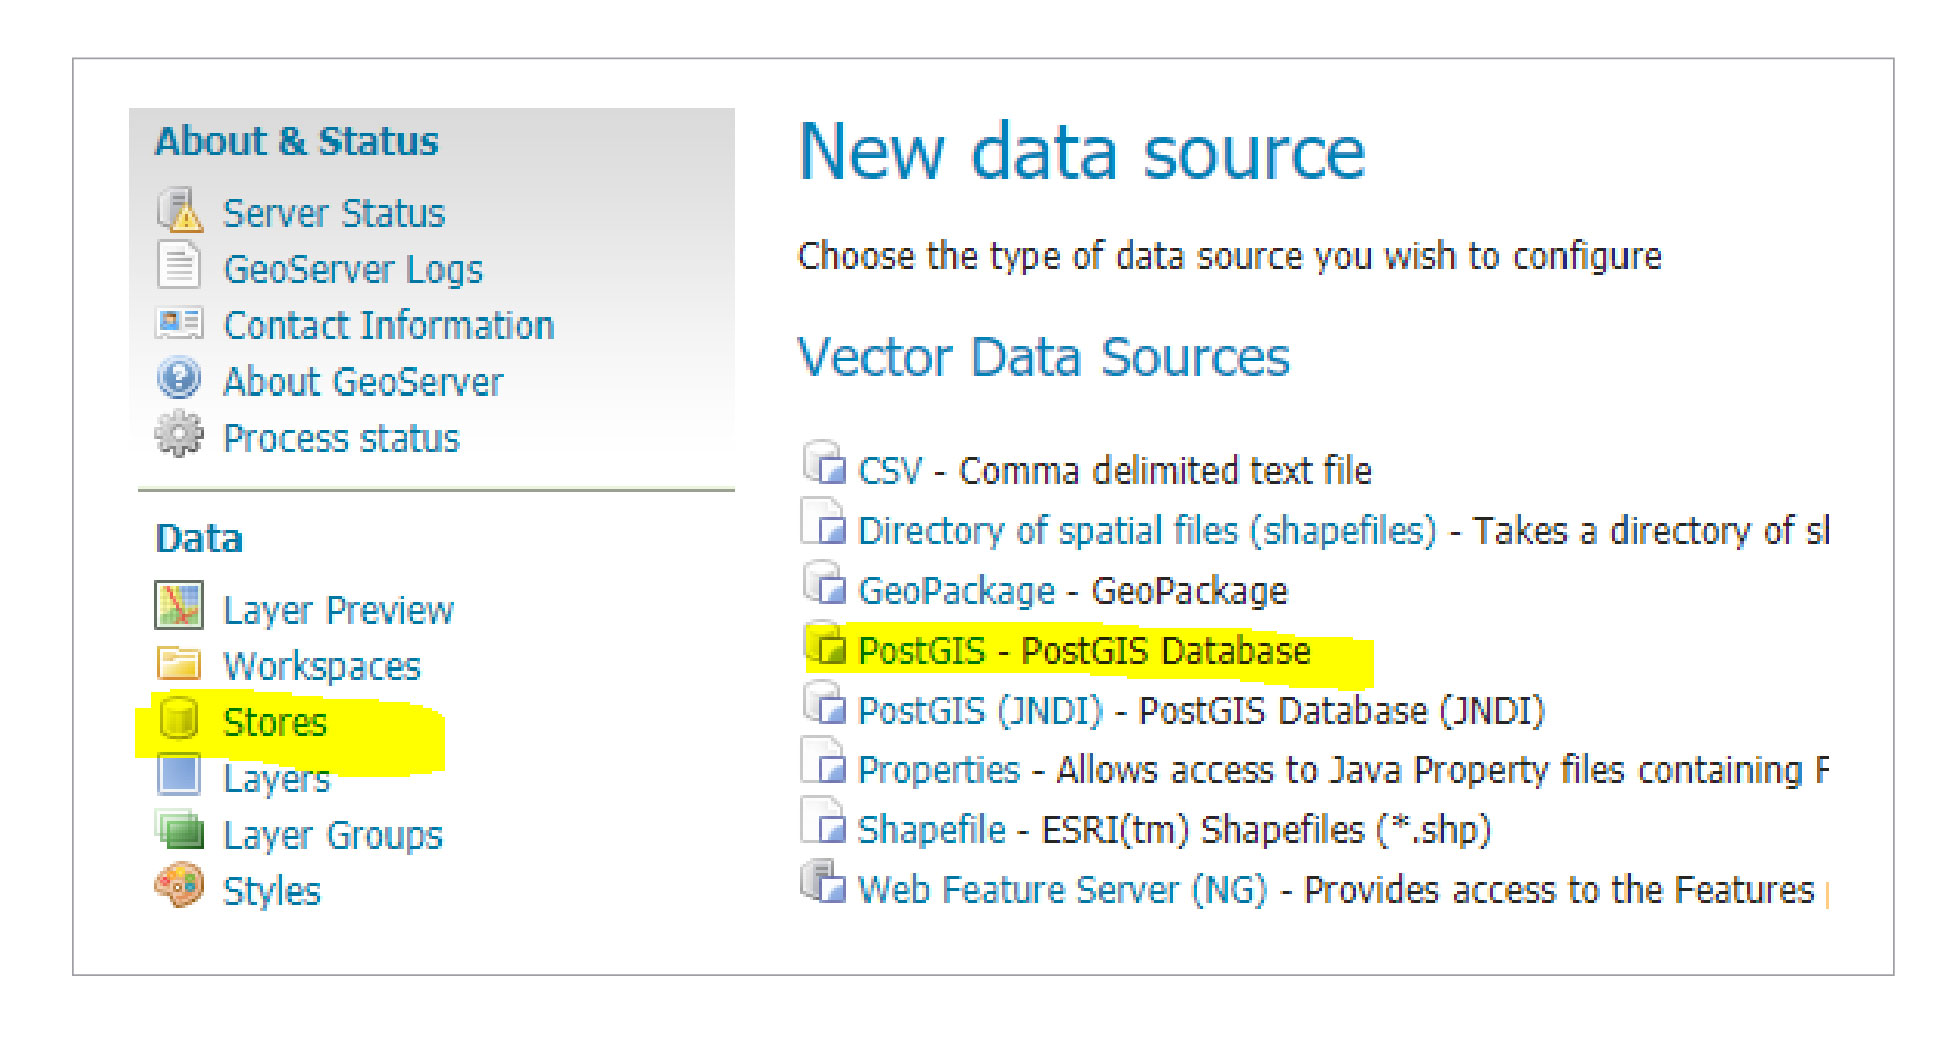
Let’s come back to our initial task, and configure our PostGIS database as a vector data source.
1. Click on store and choose PostGIS as your vector datasource:
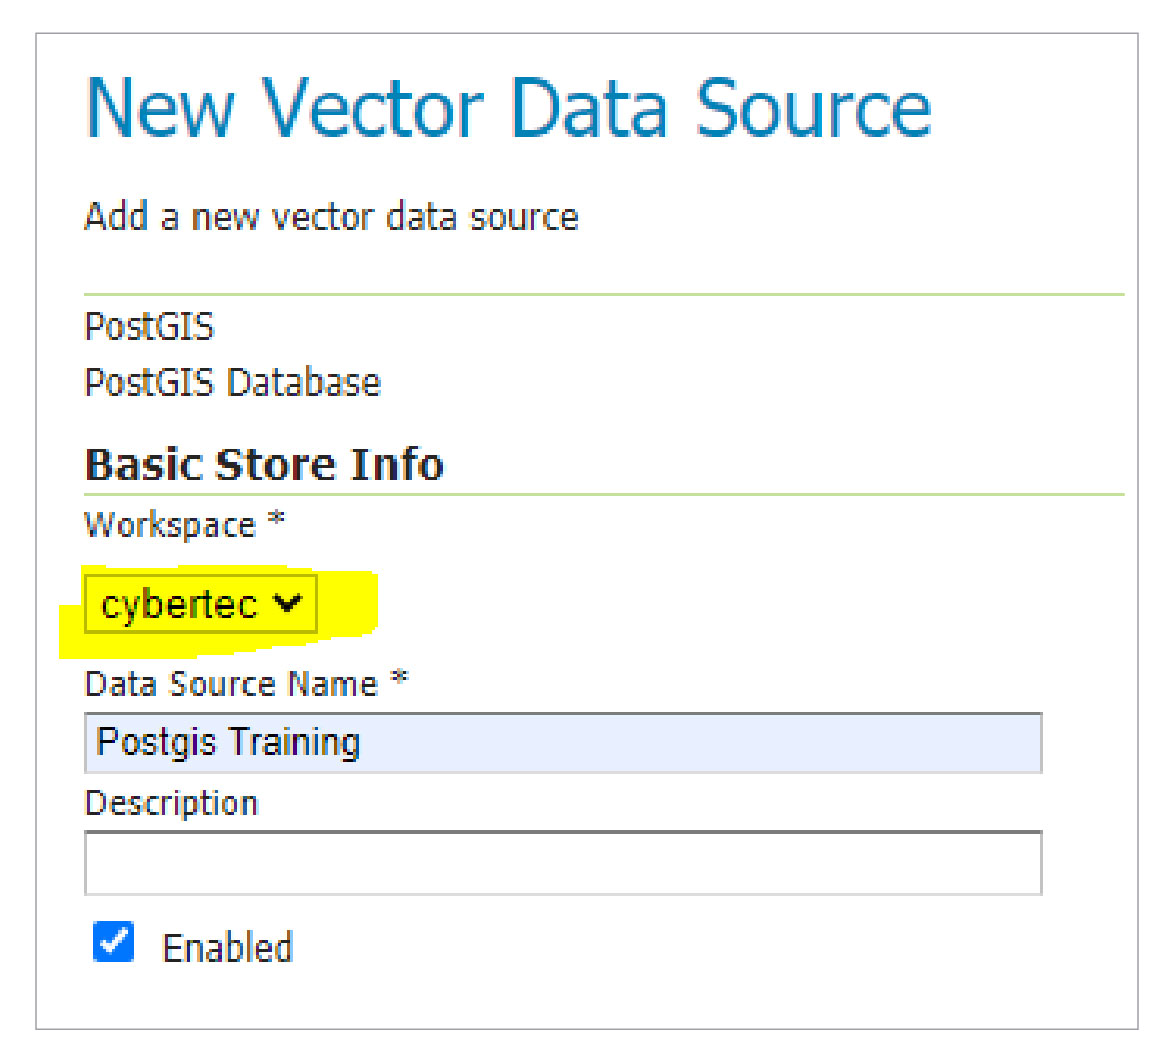
2. Choose your workspace and configure and relate your PostGIS connection:
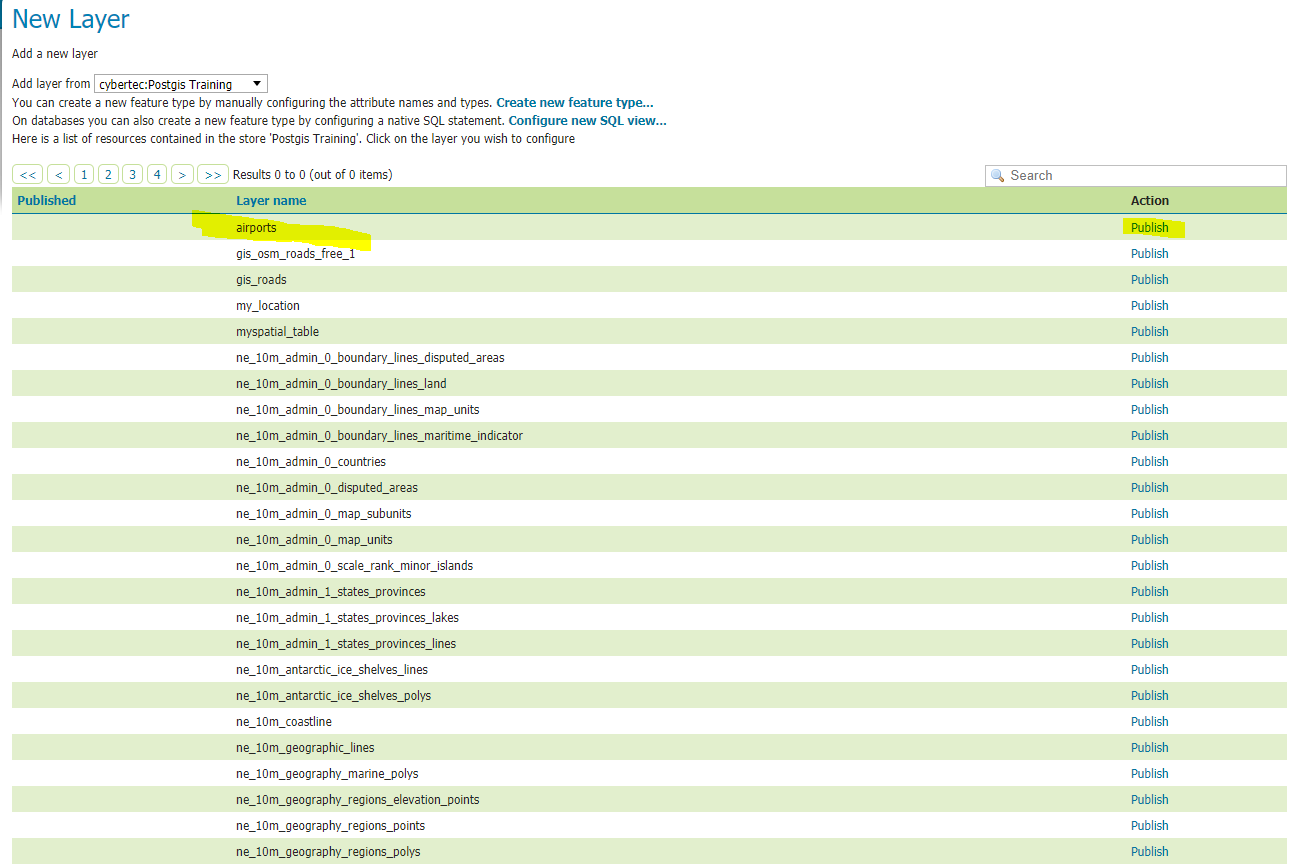
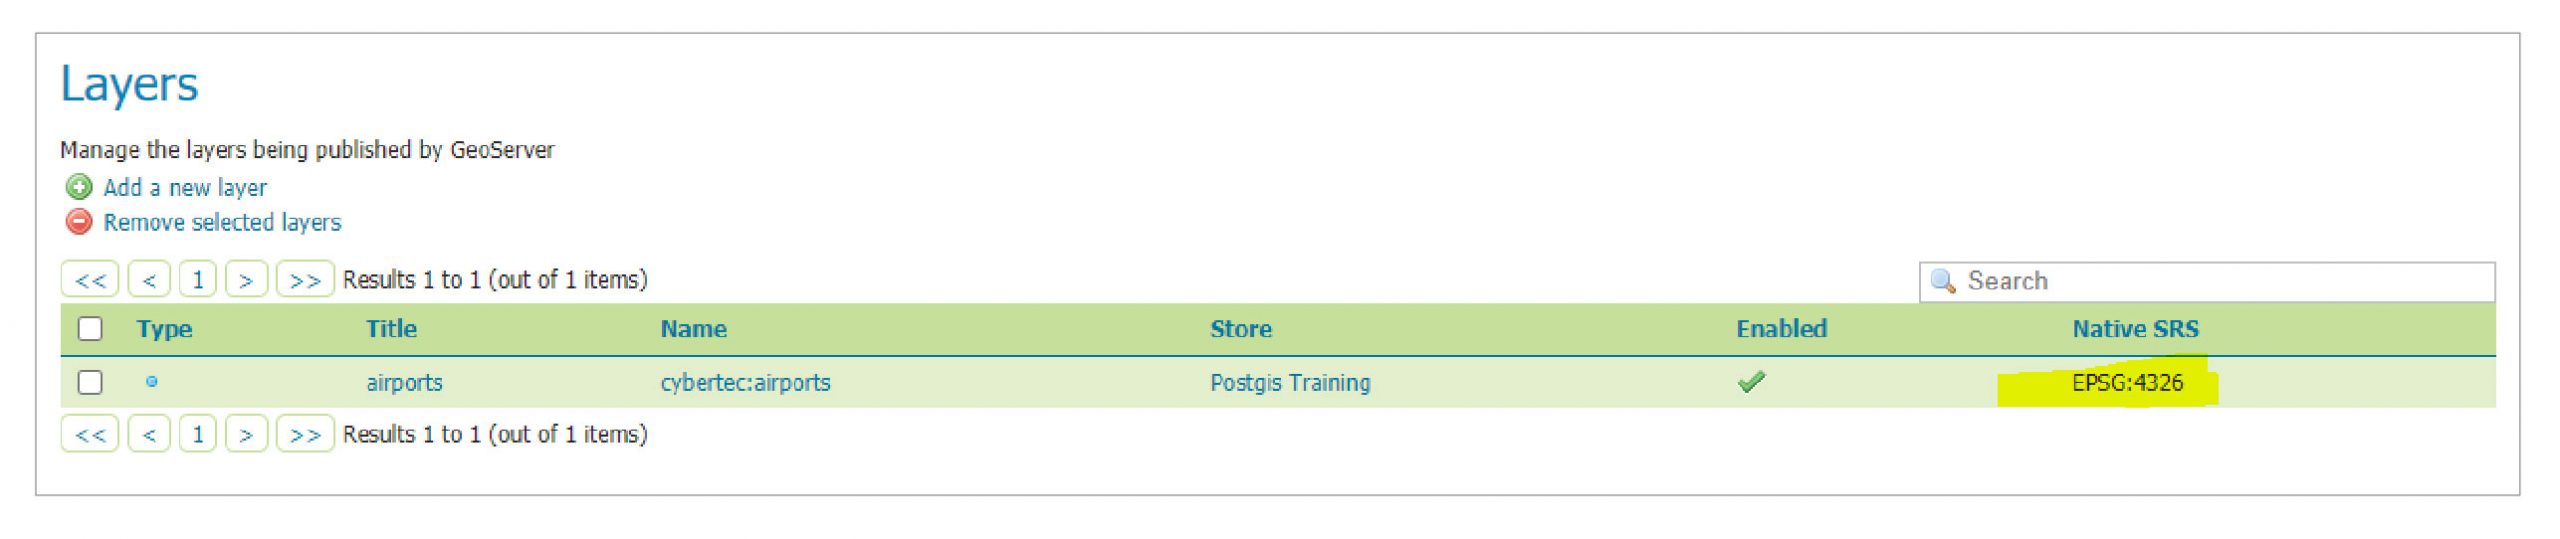
3. If everything runs according to plan, saving our new data source results in a list of available spatial tables. Picking airports from this list brings us one step closer to our goal.
Unfortunately, we are not completely done with our initial layer configuration ☹. Successfully publishing a vector layer within Geoserver involves defining at least the coordinate reference system’s and layer’s extent (bounding box). Geoserver tries to extract the coordinate reference system from the data source’s metadata, thus if registered correctly within your data source, there should be no need to define this by hand. Subsequently, the layer’s bounding box can be extracted from the coordinate reference systems’ real data, or can be overridden too. Don’t worry about forgetting to define those parameters – Geoserver will force you to define these mandatory settings. Once the job has been done, you are rewarded for your efforts by finding a “fully” configured layer item in the layers section.
As mentioned in the beginning, Geoserver acts as a full-fledged open source mapping server. What do I mean by calling Geoserver full-fledged? On the one hand, I’m referring to its huge list of supported data sources and formats, on the other hand this statement is based on the wide range of spatial services implemented. By default, Geoserver is prebuilt with support for the following services: TMS, WMS-C, WMTS, CSW, WCS, WFS, WMS, and WPS. What do all these abbreviations mean? Most of them are acronyms for OGC-compliant services. But no worries – I won’t bother you with details of OGC standards – this time ????.Today and in this article, we will have a closer look at Web Mapping Services (WMS), but I recommend to check out OGC standards, released in https://www.ogc.org/docs/is, to get a comprehensive understanding what those services are about.
WMS stands for Web Mapping Service, which is an OGC-compliant mapping service whose main purpose is simply producing maps. WMS creates maps on the fly; this fact enables clients to individualize their map requests in terms of styling, extent and projection.
Within Geoserver, WMS is enabled globally by default, thus we can move on and test our service. Fortunately, Geoserver offers a useful layer preview, which allows us to verify various services within its own ecosystem.
Let’s open the Layer preview from the navigation pane and pick WMS/JPEG from the formats dropdown.
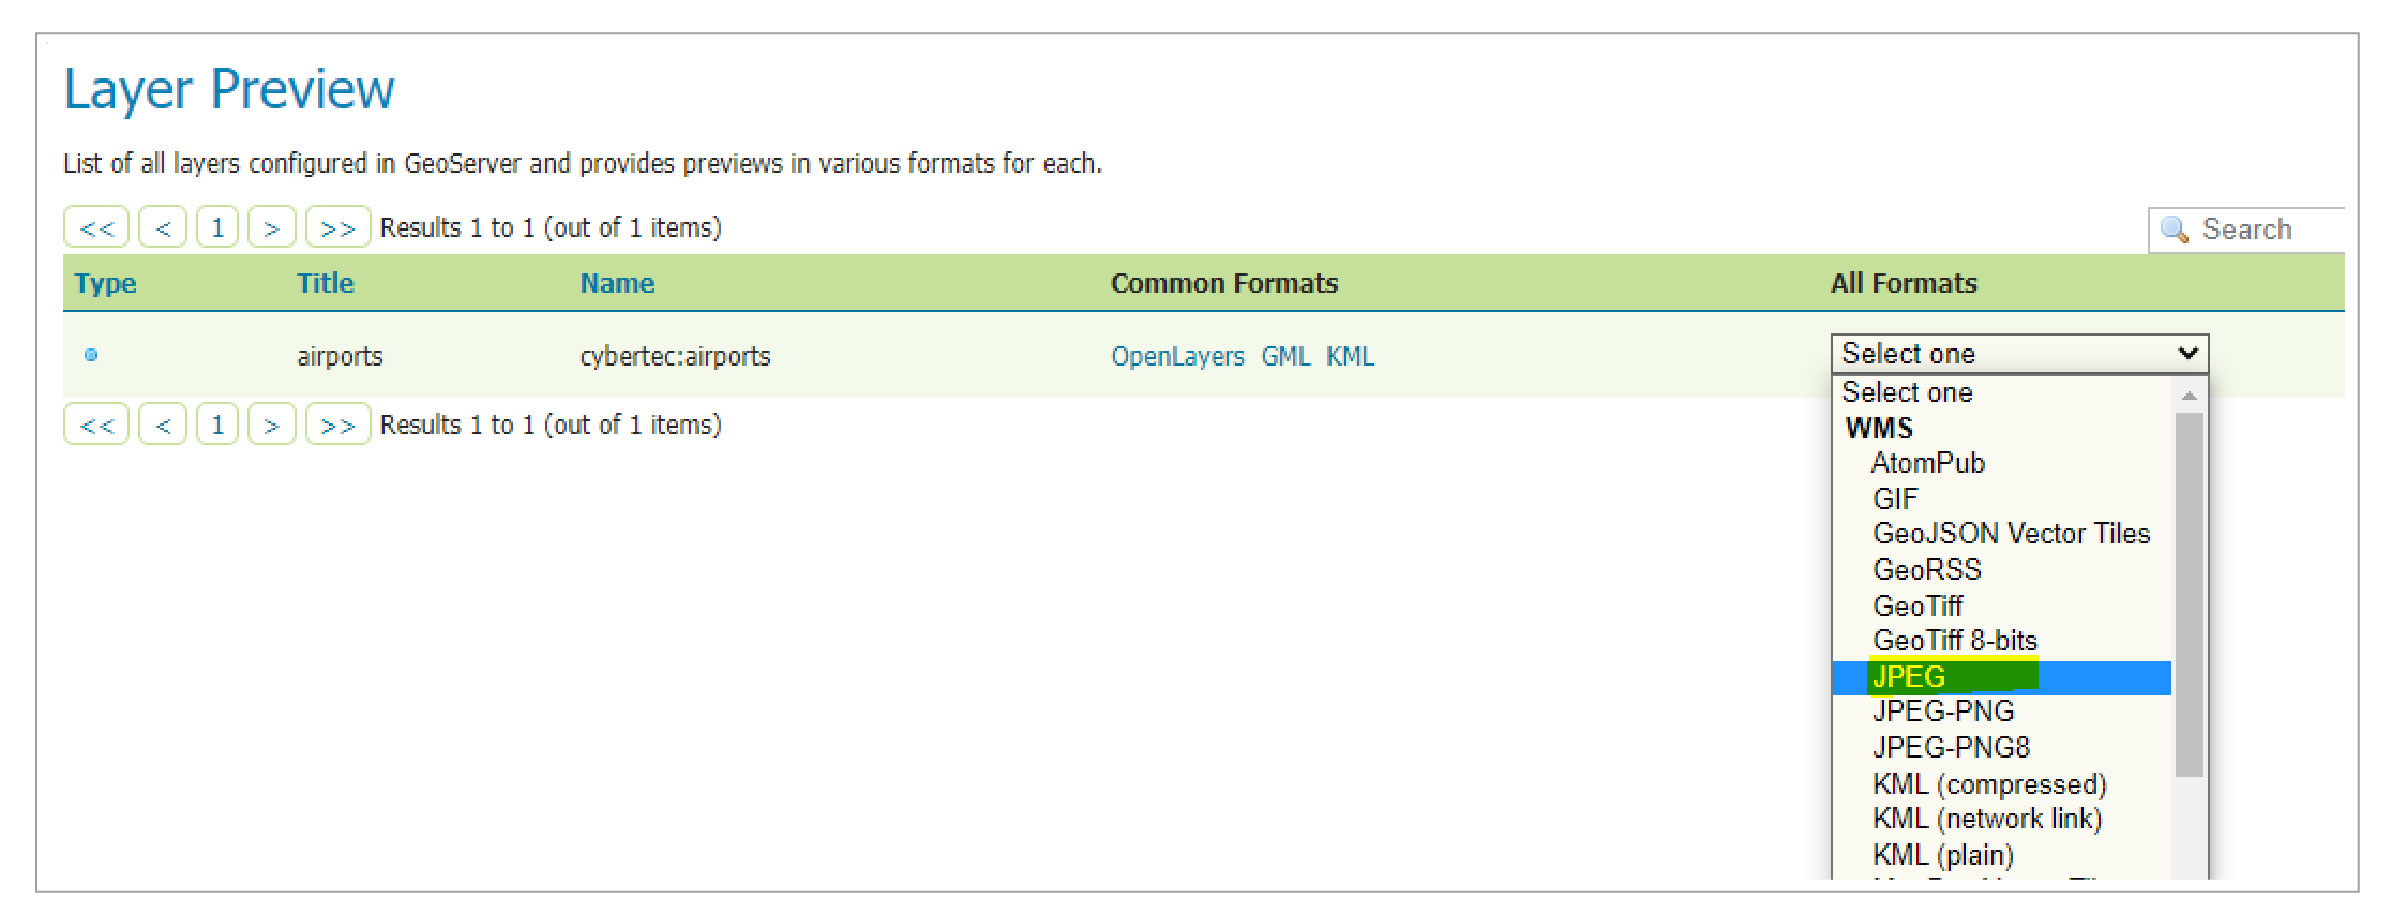
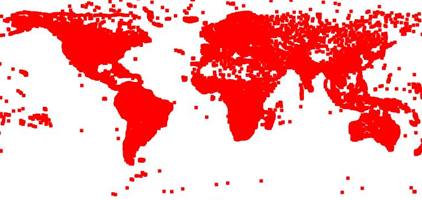
This action immediately results in a get request against our WMS endpoint, which responds with an image representing our airports.
http://10.0.0.216:8090/geoserver/cybertec/wms?service=WMS&version=1.1.0&request=GetMap&layers=cybertec%3Aairports&bbox=-179.8769989013672%2C-90.0%2C179.9757080078125%2C82.75&width=768&height=368&srs=EPSG%3A4326&styles=&format=image%2Fjpeg
Figure 9 presents the map generated. Not quite appealing you might think – I must agree. As we did not define and refine any styling parameters for our airport layer, Geoserver applies default stylings to our layer. Styling is another big story which will not be covered today.
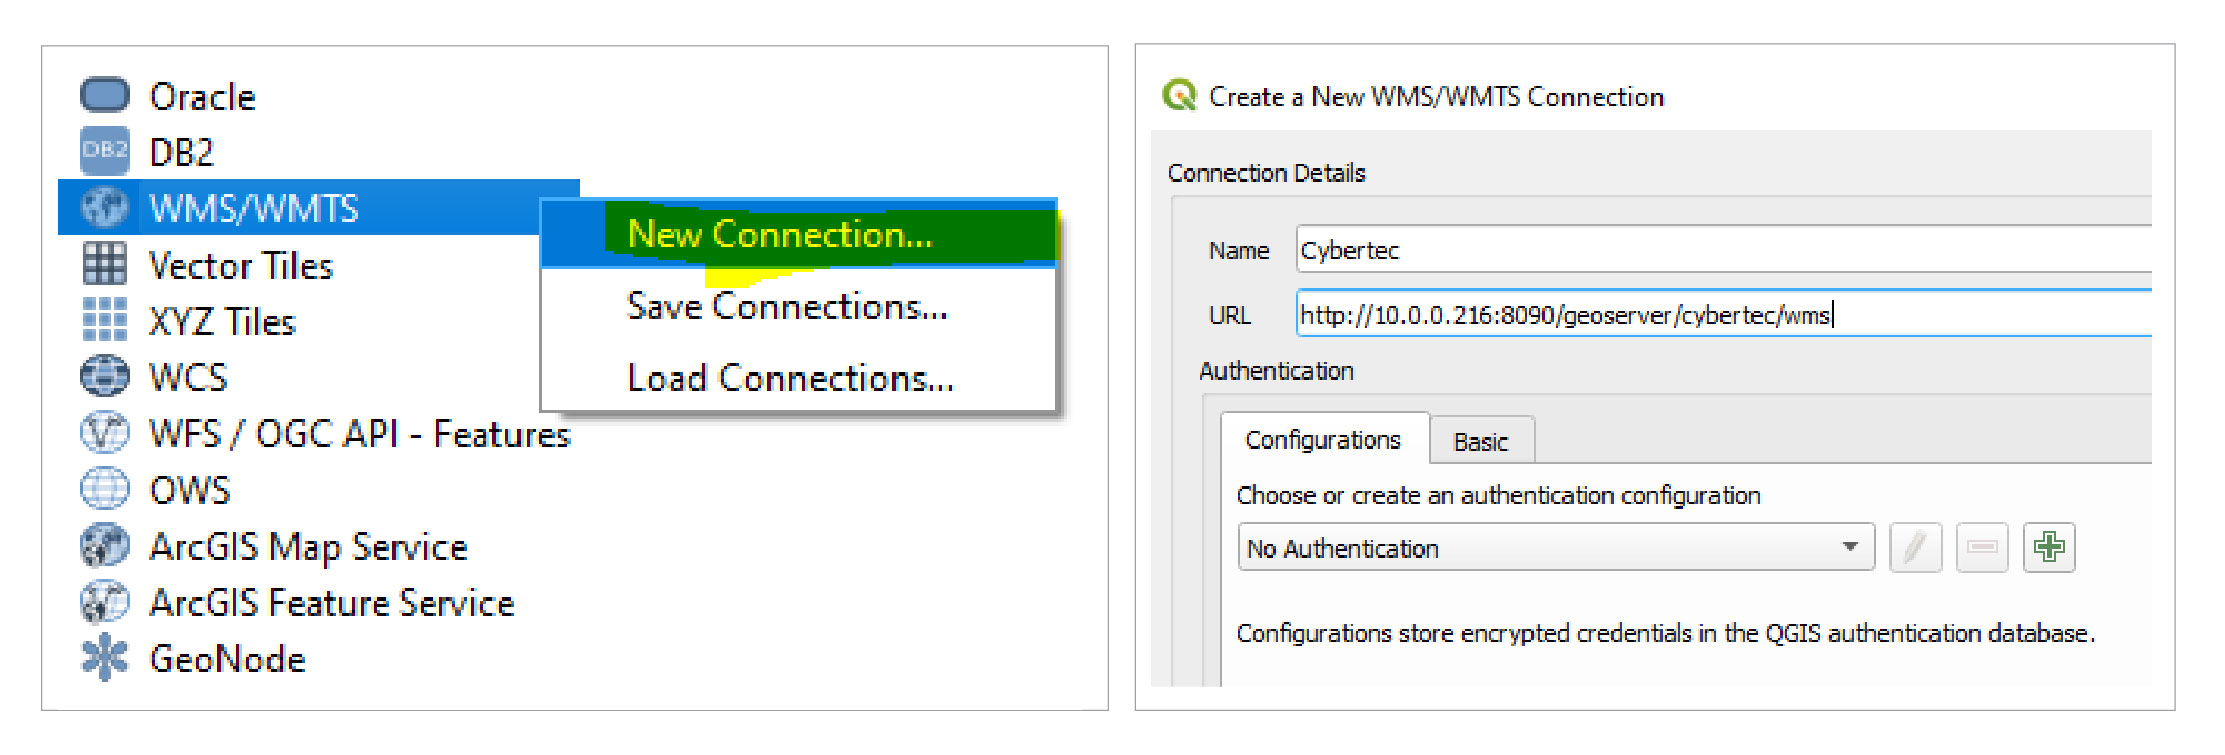
It’s time to request our Web Mapping Service from our preferred GIS client. I am a huge fan of Quantum GIS (QGIS), a mature open-source GIS client, but any other fat or web-based client with WMS support will do this job too.
After opening up QGIS, add and configure a new WMS connection from the navigation pane (see Figure 10 and 11). By utilizing the layer preview, we can easily extract the http address our WMS listens to from the url which was previously generated.
http://10.0.0.216:8090/geoserver/cybertec/wms
What happens now in the background is quite interesting. QGIS first requests http://10.0.0.216:8090/geoserver/cybertec/wms?service=WMS&version=1.1.0&request=GetCapabilities, to gather comprehensive metadata about the service. The xml document it returns covers details about published layers, projections, formats and much more.
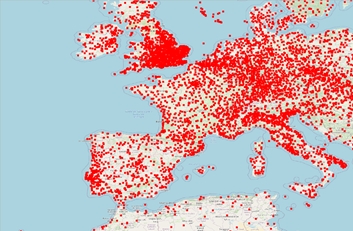
If everything has gone to plan, QGIS processes GetCapabilities response first and finally extends the WMS' description by our airport layer. Figure 12 proudly presents the results from our demonstration – airports which are displayed on top of OpenStreetMap tiles to slightly improve the overall map style.
We set up and configured Geoserver to publish an individual spatial dataset via WMS. By offering various data sources and OGC-compliant services out of the box, it’s no exaggeration to claim that Geoserver is a very powerful mapping server. This makes it easy to start and build up your spatial infrastructure. When it comes to productive environments, things turn out differently, since further topics such as performance and security must be considered too. If you would like more information on how to build up or improve your spatial infrastructure together with Geoserver and PostGIS, get in contact with the folks at CYBERTEC!
Leave a Reply