In one of his last blogposts, our CEO Hans-Jürgen Schönig explained how to set up PostgreSQL on Ubuntu. He consciously avoided any discussion of how to deal with our beloved PostGIS extension. Let’s fix that up right now by following these steps to implement PostGIS setup:
Let’s assume you followed Hans’ blog post (see link above) and installed PostgreSQL 13 on Ubuntu.
By utilizing apt list –installed, we can quickly list installed packages related to PostgreSQL.
|
1 2 3 4 5 6 7 8 |
$ sudo apt list --installed | grep postgresql postgresql-13/focal-pgdg,now 13.2-1.pgdg20.04+1 amd64 [installed,automatic] postgresql-client-13/focal-pgdg,now 13.2-1.pgdg20.04+1 amd64 [installed,automatic] postgresql-client-common/focal-pgdg,now 225.pgdg20.04+1 all [installed,automatic] postgresql-common/focal-pgdg,now 225.pgdg20.04+1 all [installed,automatic] postgresql-contrib/focal-pgdg,now 13+225.pgdg20.04+1 all [installed] postgresql/focal-pgdg,now 13+225.pgdg20.04+1 all [installed] |
From the console’s output, we can confirm that both server and client have been installed in version 13.2.1. Together with this version string and the PostGIS support matrix we can ensure that our PostGIS version of interest is finally supported.
The table below displays a relevant excerpt of this matrix:
| PostgreSQL version | PostGIS 2.4. | PostGIS 2.5 | PostGIS 3.0 | PostGIS 3.1 (master) |
| PostGIS release date | 2017/09/30 | 2018/09/23 | 2019/10/20 | 2020/XX/XX |
| 13 | No | No | Yes* | Yes* |
| 12 | No | Yes | Yes | Yes |
| 11 | Yes* | Yes | Yes | Yes |
| 10 | Yes | Yes | Yes | Yes |
| 9.6 | Yes | Yes | Yes | Yes |
| 9.5 | Yes | Yes | Yes | No |
The support matrix suggests installing PostGIS packages 3.0 or 3.1 on top of PostgreSQL 13. Now let’s verify that our main apt-repository contains the necessary packages, by utilizing apt-cache search.
|
1 2 3 4 5 6 7 8 |
$ apt-cache search postgresql-13-postgis postgresql-13-postgis-2.5 - Geographic objects support for PostgreSQL 13 postgresql-13-postgis-2.5-dbgsym - debug symbols for postgresql-13-postgis-2.5 postgresql-13-postgis-2.5-scripts - Geographic objects support for PostgreSQL 13 -- SQL scripts postgresql-13-postgis-3 - Geographic objects support for PostgreSQL 13 postgresql-13-postgis-3-dbgsym - debug symbols for postgresql-13-postgis-3 postgresql-13-postgis-3-scripts - Geographic objects support for PostgreSQL 13 -- SQL scripts |
The listing does not include packages for all minor PostGIS versions. So how is it possible to install not the latest PostGIS 3.1 version, but PostGIS 3.0, instead? As an interim step, let’s output the packages’ version table first.
|
1 2 3 4 5 6 7 8 9 10 11 12 13 14 |
$ apt-cache policy postgresql-13-postgis-3 postgresql-13-postgis-3-scripts postgresql-13-postgis-3: Installed: (none) Candidate: 3.1.1+dfsg-1.pgdg20.04+1 Version table: 3.1.1+dfsg-1.pgdg20.04+1 500 500 http://apt.postgresql.org/pub/repos/apt focal-pgdg/main amd64 Packages postgresql-13-postgis-3-scripts: Installed: (none) Candidate: 3.1.1+dfsg-1.pgdg20.04+1 Version table: 3.1.1+dfsg-1.pgdg20.04+1 500 500 http://apt.postgresql.org/pub/repos/apt focal-pgdg/main amd64 Packages |
From the output, we realize the repository used does not provide PostGIS 3.0 packages for PostgreSQL 13. So, let’s execute apt-cache policy for postgresql-12 to see and understand the difference:
|
1 2 3 4 5 6 7 8 9 10 11 12 13 14 15 16 17 18 |
$ apt-cache policy postgresql-12-postgis-3 postgresql-12-postgis-3-scripts postgresql-12-postgis-3: Installed: (none) Candidate: 3.1.1+dfsg-1.pgdg20.04+1 Version table: 3.1.1+dfsg-1.pgdg20.04+1 500 500 http://apt.postgresql.org/pub/repos/apt focal-pgdg/main amd64 Packages 3.0.0+dfsg-6ubuntu4 500 500 http://at.archive.ubuntu.com/ubuntu focal/universe amd64 Packages postgresql-12-postgis-3-scripts: Installed: (none) Candidate: 3.1.1+dfsg-1.pgdg20.04+1 Version table: 3.1.1+dfsg-1.pgdg20.04+1 500 500 http://apt.postgresql.org/pub/repos/apt focal-pgdg/main amd64 Packages 3.0.0+dfsg-6ubuntu4 500 500 http://at.archive.ubuntu.com/ubuntu focal/universe amd64 Packages |
The version table now includes minor PostGIS version strings too, which can be handed over to apt-get install, in order to choose one particular PostGIS version. If this version string is not provided, the latest PostGIS version will be installed by default.
For demonstration purposes, let’s install PostGIS 3.1.1 by parameterizing the version string as follows:
|
1 |
sudo apt-get install postgresql-13-postgis-3=3.1.1+dfsg-1.pgdg20.04+1 postgresql-13-postgis-3-scripts=3.1.1+dfsg-1.pgdg20.04+1 |
By executing apt list –-installed again, we can confirm our successful PostGIS 3 installation on Ubuntu.
|
1 2 3 4 5 6 7 8 9 10 |
$ sudo apt list --installed | grep postgresql postgresql-13-postgis-3-scripts/focal-pgdg,now 3.1.1+dfsg-1.pgdg20.04+1 all [installed] postgresql-13-postgis-3/focal-pgdg,now 3.1.1+dfsg-1.pgdg20.04+1 amd64 [installed] postgresql-13/focal-pgdg,now 13.2-1.pgdg20.04+1 amd64 [installed,automatic] postgresql-client-13/focal-pgdg,now 13.2-1.pgdg20.04+1 amd64 [installed,automatic] postgresql-client-common/focal-pgdg,now 225.pgdg20.04+1 all [installed,automatic] postgresql-common/focal-pgdg,now 225.pgdg20.04+1 all [installed,automatic] postgresql-contrib/focal-pgdg,now 13+225.pgdg20.04+1 all [installed] postgresql/focal-pgdg,now 13+225.pgdg20.04+1 all [installed] |
PostGIS must be enabled within each database separately. This implies that PostGIS must be registered as an extension within PostgreSQL’s ecosystem. PostgreSQL kindly provides a view containing all available extensions to verify this.
|
1 2 3 4 5 6 7 8 9 10 11 12 13 |
postgres=# select * from pg_available_extensions where name like 'postgis%'; name | default_version | installed_version | comment -------------------------+-----------------+-------------------+------------------------------------------------------------ postgis_topology | 3.1.1 | | PostGIS topology spatial types and functions postgis_tiger_geocoder-3 | 3.1.1 | | PostGIS tiger geocoder and reverse geocoder postgis_raster | 3.1.1 | | PostGIS raster types and functions postgis_tiger_geocoder | 3.1.1 | | PostGIS tiger geocoder and reverse geocoder postgis_raster-3 | 3.1.1 | | PostGIS raster types and functions postgis | 3.1.1 | | PostGIS geometry and geography spatial types and functions postgis-3 | 3.1.1 | | PostGIS geometry and geography spatial types and functions postgis_sfcgal | 3.1.1 | | PostGIS SFCGAL functions postgis_topology-3 | 3.1.1 | | PostGIS topology spatial types and functions postgis_sfcgal-3 | 3.1.1 | | PostGIS SFCGAL functions |
From these results, we realize there is more than one extension related to PostGIS setup. Why is that the case, and how should we handle it? PostGIS is a great extension, containing various data types and functions. To group types and functions by topics, the extension is organized in various sub-extensions. The most recent refactoring in this area was carried out by swapping out raster functionality, for instance. That means that someone who deals solely with vector data is not forced to install postgis_raster too.
Finally, let’s create a new database and enable PostGIS ????.
|
1 2 3 4 5 6 |
postgres=# create database pdemo; CREATE DATABASE postgres=# c pdemo; You are now connected to database 'pdemo' as user 'postgres'. pdemo=# create extension postgis; CREATE EXTENSION |
Querying pg_extension lists the extensions installed in the context of the current database:
|
1 2 3 4 5 6 |
pdemo=# select extname, extversion from pg_extension; extname | extversion --------+------------ plpgsql | 1.0 postgis | 3.1.1 (2 rows) |
To gather even more information about the PostGIS version installed, you can query postgis_full_version() - in order to see details about which libraries were referenced, too.
|
1 2 3 |
pdemo=# select * from postgis_full_version(); POSTGIS='3.1.1 aaf4c79' [EXTENSION] PGSQL='130' GEOS='3.8.0-CAPI-1.13.1 ' PROJ='6.3.1' LIBXML='2.9.10' LIBJSON='0.13.1' LIBPROTOBUF='1.3.3' WAGYU='0.5.0 (Internal)' (1 row) |
We successfully completed our task: PostGIS setup on a fresh and clean Ubuntu. Good preparation should prevent almost anything from going wrong. When it comes to upgrades, things are a bit more complicated. Do not forget to consult the PostGIS support matrix and the folks at CYBERTEC???? for further support.
Manage constraints over multiple rows: In PostgreSQL and many other relational databases, constraints are an integral part of the feature set. Many people are aware of primary keys, foreign keys, CHECK-constraints, and table constraints. However, from time to time, the situation is way more complicated. That’s when some more advanced techniques are needed to enforce integrity in the way it is desired by end users.
In this post, we will elaborate on restrictions spanning more than one row. What does that mean? Let us envision a simple scenario: We want to store information about airplane ownership. In aviation, it happens more often than not that a single plane has more than one owner. In this example, we want to make sure that the ownership parts actually add up to 100% of the whole. Similar challenges can be found over and over again in real business applications.
Let’s first create some sample data, and see how we can actually solve the problem of ensuring that ownership always has to end up at 100% for a specific airplane:
|
1 2 3 4 5 6 7 8 9 10 11 12 13 14 15 16 17 18 19 20 |
CREATE TABLE t_plane ( id int UNIQUE, call_sign text NOT NULL UNIQUE ); CREATE TABLE t_owner ( plane_id int REFERENCES t_plane (id) INITIALLY DEFERRED, owner text, fraction numeric ); INSERT INTO t_plane (id, call_sign) VALUES (1, 'D-EHWI'), (2, 'ES-TEEM'), (3, 'D-ONUT'); |
In this case, we’ve got two tables: The t_plane table contains a unique ID and the call sign of the plane. The call sign is similar to a license plate - it identifies the aircraft. “D” indicates Germany, OE means Austria and “N” would indicate that we are dealing with a US-registered aircraft.
As you can see, we have used a 1 : N relationship here. One plane can have many owners. The trouble is, if we add up the owners’ percentages of a plane, we always have to end up with 100%. The nasty part is concurrency. What if many people make changes at the same time?
Let’s take a look at the basic problem of concurrency:
User 1
User 2
Comment
|
1 |
BEGIN; |
|
1 |
BEGIN; |
|
1 2 3 |
INSERT INTO t_owner VALUES (1, 'Hans', 100); |
|
1 2 3 |
INSERT INTO t_owner VALUES (1, 'Joe', 100); |
|
1 |
COMMIT; |
|
1 |
COMMIT; |
|
1 2 3 4 5 |
SELECT sum(fraction) FROM t_owner WHERE plane_id = 1; |
returns 200 for D-EHWI
Here you can see that two people are about to modify the same airplane concurrently. There is nothing to stop those two users from actually doing that. The end result is that D-EHWI is owned by two people at the same time - a big no-no.
There are various ways to avoid such concurrency predicaments.
One of the more commonly chosen methods is to use a table lock. Let’s take a look and see how this works:
User 1
User 2
Comment
|
1 |
BEGIN; |
|
1 |
BEGIN; |
|
1 2 |
LOCK TABLE t_owner IN EXCLUSIVE MODE; |
|
1 2 |
LOCK TABLE t_owner IN EXCLUSIVE MODE; |
in case user 1 is slightly ahead user 2 has to wait
|
1 2 3 |
INSERT INTO t_owner VALUES (1, 'Hans', 100); |
|
1 |
... |
user 2 has to wait ...
|
1 2 3 4 5 |
SELECT sum(fraction) FROM t_owner WHERE plane_id = 1; |
|
1 |
... |
returns 100, we are fine
|
1 |
COMMIT; |
|
1 |
... |
user 2 wakes up
|
1 2 3 |
INSERT INTO t_owner VALUES (1, 'Hans', 100); |
|
1 2 3 4 5 |
SELECT sum(fraction) FROM t_owner WHERE plane_id = 1; |
user 2 gets 200
|
1 |
ROLLBACK; |
we must rollback because the constraint is violated
In this case, we have used a table lock to solve the problem. The important point here is that PostgreSQL allows us to define 8 different types of locks:
|
1 2 3 4 5 6 7 8 9 10 |
test=# h LOCK Command: LOCK Description: lock a table Syntax: LOCK [ TABLE ] [ ONLY ] name [ * ] [, ...] [ IN lockmode MODE ] [ NOWAIT ] where lockmode is one of: ACCESS SHARE | ROW SHARE | ROW EXCLUSIVE | SHARE UPDATE EXCLUSIVE | SHARE | SHARE ROW EXCLUSIVE | EXCLUSIVE | ACCESS EXCLUSIVE |
ACCESS SHARE simply means that somebody is reading a row. All it does is to prevent things such as DROP TABLE from happening. However, what we need to do here is to ensure that people cannot insert or modify concurrently. The solution to the problem is lock level EXCLUSIVE. Reading is still possible, but only a single transaction can modify the table. ACCESS EXCLUSIVE would prevent both concurrent reads and writes, but that would be overkill in this case.
What is the problem with this approach? The answer is scalability: In case of a table lock, only ONE transaction can modify the same table at the same time. If 100 airplanes are modified at the same time, 99 transactions have to wait until one transaction is actually able to commit. One could argue that airplane ownership does not change that often. However, this might not be true for other use-cases; we need to keep in mind that scalability does matter. It makes no sense to buy a 32-core server if 31 cores are doomed to idle due to locking.
A more sophisticated solution is needed.
One solution to the problem is to use a higher transaction isolation level. Basically, PostgreSQL supports three out of four transaction isolation levels proposed by the ANSI SQL standard:
|
1 2 3 4 5 6 7 8 9 10 11 12 |
test=# h BEGIN Command: BEGIN Description: start a transaction block Syntax: BEGIN [ WORK | TRANSACTION ] [ transaction_mode [, ...] ] where transaction_mode is one of: ISOLATION LEVEL { SERIALIZABLE | REPEATABLE READ | READ COMMITTED | READ UNCOMMITTED } READ WRITE | READ ONLY [ NOT ] DEFERRABLE |
Currently, READ UNCOMMITTED is mapped to READ COMMITTED, which makes a lot of sense in an MVCC context. However, it’s not enough here.
SERIALIZABLE is the method of choice in this case. What is the basic idea behind SERIAZIABLE? It provides us with the illusion of sequential execution - however, in the background, things are happening with as much parallelism as possible.
Let’s take a closer look at SERIALIZABLE:
User 1
User 2
Comment
|
1 2 |
BEGIN TRANSACTION ISOLATION LEVEL SERIALIZABLE; |
start a transaction using the right isolation level
|
1 2 3 |
INSERT INTO t_owner VALUES (3, 'Hans', 60); |
make desired changes
|
1 2 3 |
INSERT INTO t_owner VALUES (3, 'Paul', 40); |
|
1 2 3 4 5 |
SELECT sum(fraction) FROM t_owner WHERE plane_id = 3; |
|
1 2 |
BEGIN TRANSACTION ISOLATION LEVEL SERIALIZABLE; |
check to make sure that ownership is correct (the app will decide whether to commit or rollback).
|
1 |
COMMIT; |
|
1 |
... |
user 2 wakes up
|
1 2 3 |
INSERT INTO t_owner VALUES (1, 'Hans', 100); |
|
1 2 3 4 5 |
SELECT sum(fraction) FROM t_owner WHERE plane_id = 1; |
user 2 gets 200
|
1 |
ROLLBACK; |
we must rollback because the constraint is violated
User 1
User 2
Comment
|
1 2 |
BEGIN TRANSACTION ISOLATION LEVEL SERIALIZABLE; |
start a transaction using the right isolation level
|
1 2 |
INSERT INTO t_owner VALUES (3, 'Hans', 60); |
make desired changes
|
1 2 |
INSERT INTO t_owner VALUES (3, 'Paul', 40); |
|
1 2 3 4 5 6 7 |
SELECT sum(fraction) FROM t_owner WHERE plane_id = 3; ----- (1 row) |
|
1 2 |
BEGIN TRANSACTION ISOLATION LEVEL SERIALIZABLE; |
check to make sure that ownership is correct (the app will decide whether to commit or rollback).
|
1 2 |
INSERT INTO t_owner VALUES (3, 'Hans', 60); |
make conflicting changes violating ownership
|
1 2 |
INSERT INTO t_owner VALUES (3, 'Paul', 40); |
|
1 |
COMMIT; |
|
1 |
... |
the app decided to commit
|
1 2 3 4 |
COMMIT; ERROR: could not serialize access ... |
in this case, we will fail because transactions are not guaranteed to be independent anymore.
We have started to insert data for D-ONUT. The idea is to insert it directly and check at the end of the transaction to see what happens. Note that there is no LOCK TABLE, no SELECT FOR UPDATE or anything of that kind. It is a plain transaction in isolation level SERIALIZABLE. It inserts two owners and then it checks for correctness. The important part is that SERIALIZABLE is actually going to error out:
|
1 2 3 4 5 |
ERROR: could not serialize access due to read/write dependencies among transactions DETAIL: Reason code: Canceled on identification as a pivot, during conflict out checking. HINT: The transaction might succeed if retried. CONTEXT: SQL statement 'SELECT 1 FROM ONLY 'public'.'t_plane' x WHERE 'id' OPERATOR(pg_catalog.=) $1 FOR KEY SHARE OF x' |
PostgreSQL noticed that the same data was touched here and that the SELECT statement can surely not return the desired data. The transaction would actually have worked, had we not modified the data. But we did, and therefore the system figured that it cannot uphold the illusion of sequential execution.
There are a couple of questions people frequently ask concerning constraints over multiple rows and SERIALIZABLE:
SELECT FOR UPDATE?Let’s focus on SELECT FOR UPDATE first: It is true that SELECT FOR UPDATE does lock rows, and that we cannot modify them concurrently (UPDATE, DELETE). But there is a problem: SELECT FOR UPDATE protects against changes made to existing rows. It does not lock “future” rows. In other words: SELECT FOR UPDATE does not prevent other transactions from inserting data, which of course would allow the violation of our constraint (= total ownership has to be NULL or add up to 100%).
The second argument is heard more often than not: It is true that airplane ownership does not change very often. But what we have seen here is that getting things right is really easy and does not require much effort. So why not write proper code to avoid problems in the first place? Managing locking and transaction isolation well is important - not just for consistency but also for scalability. That’s why I recommend you take coding constraints over multiple rows seriously.
Transaction isolation is a highly important topic. Another crucial topic is how to know when to use what data type. If you want to find out more about data types in PostgreSQL, we recommend checking out our post on differentiating integer, float, and numeric types. It will give you some insight into what is possible on the data type front.
In order to receive regular updates on important changes in PostgreSQL, subscribe to our newsletter, or follow us on Facebook, or LinkedIn.
Since v10, PostgreSQL has provided support for scram-sha-256 for password hashing and authentication. This article describes how you can adapt your application safely.
scram-sha-256?PostgreSQL uses cryptographic hashing for two purposes:
Now, the MD5 hashing method has weaknesses that make it unsuitable for cryptography. In particular, it is too easy to construct a string with a given MD5 hash. These shortcomings do not apply to the way PostgreSQL uses MD5, but it still makes sense to use a better hashing algorithm:
Hence the introduction of scram-sha-256 support in v10. If you can, start using the new hashing method. The increased difficulty of brute force password attacks makes it worth the effort.
scram-sha-256There are two problems that make it hard to switch over from MD5 to scram-sha-256:
scram-sha-256.scram-sha-256 authentication, so authentication with older client software will fail.The error message you get with an old version of libpq when you attempt to connect to a server that requires scram-sha-256 authentication is:
|
1 |
authentication method 10 not supported |
An old JDBC driver will tell you:
|
1 |
The authentication type 10 is not supported. |
Old versions of Npgsql will come back with:
|
1 |
Authentication method not supported (Received: 10) |
scram-sha-256It is actually not difficult to convert to scram-sha-256, if you follow these guidelines:
Upgrade all PostgreSQL client software and drivers that are too old to support the new authentication method. This is a good idea anyway, as it is never smart to get stuck with old, unmaintained software.
password_encryption parameterEdit postgresql.conf and change the parameter to
|
1 |
password_encryption = scram-sha-256 |
Make sure you remove the hash (#) at the beginning of the line. Then reload the server by running
|
1 |
pg_ctl reload -D /postgres/datadir |
where /postgres/datadir is the PostgreSQL data directory. Alternatively, you can run this SQL statement:
|
1 |
SELECT pg_reload_conf(); |
Look into the log file to see if the reload was successful, and check the new value via SQL:
|
1 |
SHOW password_encryption; |
Note that even though you changed the parameter, the old MD5 passwords still work, as long as the authentication method in pg_hba.conf is set to md5.
All password authenticated users have to change their password. In psql, a superuser can change any user's password with
|
1 |
password user_name |
Even if the user sets the same password as before, the password will now be hashed with SHA-256. Before proceeding with the next step, examine the table pg_authid and make sure that it contains no more MD5 hashed passwords.
pg_hba.confThis step is not strictly necessary, because PostgreSQL will use scram-sha-256 authentication for scram-sha-256-hashed passwords, even if the authentication method is set to md5 in pg_hba.conf. This is a compatibility feature.
Still, you should adapt pg_hba.conf by replacing all occurrences of “md5” with “scram-sha-256”. That will prevent users who still have an old MD5 password from authenticating.
After that, reload the configuration as above. Then check the log file or examine the view pg_hba_file_rules to see if the reload was successful.
You can see from the above that it is not so difficult to change from md5 to scram-sha-256. The hard parts are that you have to set all the passwords again, and that you may have to upgrade the client software.
If you want to know how to protect yourself from common security problems, read Kaarel's blog or my article about SECURITY DEFINER functions.
In order to receive regular updates on important changes in PostgreSQL, subscribe to our newsletter, or follow us on Twitter, Facebook, or LinkedIn.
A “materialized view” is a database object which stores the result of a precalculated database query and makes it easy to refresh this result as needed. Materialized views are an integral feature of pretty much all advanced database systems. Naturally, PostgreSQL also provides support for materialized views, and offers the end-user a powerful tool to handle more time-consuming requests.
The main questions are now: What are the pitfalls, and how can you make use of materialized views in the first place? Let’s dive in and find out.
Before we can actually take a look at materialized views and figure out how they work, we have to import some sample data which we can use as the basis for our calculations:
|
1 2 3 4 5 6 7 8 |
demo=# CREATE TABLE t_demo (grp int, data numeric); CREATE TABLE demo=# INSERT INTO t_demo SELECT 1, random() FROM generate_series(1, 5000000); INSERT 0 5000000 demo=# INSERT INTO t_demo SELECT 2, random() FROM generate_series(1, 5000000); INSERT 0 5000000 |
We have created 10 million rows organized in 2 groups.
To create a materialized view in PostgreSQL, we can make use of the following syntax specification:
|
1 2 3 4 5 6 7 8 9 10 11 |
demo=# h CREATE MATERIALIZED VIEW Command: CREATE MATERIALIZED VIEW Description: define a new materialized view Syntax: CREATE MATERIALIZED VIEW [ IF NOT EXISTS ] table_name [ (column_name [, ...] ) ] [ USING method ] [ WITH ( storage_parameter [= value] [, ... ] ) ] [ TABLESPACE tablespace_name ] AS query [ WITH [ NO ] DATA ] |
Basically, a materialized view has a name, some parameters, and is based on a query.
Here is an example of a materialized view:
|
1 2 3 4 5 |
demo=# CREATE MATERIALIZED VIEW mat_view AS SELECT grp, avg(data), count(*) FROM t_demo GROUP BY 1; SELECT 2 |
What is really important to note here is the size of the materialized view compared to the underlying table:
|
1 2 3 4 5 6 7 |
demo=# d+ List of relations Schema | Name | Type | Owner | Persistence | Size | Description -------+----------+-------------------+-------+-------------+--------+------------- public | mat_view | materialized view | hs | permanent | 16 kB | public | t_demo | table | hs | permanent | 423 MB | (2 rows) |
423 MB vs. 16 KB is a real difference. If you want to query the materialized view, you can do it just like you would query a normal PostgreSQL table:
|
1 2 3 4 5 6 7 8 9 10 11 12 |
demo=# SELECT * FROM mat_view; grp | avg | count -----+--------------------------+--------- 1 | 0.500091604165533141153 | 5000000 2 | 0.499893365960709086730 | 5000000 (2 rows) demo=# explain SELECT * FROM mat_view; QUERY PLAN ------------------------------------------------------------- Seq Scan on mat_view (cost=0.00..21.30 rows=1130 width=44) (1 row) |
Looking at the execution plan (explain) shows that there is no difference between a normal table and a materialized view. We can simply query the data.
At this point, the only suboptimal thing is the query optimizer’s estimate (= 1130 rows). However, that can easily be fixed.
The process is the same as for any other table:
|
1 2 3 4 5 6 7 |
demo=# ANALYZE; ANALYZE demo=# explain SELECT * FROM mat_view; QUERY PLAN --------------------------------------------------------- Seq Scan on mat_view (cost=0.00..1.02 rows=2 width=26) (1 row) |
ANALYZE has recreated the new optimizer statistics and fixed the estimate nicely. If you want to know more about ANALYZE in general, we recommend our posts about PostgreSQL optimizer statistics and autovacuum. Autovacuum is also able to recreate optimizer statistics.
However, there is more. PostgreSQL offers some additional important features which are relevant in this field. One of those features is the USING clause. What is the purpose of this one? At the moment, PostgreSQL supports only one storage format (heap). However, in the future, we hope to see more storage formats such as zheap or zedstore.
The idea of USING is to have the ability to select the best storage format for the given requirement. At the moment, heap is the default format, and that’s perfectly fine.
The WITH-clause is the same as in CREATE TABLE. It allows you to define storage parameters such as autovacuum behavior, FILLFACTOR and so on.
Here’s an example:
|
1 2 3 4 5 6 |
demo=# CREATE MATERIALIZED VIEW mat_view_2 WITH (autovacuum_enabled = false) AS SELECT grp, avg(data), count(*) FROM t_demo GROUP BY 1; SELECT 2 |
In general, a materialized view is stored just like a table, so simply follow the same recommendations as you would follow when creating a standard table.
The same is true for the TABLESPACE keyword. In the default setup, the materialized view will be stored in the default tablespace which is $PGDATA:
|
1 2 3 4 5 |
demo=# SHOW data_directory; data_directory ------------------ /Users/hs//db13 (1 row) |
SHOW is an easy way to figure out where that is. If you want to find out more about tablespaces, consider checking out our blog post about tablespaces in PostgreSQL.
By default, a materialized view is created in a way that it contains the result. However, if the object is created using the NO DATA option, it is empty. Only the definition is created.
One has to be aware of the fact that in this case, the view cannot be queried until it has been refreshed to contain data. We have not seen the NO DATA option being used too frequently in database support. It’s still worth mentioning that this option does exist.
Sometimes a materialized view has to be modified later on. A classical example would be to rename a column of the view without recreating it.
Let’s take a look at the definition of the view:
|
1 2 3 4 5 6 7 |
demo=# d mat_view Materialized view 'public.mat_view' Column | Type | Collation | Nullable | Default --------+---------+-----------+----------+--------- grp | integer | | | avg | numeric | | | count | bigint | | | |
Modifying a materialized view is done using the ALTER MATERIALIZED VIEW command which is a powerful tool to facilitate all kinds of changes.
The syntax is pretty similar to what ALTER TABLE can do for you:
|
1 2 3 4 5 6 7 8 9 10 11 12 13 14 15 16 17 18 19 20 21 22 23 24 25 26 27 28 29 30 31 |
demo=# h ALTER MATERIALIZED VIEW Command: ALTER MATERIALIZED VIEW Description: change the definition of a materialized view Syntax: ALTER MATERIALIZED VIEW [ IF EXISTS ] name action [, ... ] ALTER MATERIALIZED VIEW name DEPENDS ON EXTENSION extension_name ALTER MATERIALIZED VIEW [ IF EXISTS ] name RENAME [ COLUMN ] column_name TO new_column_name ALTER MATERIALIZED VIEW [ IF EXISTS ] name RENAME TO new_name ALTER MATERIALIZED VIEW [ IF EXISTS ] name SET SCHEMA new_schema ALTER MATERIALIZED VIEW ALL IN TABLESPACE name [ OWNED BY role_name [, ... ] ] SET TABLESPACE new_tablespace [ NOWAIT ] where action is one of: ALTER [ COLUMN ] column_name SET STATISTICS integer ALTER [ COLUMN ] column_name SET ( attribute_option = value [, ... ] ) ALTER [ COLUMN ] column_name RESET ( attribute_option [, ... ] ) ALTER [ COLUMN ] column_name SET STORAGE { PLAIN | EXTERNAL | EXTENDED | MAIN } CLUSTER ON index_name SET WITHOUT CLUSTER SET ( storage_parameter [= value] [, ... ] ) RESET ( storage_parameter [, ... ] ) OWNER TO { new_owner | CURRENT_USER | SESSION_USER } |
What is noteworthy here is that you can also do things such as CLUSTER (= index organize), SET STATISTICS (= adjust size of histogram for the PostgreSQL optimizer) and so on. The process is the same as for a normal table.
Now, let’s try it out and rename a column:
|
1 2 3 4 5 6 7 8 9 10 |
demo=# ALTER MATERIALIZED VIEW mat_view RENAME COLUMN avg TO average; ALTER MATERIALIZED VIEW demo=# d mat_view Materialized view 'public.mat_view' Column | Type | Collation | Nullable | Default ---------+---------+-----------+----------+--------- grp | integer | | | average | numeric | | | count | bigint | | | |
Before we move on to refreshing, I want to focus your attention on indexing:
|
1 2 |
demo=# CREATE INDEX idx_average ON mat_view (average); CREATE INDEX |
It is a good idea to index a materialized view to ensure fast querying. Again, the same rules as for a table exist. Simply index entries which are diverse and offer good selectivity when the materialized view is read.
A materialized view contains a snapshot of the query result. It is not updated periodically, unless the user forces PostgreSQL to do so. In Oracle, materialized view support is a bit more sophisticated. Hopefully, PostgreSQL will soon catch up in this area a bit.
However, at the moment,a materialized view in PostgreSQL has to be refreshed.
Refresh manually using the REFRESH MATERIALIZED VIEW command:
|
1 2 3 4 5 6 |
demo=# h REFRESH MATERIALIZED VIEW Command: REFRESH MATERIALIZED VIEW Description: replace the contents of a materialized view Syntax: REFRESH MATERIALIZED VIEW [ CONCURRENTLY ] name [ WITH [ NO ] DATA ] |
Running the refresh is simple:
|
1 2 |
demo=# REFRESH MATERIALIZED VIEW mat_view; REFRESH MATERIALIZED VIEW |
PostgreSQL knows the query which has to be re-executed to refresh the content of the materialized view. There is just one downside: PostgreSQL has to lock the object for the time of the refresh, which means that nobody can access it while it is refreshed.
Sometimes it is simply not acceptable to tolerate a locked materialized view. In that case, concurrent updates are needed. However, there is a problem:
|
1 2 3 4 |
demo=# REFRESH MATERIALIZED VIEW CONCURRENTLY mat_view; ERROR: cannot refresh materialized view 'public.mat_view' concurrently HINT: Create a unique index with no WHERE clause on one or more columns of the materialized view. |
The materialized view needs a unique column to support concurrent refreshing.
That means you have to determine a “primary key” and create a unique index:
|
1 2 3 4 |
demo=# CREATE UNIQUE INDEX idx_grp ON mat_view (grp); CREATE INDEX demo=# REFRESH MATERIALIZED VIEW CONCURRENTLY mat_view; REFRESH MATERIALIZED VIEW |
You need to be a bit careful and make sure that table bloat does not take over. Technically, it is a DELETE / INSERT, which is prone to cause table bloat. Make sure a proper VACUUMpolicy is in place.
Materialized views are an important feature in most databases, including PostgreSQL. They can help to speed up large calculations - or at least to cache them.
If you want to make sure that your materialized views are up to date and if you want to read more about PostgreSQL right now, check out our blog about pg_timetable which shows you how to schedule jobs in PostgreSQL. Why is pg_timetable so useful? Our scheduler makes sure that identical jobs cannot overlap, and that they simply don’t execute again, in case the same job is already running. In case of long jobs, this is super important - especially if you want to use materialized views.
In order to receive regular updates on important changes in PostgreSQL, subscribe to our newsletter, or follow us on Facebook or LinkedIn.

For many people, “cross join” is something to be afraid of. They remember the time when they forgot the join condition and the DBA was angry, because the query hogged the CPU and filled the disk. However, there are valid use cases for cross joins which I want to explore in this article.
The term comes from relational algebra, which also calls the Cartesian product between two relations cross product and denotes it by A × B. This is the most basic kind of join: it combines every row of one table with every row of another table.
A simple example:
| Table A | Table B | |||||
|---|---|---|---|---|---|---|
| name | birthday | street | city | |||
| John | 1989-08-24 | Roman Road | Kexborough | |||
| Paul | 2001-10-03 | Earl Street | Fitzwilliam | |||
| Claude | 1996-04-18 | |||||
The cross product of the tables would be:
| name | birthday | street | city | ||
|---|---|---|---|---|---|
| John | 1989-08-24 | Roman Road | Kexborough | ||
| Paul | 2001-10-03 | Roman Road | Kexborough | ||
| Claude | 1996-04-18 | Roman Road | Kexborough | ||
| John | 1989-08-24 | Earl Street | Fitzwilliam | ||
| Paul | 2001-10-03 | Earl Street | Fitzwilliam | ||
| Claude | 1996-04-18 | Earl Street | Fitzwilliam |
There are two ways to write the cross join of A and B in SQL.
A comma separated list in the FROM clause:
|
1 2 |
SELECT name, birthday, street, city FROM a, b; |
With the explicit CROSS JOIN syntax:
|
1 2 |
SELECT name, birthday, street, city FROM a CROSS JOIN b; |
Cross joins are the most basic joins, and you can think of an inner join as a cross join with an additional filter condition. Of course, PostgreSQL doesn't calculate inner joins that way. It uses more efficient join strategies.
If you write your joins using a comma separated table list (like in the first example above), an inner join and a cross join look very similar. The only difference is a WHERE condition. Now it is a frequent mistake to forget a join condition when you develop an SQL query. The result of such an omission is that you get way more result rows than you reckoned with: a cross join between two tables with a million rows each would result in a trillion rows!
Such a query will run forever. If the query contains an ORDER BY clause, the database server has to cache the whole result set in order to sort it. Since this result set doesn't fit into memory, PostgreSQL will start writing temporary files to hold the data. These temporary files can fill up the disk. As soon as the query runs out of disk space, PostgreSQL rolls it back and deletes the temporary files. However, if the timing is bad, even a short out-of-disk condition can cause the database server to crash.
Never use the “comma separated list” syntax to write joins!
If you write your inner joins as a JOIN b, it is a syntax error to omit the join condition (ON or USING). A cross join is then explicitly written as CROSS JOIN and cannot happen by mistake.
The above sounds pretty discouraging, but there are situations when a cross join is just what you need. In the following, I present two typical cases:
In a lateral join, a join relation (an expression or subquery) can refer to earlier entries in the FROM clause. This is very often used in combination with table functions: if you want to join a row with all the table function results that belong to it, you use a lateral join. In that case, LATERAL already implies that each row is only joined to the function results that belong to it, so there is no need for an extra join condition.
Here is an example (not recommended for your production database!):
|
1 2 3 4 5 6 7 8 |
CREATE TABLE mytab ( id bigint PRIMARY KEY, data jsonb ); INSERT INTO mytab VALUES (1, '{ 'key': ['five', 'six'] }'), (2, '{ 'key': ['pick', 'up', 'sticks'] }'); |
Then the arrays could be unpacked with a lateral expression like this:
|
1 2 3 4 5 6 7 8 9 10 11 12 13 14 15 |
SELECT mytab.id, j.elem FROM mytab CROSS JOIN LATERAL jsonb_array_elements_text( mytab.data -> 'key' ) AS j(elem); id | elem ----+-------- 1 | five 1 | six 2 | pick 2 | up 2 | sticks (5 rows) |
Sometimes you have a more complicated or expensive expression that you want to use in several places with one query. In that case, it can be a good idea to write a common table expression. You have to use that CTE in the FROM clause, typically with a cross join:
|
1 2 3 4 5 6 7 8 9 10 11 12 |
WITH config AS ( SELECT language, preview_lines FROM config_data WHERE username = current_user ) SELECT d.line FROM description AS d CROSS JOIN config AS c WHERE d.topic = 'SQL joins' AND d.lang = c.language AND d.line_nr <= c.preview_lines ORDER BY d.line_nr; |
You don't need cross joins very often, but sometimes they do come in handy.
Avoid the “comma separated list” join syntax, so that you don't get cross joins by mistake. Such a statement can run forever and use up your database machine's resources.
In case you need help to run your database in the most efficient way possible, CYBERTEC offers 24/7 support services to customers around the world.
PostgreSQL contains some hidden gems which have been around for many years and help to silently speed up your queries. They optimize your SQL statements in a clever and totally transparent way. One of those hidden gems is the ability to synchronize sequential scans. Actually, this feature has been around for 15+ years, but has gone mostly unnoticed by many end-users. However, if you are running data warehouses and analytical workloads, you might have already used synchronized seq scans without actually knowing it.
Before we draw any conclusions, it is necessary to understand the problem we’re trying to solve in the first place. Consider the following scenario: 10 users are concurrently running analytics on a large table. For the sake of simplicity, we assume that the size of the table is 1 TB and we can read 1 GB / second. In case there is just 1 user, we can get read data in around 17 minutes (assuming there is zero caching). But what if people are reading the table concurrently and if there is still zero caching, because those reads are spread all over the PostgreSQL table? In that case, we face a problem:
| Number of users | MB / second | Time |
| 1 | 1000 | 16.6 minutes |
| 2 | 500 | 33.2 minutes |
| 4 | 250 | 67 minutes |
| 10 | 100 | 166 minutes |
Assuming that the overall throughput is a constant (which of course it is not - especially not on spinning disks) we really have a big problem.
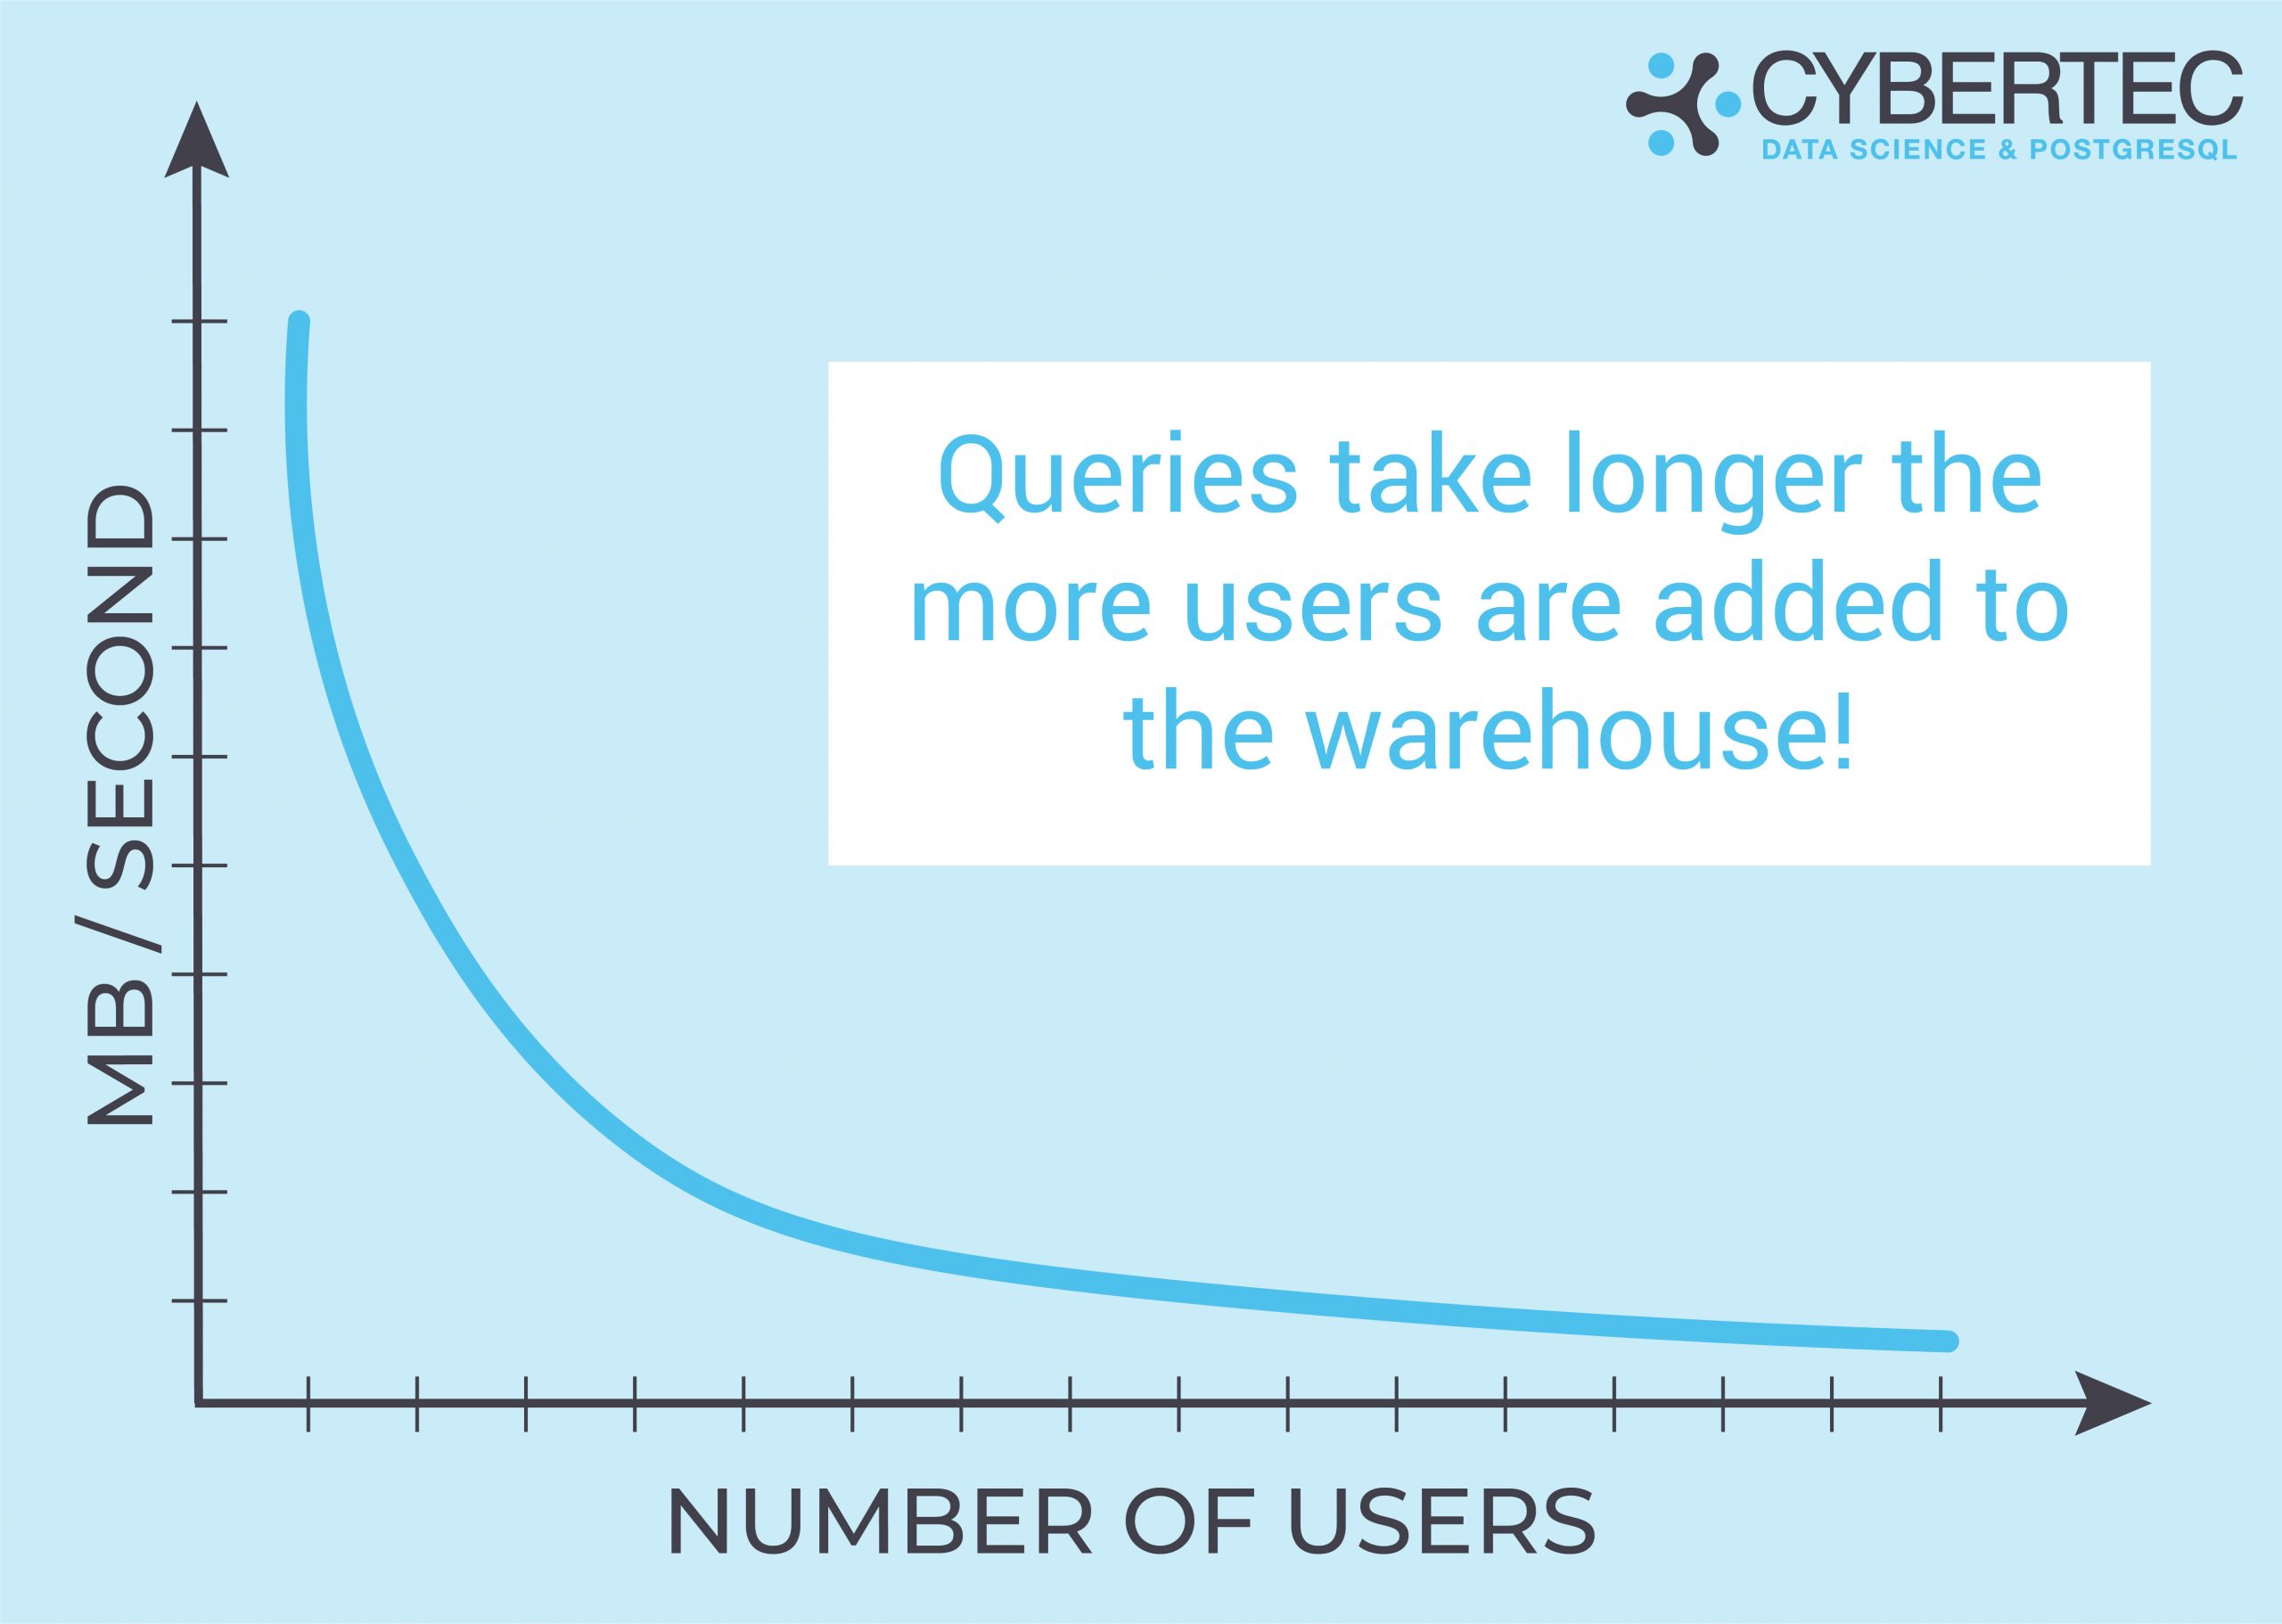
What is important to understand is that queries take longer and longer as more users are added to your warehouse.
Synchronized sequential scans have been around for many years and are a good way to reduce I/O. Let’s take a look at a picture explaining the solution to the problems we face in many data warehouses:
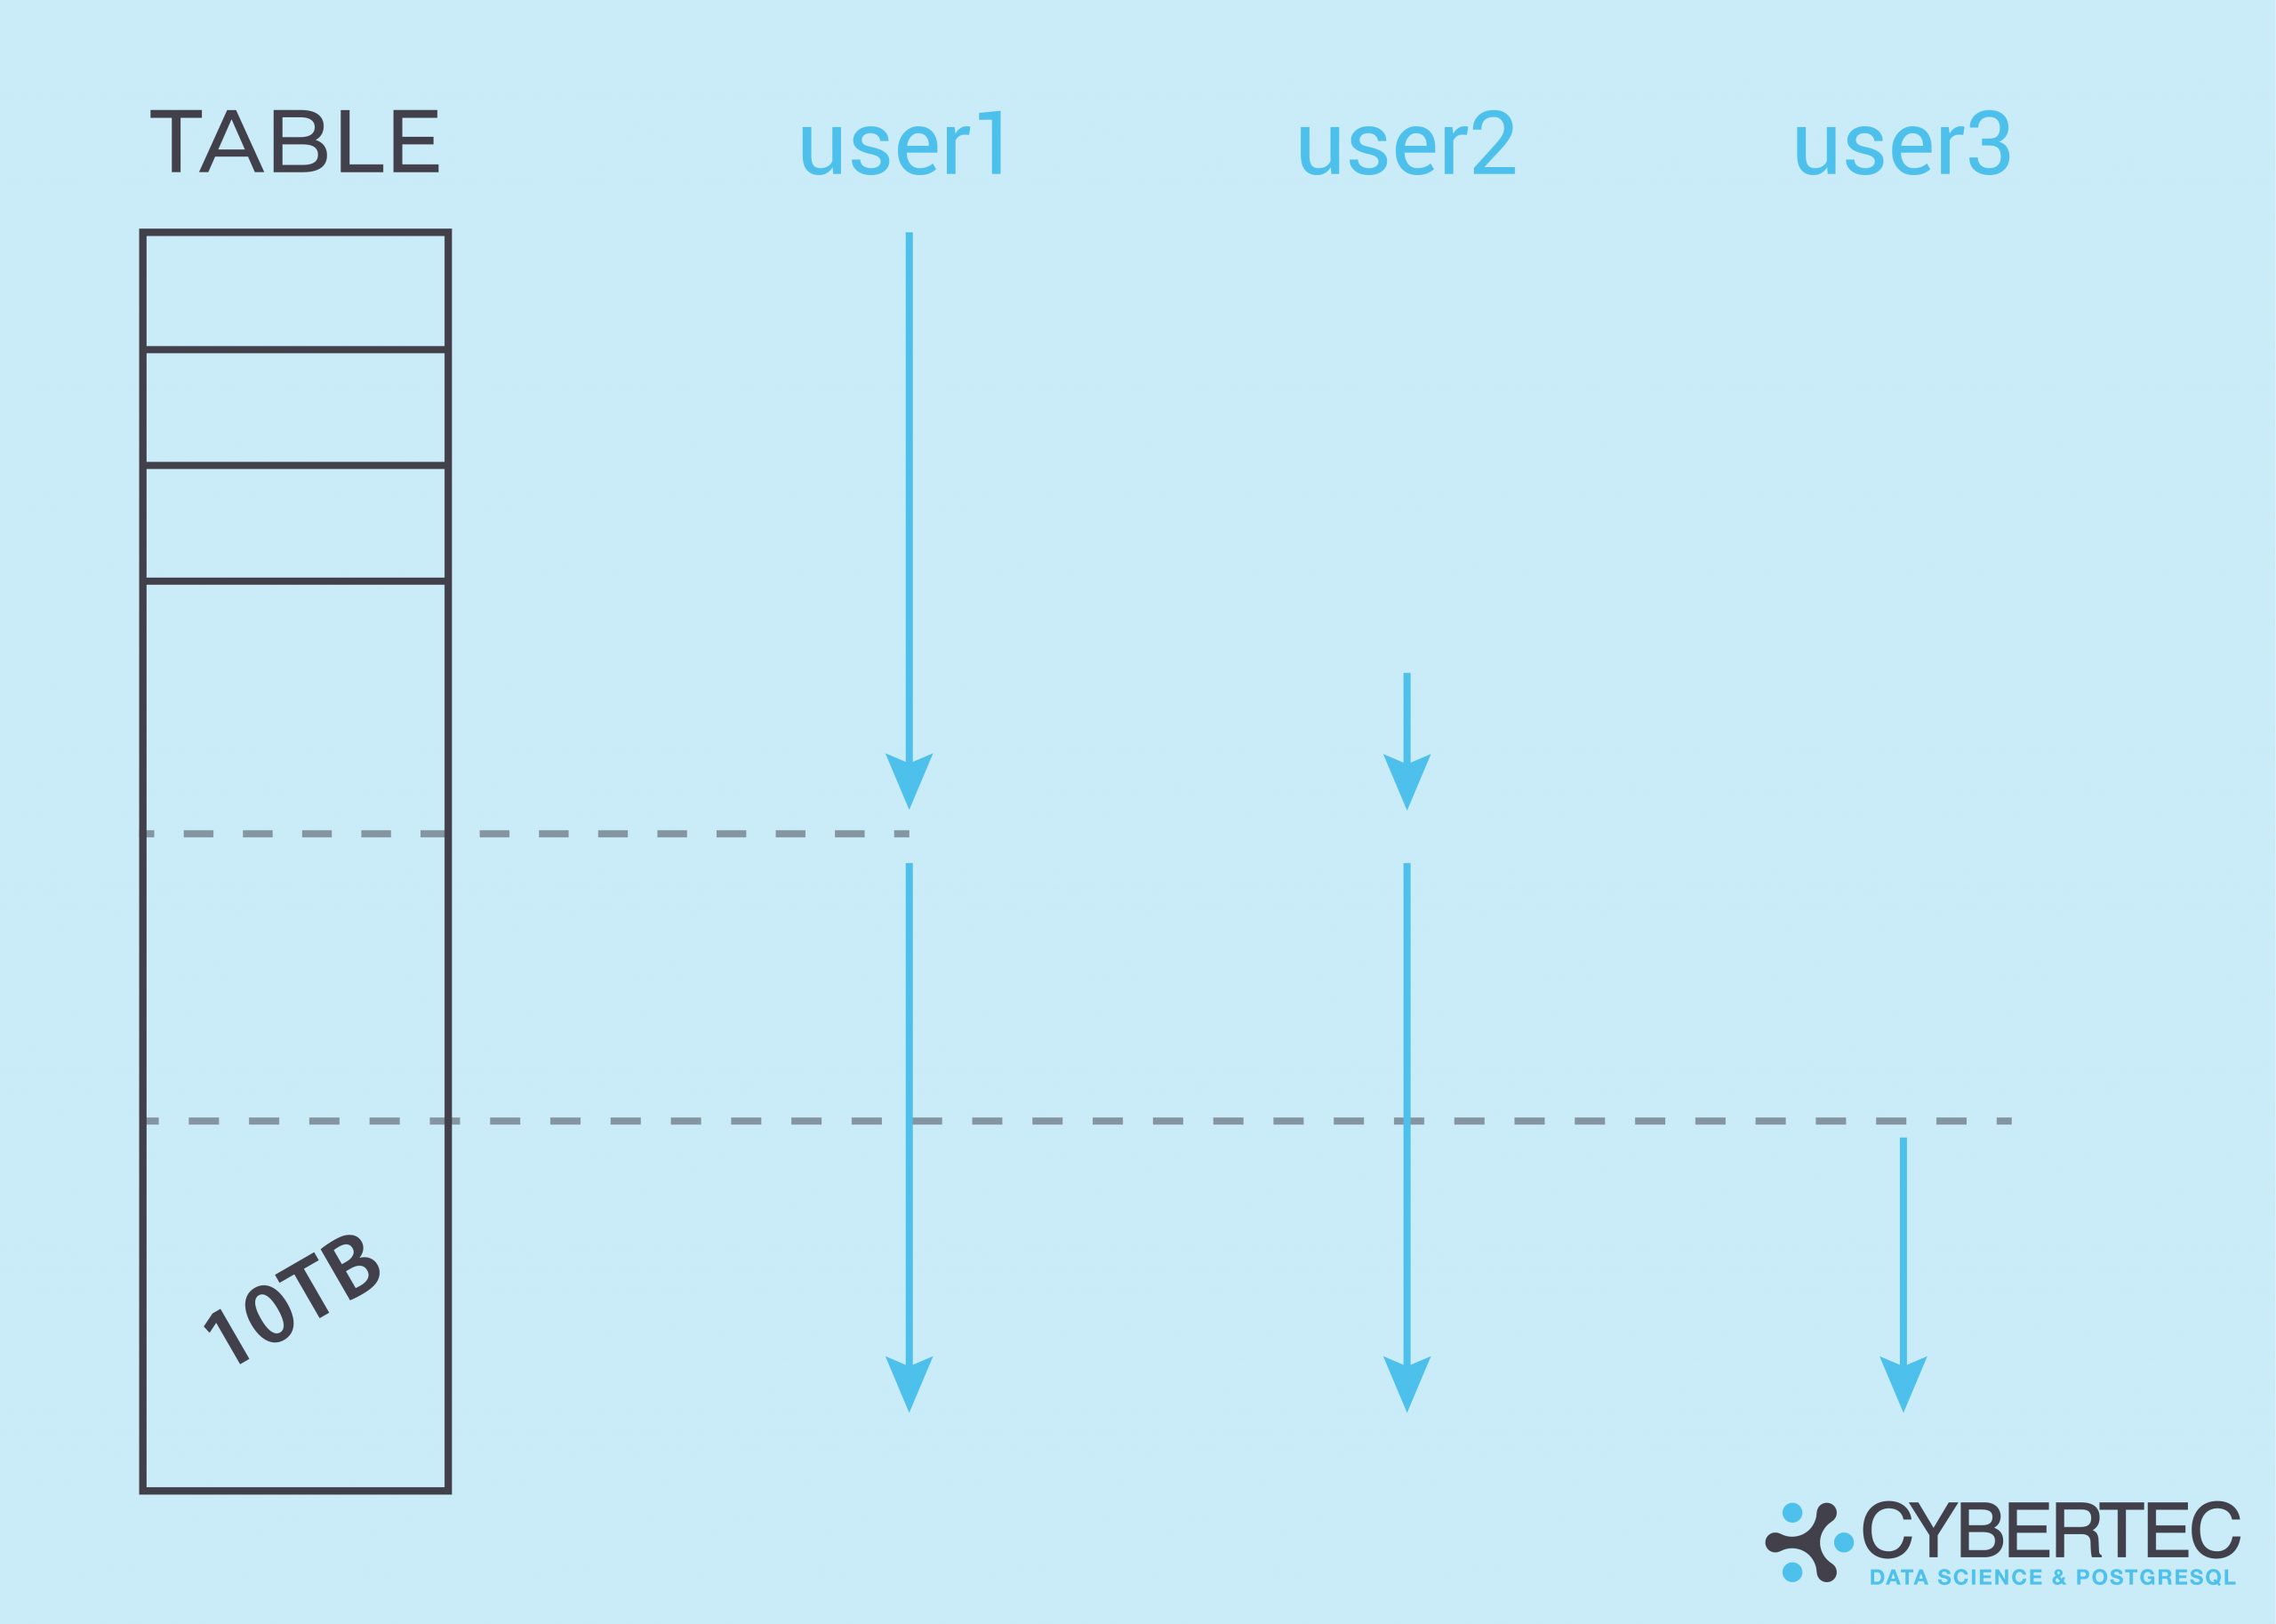
Suppose query 1 starts a sequential scan on the table. After it has read 4TB, a second query also needs to perform a sequential scan. Instead of starting at the beginning, the second query can start reading the table at the current position of query 1. The idea is to serve both sequential scans with a single I/O request. The scans proceed in lock step until they reach the end of the table, then the second scan continues reading at the start of the table until it has read the data it missed in the beginning.
More users can be added as needed. By keeping the scans together, I/O can be reduced dramatically in many cases - especially if the amount of data is really large. What is important to note here is that PostgreSQL synchronizes the scans once, but does not force them to stay together. If one of the scans is significantly slower than the other one, the scans won’t stick together, but will go separate ways, to make sure that neither scan is forced to execute slowly.
However, since data warehousing and analytics in general are often I/O bound, we’ve got a good chance to see better performance.
To control this behavior, PostgreSQL offers the following variable:
|
1 2 3 4 5 |
demo=# SHOW synchronize_seqscans; synchronize_seqscans ---------------------- on (1 row) |
By default, synchronize_seqscans is on, which is a good value. However, if you want to change the default behavior, it is possible to change the value in postgresql.conf.
If you want to learn more about PostgreSQL performance tuning, consider checking out our blog about improving PostgreSQL’s ability to handle time series.
In case you need help to run your database in the most efficient way possible, CYBERTEC offers 24x7 support services to customers around the world.

When analyzing customer's problems, I have seen the mess you can get into if you disable autocommit in your interactive client, so I'd like to bring this topic to a wider audience.
In PostgreSQL, like in any other ACID-complicant database, each statement runs in a transaction: if the statement causes an error, PostgreSQL undoes all its effects.
You can start transactions explicitly using the START TRANSACTION statement (or BEGIN in PostgreSQL). However, if you don't do that, different RDBMS’ behave differently:
COMMIT statement to end the transactionThe latter mode is called autocommit mode.
PostgreSQL operates in autocommit mode, and there is no way to change that behavior on the server side.
Back in 2002, release 7.3 introduced a database parameter, autocommit, that allowed users to turn autocommit mode off. This proved to be a bad mistake: now the effects of SQL statements varied depending on that database setting, which led to all kinds of confusion and problems. Consequently, release 7.4 in 2003 removed that feature again.
Instead, PostgreSQL now implements autocommit mode on the client side. Almost all database clients and APIs offer a way to turn autocommit off. A few examples:
psql, you can run “set AUTOCOMMIT off”java.sql.Connection.setAutoCommit(boolean)connection.set_session(autocommit=True) icon in the query tool to turn off autocommit
 icon in the SQL editor to disable autocommit
Note that in the above list, all clients except for psycopg2 run in autocommit mode by default.
The way that clients disable autocommit is by automatically sending a BEGIN statement before the first statement after the end of a transaction.
If you are inside a database transaction, nothing much can go wrong: if you make a mistake, you can simply issue ROLLBACK and everything you did is undone. This is appealing because it allows you to recover from mistakes like running a DELETE statement without a WHERE clause.
Moreover, users who are used to database systems that do not operate in autocommit mode (for example, Oracle), like to disable autocommit to get the behavior that they are accustomed to.
This seems to be a safe and useful setting, so many people are surprised to learn that it is a really bad idea in PostgreSQL.
If you disable autocommit, and you don't explicitly commit or roll back, your database session will remain in the state “idle in transaction”. Such long-running transactions cause two kinds of problems in the database:
PostgreSQL holds the locks that SQL statements take until the transaction ends. Now if you ran a data modifying statement after your last commit, some rows in your database are locked. Any other transaction that tries to modify such a row will hang until your transaction is ended.
To make things worse, each SQL statement causes a table-level lock on the tables it accesses: even a “harmless” SELECT will take an ACCESS SHARE on the tables it reads. This is to prevent concurrent data definition statements like DROP TABLE or ALTER TABLE from deleting the table or changing its definition while the SELECT is reading it.
As a consequence, a session with an open transaction can block data definition statements indefinitely long. In a DevOps environment, where new versions are deployed frequently, this will lead to serious disruptions. So even a simple SELECT from a client, with autocommit disabled, can do damage!
Whenever you update or delete a row in PostgreSQL, it retains the old version of the row to satisfy concurrent read requests. These old versions soon become obsolete and have to be removed. This is the job of the autovacuum daemon in PostgreSQL. If your database session has a long-running open transaction, it is possible that autovacuum cannot delete any row versions that are younger than the start of your transaction, because you might still need them.
The consequence is that autovacuum keeps running to get rid of those “dead tuples”, but it cannot delete them and cannot make any progress. This leads to table bloat, where a table grows out of proportion while containing mostly junk data. Once you have a bloated table, you usually have to take downtime to run VACUUM (FULL) to fix the problem. There are tools like pg_squeeze to make this less painful.
There are a couple of things that the database administrator can do to mitigate these problems:
idle_in_transaction_session_timeout to a value greater than 0. This will automatically cancel all transactions that are idle for longer than the specified time. The transaction is rolled back, and the client receives an error message.old_snapshot_threshold to a value greater than -1. Then VACUUM will clean up dead tuples that have been dead for longer than that time, even if a long-running transaction might still need them. If the transaction tries to access a page that has been processed by such a VACUUM, it will receive an error message. Note that this parameter will not prevent idle transactions from holding locks!While these parameters allow you to prevent the worst, they are “not nice”, because they will lead to errors and rollbacks on the client side.
Nice as it may seem, resist the temptation to disable autocommit in your interactive client. Get used to PostgreSQL's autocommit mode, otherwise you will endanger the health of your database. The administrator can set idle_in_transaction_session_timeout and old_snapshot_threshold to prevent such damage, at the price of causing errors on the client side.
UPDATED August 2023: Autovacuum has been part of PostgreSQL for a long time. But how does it really work? Can you simply turn it on and off? People keep asking us these questions about enabling and disabling autovacuum. PostgreSQL relies on MVCC to handle concurrency in a multiuser environment. The problem which arises with concurrent transactions is that dead tuples must be cleaned up. In PostgreSQL this is handled by the VACUUM command, which we already have covered in some other posts. However, running VACUUM manually is a thing of the past. Most people rely on the PostgreSQL autovacuum daemon to handle cleanup.
The first thing to understand is that autovacuum really does what it says: basically, it is automation around manual VACUUM. All it does is to sleep for a while and check periodically if a table requires processing. There are three things autovacuum takes care of:
ANALYZE)In PostgreSQL, autovacuum is a server-side daemon which is always there. Yes, that’s right: ALWAYS. Even if you turn autovacuum off in postgresql.conf (or by using ALTER SYSTEM to adjust postgresql.auto.conf), the daemon will still be around - by design - to help with wraparound protection.
The way autovacuum works is: it periodically checks if work has to be done, and notifies the postmaster in case new workers have to be launched to take care of a table. Autovacuum does not launch a worker directly, but works indirectly through the postmaster to make sure that all processes are on one level. The fact that it works through the postmaster clearly helps to make the system more reliable.
Let’s take a closer look at what autovacuum does.
The PostgreSQL optimizer relies heavily on statistics. It estimates the number of rows returned by various operations and tries to guess the best way to optimize a query.
The optimizer uses the statistical distribution of data in a table in order to do that. In case the content of a table changes, the optimizer has to use stale data, which in turn can lead to bad performance.
Therefore autovacuum kicks in on a regular basis to update all the statistics. Autovacuum relies on various configuration parameters (to be found in postgresql.conf) which can be changed to optimize this behavior:
|
1 2 3 4 |
autovacuum_analyze_threshold = 50 # min number of row updates before analyze autovacuum_analyze_scale_factor = 0.1 # fraction of table size before analyze |
These parameters will tell autovacuum when to create new statistics. In the above case, the rule is as follows:
|
1 2 |
analyze threshold = analyze base threshold + analyze scale factor * number of tuples |
Given the default configuration, autovacuum usually does a good job to maintain statistics automatically. However, sometimes it is necessary to exercise some more precise control:
|
1 2 3 4 5 6 7 8 9 |
test=# CREATE TABLE t_foo (id int) WITH (autovacuum_analyze_scale_factor = 0.05); CREATE TABLE test=# d+ t_foo Table 'public.t_foo' Column | Type | Collation | Nullable | Default | Storage | Stats target | Description --------+---------+-----------+----------+---------+---------+--------------+------------- id | integer | | | | plain | | Access method: heap Options: autovacuum_analyze_scale_factor=0.05 |
In this example, I have adjusted autovacuum_analyze_scale_factor to 0.05 to make autovacuum more aggressive. Once in a while, this is necessary - especially if tables are really, really large in size.
Creating fresh optimizer statistics is quite important. However, there’s more: cleaning out dead rows. The purpose of VACUUM in general is to make sure that dead rows are removed from heaps and indexes nicely. We have written extensively about VACUUM and cleanup in the past.
Usually, the default settings are ok. However, just like in the case of ANALYZE, it can make sense to adjust these parameters to make the autovacuum daemon either more aggressive, or to make it behave in a more relaxed way.
Setting autovacuum parameters can either be done globally during table creation (check out postgresql.conf or postgresql.auto.conf), or later on in the process, as shown in the next listing:
|
1 2 3 |
test=# ALTER TABLE t_foo SET (autovacuum_vacuum_scale_factor = 0.4); ALTER TABLE |
In this case, we have changed the scale factor and made autovacuum kick in less frequently.
There is a third thing autovacuum does: it prevents transaction wraparound. If you want to find out more about this topic, you can also check out my article about wraparound protection in PostgreSQL.
Wraparound protection is an important thing which must not be taken lightly; it can cause serious downtime and cause problems for various workloads.
Autovacuum can be turned off globally. However, this does NOT mean that the daemon stops - it merely means that it ONLY does wraparound protection. The reason why this is done is to make sure that downtime is minimized as much as possible. It’s easier to live with table bloat than with downtime.
Therefore, stopping autovacuum is not really possible - it can only be suspended for the majority of tasks. It is not a good idea to turn off the autovacuum completely, anyway. In most cases, all turning it off does is cause trouble.
What does make sense is to disable autovacuum within special scenarios on individual tables. Here is a scenario in which it might make sense:
UPDATE, DELETE)Why would anybody care about wraparound, cleanup and so on in this case? When it is clear that a table is thrown away anyway, why clean it up? Keep in mind: We're talking about very specific scenarios here, and we're definitely not talking about general-purpose tables.
Here’s how you can turn autovacuum on and off for a single table:
|
1 2 3 4 |
test=# ALTER TABLE t_foo SET (autovacuum_enabled = off); ALTER TABLE test=# ALTER TABLE t_foo SET (autovacuum_enabled = on); ALTER TABLE |
Please understand that turning autovacuum off is certainly not a good idea unless you face a specific use case with a strong justification for doing so.
What happens if the autovacuum is running but somebody starts a manual VACUUM? The general rule is: autovacuum always loses out. If you start a VACUUM but there is already an autovacuum worker running, PostgreSQL will terminate the worker and give your manual process priority.
The same is true for pretty much all other operations. Suppose somebody wants to drop a column, a table, etc. In case of a conflict, PostgreSQL will always kill the autovacuum process and make sure that normal user operations aren't harmed by background operations.
Many people keep asking why autovacuum is slower than manual VACUUM. First of all, in the default configuration, it is indeed true that autovacuum is a lot slower than manual VACUUM. The reason is a thing generally known as cost delay:
|
1 2 3 4 5 |
test=# SHOW autovacuum_vacuum_cost_delay; autovacuum_vacuum_cost_delay ------------------------------ 2ms (1 row) |
When VACUUM hits a table, it usually does so “full speed” which means that cleaning up a table can cause massive I/O bottlenecks. A single VACUUM job can suck hundreds of megabytes of I/O per second - which leaves less capacity for other operations, and can, in turn, lead to bad response times.
The solution is to punish autovacuum for I/O and add artificial delays to the process. Processing a table will take longer, but it leads to a lower overall impact on other processes. In older versions of PostgreSQL, the setting was at 20 milliseconds. However, it is set to 2 milliseconds in PostgreSQL 13 and beyond.
The artificial delays (which can be turned off on a per-table basis) are the core reason why end-users observe runtime differences.
If you want to know more about PostgreSQL performance, we also recommend checking out our consulting services. We help you to tune your database and make sure that your servers operate perfectly.